Pages

Showing posts with label architecture. Show all posts

Sunday, March 20, 2016

USK Spotlight Sunday: Fred Polito

Spotlight Sunday is series of interviews designed to introduce and highlight Chicago Urban Sketchers individually. Now that our chapter has reached nearly 500 members it has become more of a challenge to meet every single member in person and have a meaningful conversation. These posts concentrate on individuals and speak in their own words.


Meet Fred Polito

Interviewed by Wes Douglas

This week's Spotlight Sunday features the watercolor visions of Fred Polito, an architect and urban sketcher from Northbrook.  I was immediately attracted to Fred and his sketches when I first met him at The Den Theater in Wicker Park for our Urban Sketching get together last year. I personally have not mastered watercolors so I am always interested to learn more from those who do. That is why I was excited to interview Fred and have the chance to introduce him to the rest of you.

Wes: Hello there Fred and thank you for agreeing to participate in my interview. 
I am interested in how you learned about Urban Sketching and what made you decide to join Urban Sketching Chicago?

Fred: My wife and I were on one of our typical weekend outings in Chicago, she with her knitting and me with my sketchbook. While walking thru Lincoln Square, Alex Zonis saw me sketching, I saw the Urban Sketchers group doing the same, we talked and I joined the group.  It was a very fortuitous meeting. I've enjoyed the energy that the Group has given me.


Wes: Fred, why do you sketch and in what ways does it help you?

Fred: When I make a sketch, I enjoy the focus it brings to my time and mind and how it uncontrollably reflects what I'm really thinking and feeling at that moment.

Wes: I am such a big fan of your work and to see you create some of the freshest views of a particular scene. I find your work inspiring. What then inspires you and the sketches you create?

Fred: When I look at these 2/20/16 sketches, I don't see the Shedd Aquarium or the inside of the Field Museum as much as I hear the sunshine and remember a sparkling, almost Spring-like day. And then a great early dinner at Uru-Swati Indian Restaurant and having Urban Sketchers to thank for getting us out of the house.

Wes:  Fantastic. Whenever I see your work, I am amazed at how you command the watercolors in your sketches. Are watercolors your favorite sketch tool or do you have others?

Fred: A 4B pencil and watercolor paints with big brushes are, perhaps too much, my favorite tools. A bigger variety of tools would help develop more variety in sketches.

USK: Now, you live in Northbrook and I know a lot of your work takes place in the Chicago area. But where is your favorite place to sketch?

Fred: A side table in a cafe on the street, preferably in France.

Wes: Haha. I need to get to France myself. What do you do when you are not Urban Sketching? Do your sketching skills play into your day job? If so, how do they help you?

Fred: My urban sketching is an off chute of all my earlier hand drawings for my architectural designs.  Now, my office makes the designs with computer produced drawings.

Samples of my drawings can be see on my website by clicking on "Artwork."
Fred Polito  Architect
Northbrook, IL   60062

Wes: Fred, I am excited to learn more about the sketches that you sent me. 
Tell me about this first one which looks like the Field Museum in Chicago.


Fred: Yes, for this first sketch, my wife and I were walking thru Grant Park toward the Field Museum and the Urban Sketching Event. We were enjoying the wonderful February weather and the people watching opportunities. We spotted a park bench.  I was feeling the energy that the day and site was giving and also feeling the time constraint for a sketch. Hence, pencil and quick washes, trying to express the monumental scale and classical architecture of the Field Museum in 15 min. I remember the park bench the most.

Wes: Thanks Fred. I do remember that warm day and how I hated to be inside the Field Museum. While I was inside drawing replicas of dinosaur fish and warthogs, you seemed to take advantage of this opportunity to sketch outside. For this second sketch, it appears that you sketched the Shedd Aquarium, is that right?

Fred: Yes. Meeting with the Urban Sketchers group inside the Museum and considering the sketch possibilities, I agreed with my wife that the day was too nice to spend all indoors. Plus the City location can't get much better. Sketch 2 was supposed to be about the color, trees and building forms of the view of the Shedd Aquarium as seen from the Field Museum steps. What I remember most was talking with students from Manitowoc, WI and a family from Springfield, IL and why I so like Chicago.


Wes: Nice! As I am looking at your third sketch, I see that you finally made it inside the Field Museum. Did the weather get colder? Was the sun going down? Tell me a little about this last sketch.

Fred: Losing my spot in the sun and getting texts from my wife that she had a front row table at the Field Museum Cafe, I headed inside, settled in and felt more relaxed and in and under control. The resulting sketch, in my mind, conveys that state.


Wes: I guess that is all the questions I have for now. Thank you Fred for being so generous with your time and sharing your talent with us. To my fellow artists and fans of Fred's work, be sure to stop by and say hello to Fred next time you see him at one of our USk Chicago Let's Sketch events. 

Note: If you are interested in coming to one of our monthly sketching events with the chance to meet Fred and other very friendly and talented artists, check out our group Facebook page: https://www.facebook.com/groups/UrbanSketchersChicago/ or the USk Chicago Blog: http://urbansketchers-chicago.blogspot.com

Tuesday, October 6, 2015

One Spot - Two Different Subjects

A couple weeks ago I had the opportunity to spend an afternoon in the loop, riding my bike, sketching and taking photos.  One of the reasons I love living in the city is the ability to hop on Lake Shore Drive bike path and just ride and see where the day takes me.  After a recent guided kayaking tour I took with my wife on the Chicago River, I was inspired to return to one of the major stops, near Merchandise Mart and the recently finished river walkway.  I found a nice spot on the Franklin Street Bridge.  With a great view east, down the river towards Michigan Avenue, I started off with this loose ink sketch of the skyline.  I normally like to lay out my sketches in pencil, but just decided to go for it in ink with this one.  I tend to be a perfectionist.  I like to spend my time making a sketch work well, often times, too much time.  However, diving right into this ink drawing was a real nice change of pace and really freeing, creative experience.  Instead of making sure each line was completely straight, I allowed the pace of my drawing to dictate the characteristics of the sketch.  All in all, I was really pleased with how it turned out and was able to capture the essence of the skyline with gestural lines, stippling and some hatching.


The beautiful thing about being in the Loop is that there is nearly an endless supply of things to sketch.  Having finished the skyline sketch, I stayed in the same spot and sketched the Franklin Street Bridge House, which was a lot closer to me and allowed for some greater attention to material, proportion and detail.  The lighting and shadows were changing very fast so I penciled in a rough outline and indicated where the shadows were at the time.  By the time I finished the pencil sketch, the shadows had already changed and disappeared.  I then inked the drawing with a fountain pen and Faber Castell Cold Grey IV 233 PITT artist pen.


These two sketches were both done in a Stillman and Birn Epsilon sketchbook, which has become my go to sketchbook for pen and ink sketching.  For a long time, I have had a tendency to go back and forth between one sketchbook and another.  I would bounce between a sketchbook geared toward watercolor, to one with ivory colored paper to another with grey toned paper.  But, I've enjoyed this Epsilon paper so much, I've been diligent in filling it up.  This sketchbook is shaping up to be one of my favorite collections of sketches yet.   I look forward to filling it up and seeing where the rest of the pages take me.

You can see more of my work and sketches on Instagram: @abillustrator and my professional website www.AndrewBanksIllustration.com.

I am trying to savor the last precious days of nice outdoor sketching weather before Chicago winter returns.

Until next time!

Andrew

Tuesday, September 29, 2015

Architecture Guides & the Urban Sketcher


Ever felt overwhelmed with everything around you while you're Urban Sketching? Or maybe despite everything going on around you, you can't seem to see a story in your surroundings?

When I'm stuck at either of these extremes I find that an architecture guide can change what I see. Whether by focusing in my attention like a microscope, or giving me a sense of something larger like a telescope, the context these guides provide revitalize the city to me.


Ooooh, there's a helicopter landing on that building!
Chicago offers several guided architecture tours that walk, ride, kayak or segway around the city. These options can be rich with hidden stories about the city, but as a part of a group, you can't stop and sketch whenever you like.

Thankfully there are other great options!

Books:
There are always standard tourist guide books. These books are full of fun stories about people and places in the city to jog your creative juices, but to those who have been in the city a while or just want something a little off the beaten trail this might not be best. There are also books like Walking Chicago that offer routes in a given neighborhood. Sometimes themes emerge on a given route and you realize you've been walking by 4 first attempts at various architectural elements for months without knowing. Another publisher offers 50 of these routes on individual index cards – perfect to tuck into a sketch kit.  But be warned, these haven't been updated in a few years so restaurants have changed! Though I have not personally tried their tours, I've heard good things about Evisitorguide.com and the free tour maps and information you can download from their website. Of course there are always things that are left out from these books (and website), but they can add a lot of fun to your sketch outings!


Apps:
The problem with books for the Urban Sketcher is that they can be heavy and a pain to carry with you at all times. Thankfully, there are multiple apps for that!

Several of the apps for sale look great, but the only app I've tried is a free one called 312 Go! With locations services turned on on your smart phone, the app will point out interesting things around you. The narrator will say things like "On your left is The Rookery…" then go on to tell you fun tidbits about the place. Using this app with headphones also helps prevent unwanted conversation with by-standers while giving you an inside scoop on the stories around you.

Looking to try one of these out? Itching to keep practicing the techniques you learned this summer? Perfect timing! October 17th-18th is Chicago's Annual Open House Chicago, where great buildings will be open to the public free of charge. Last year USK Chicago made it into several hard-to-visit buildings during the event, I can't wait to see where you all go!


Have you ever used architecture guides to help your sketching in Chicago? How about when you're in other cities? What other tools do you use to help you "see" your surroundings again?

Tuesday, March 31, 2015

Sketching Architectural Details

TUESDAY TIPS AND TRICKS


If you have ever finished a sketch, held it up and compared it to the actual subject only to realize that something about your sketch was just not right, this post is for you.

Between Barbara Week's recent post entitled "Off The Grid - Designing a Page" which talked about guidelines as compositional tools, and a recent architectural sketch I made, I wanted to "piggy-back" off of the topic of guidelines in urban sketching and talk specifically about how guidelines can help you simplify and map out the different parts of architectural details.

Buildings and architectural details can seem like daunting subjects to draw.  Thankfully, there are several observational cues to pick up on that will help you map out your drawing and establish an educated guess about the sizes, proportions, patterns and elements that make up your specific detail.  You don't even need to know the technical names of the architectural elements, or how they go together.  You just have to have the ability to make observations.  After all, that's half the battle of urban sketching is, isn't it?

(A couple quick side notes: 1.Check out a couple of my previous and related posts for a more full set of tips on architectural sketching.  "Perspective for the Urban Sketcher" and "Drawing Architecture: Sighting Size and Proportion" AND 2) these ideas can be applied to other subjects including figure drawing, landscapes, and most other types of subjects as well.)

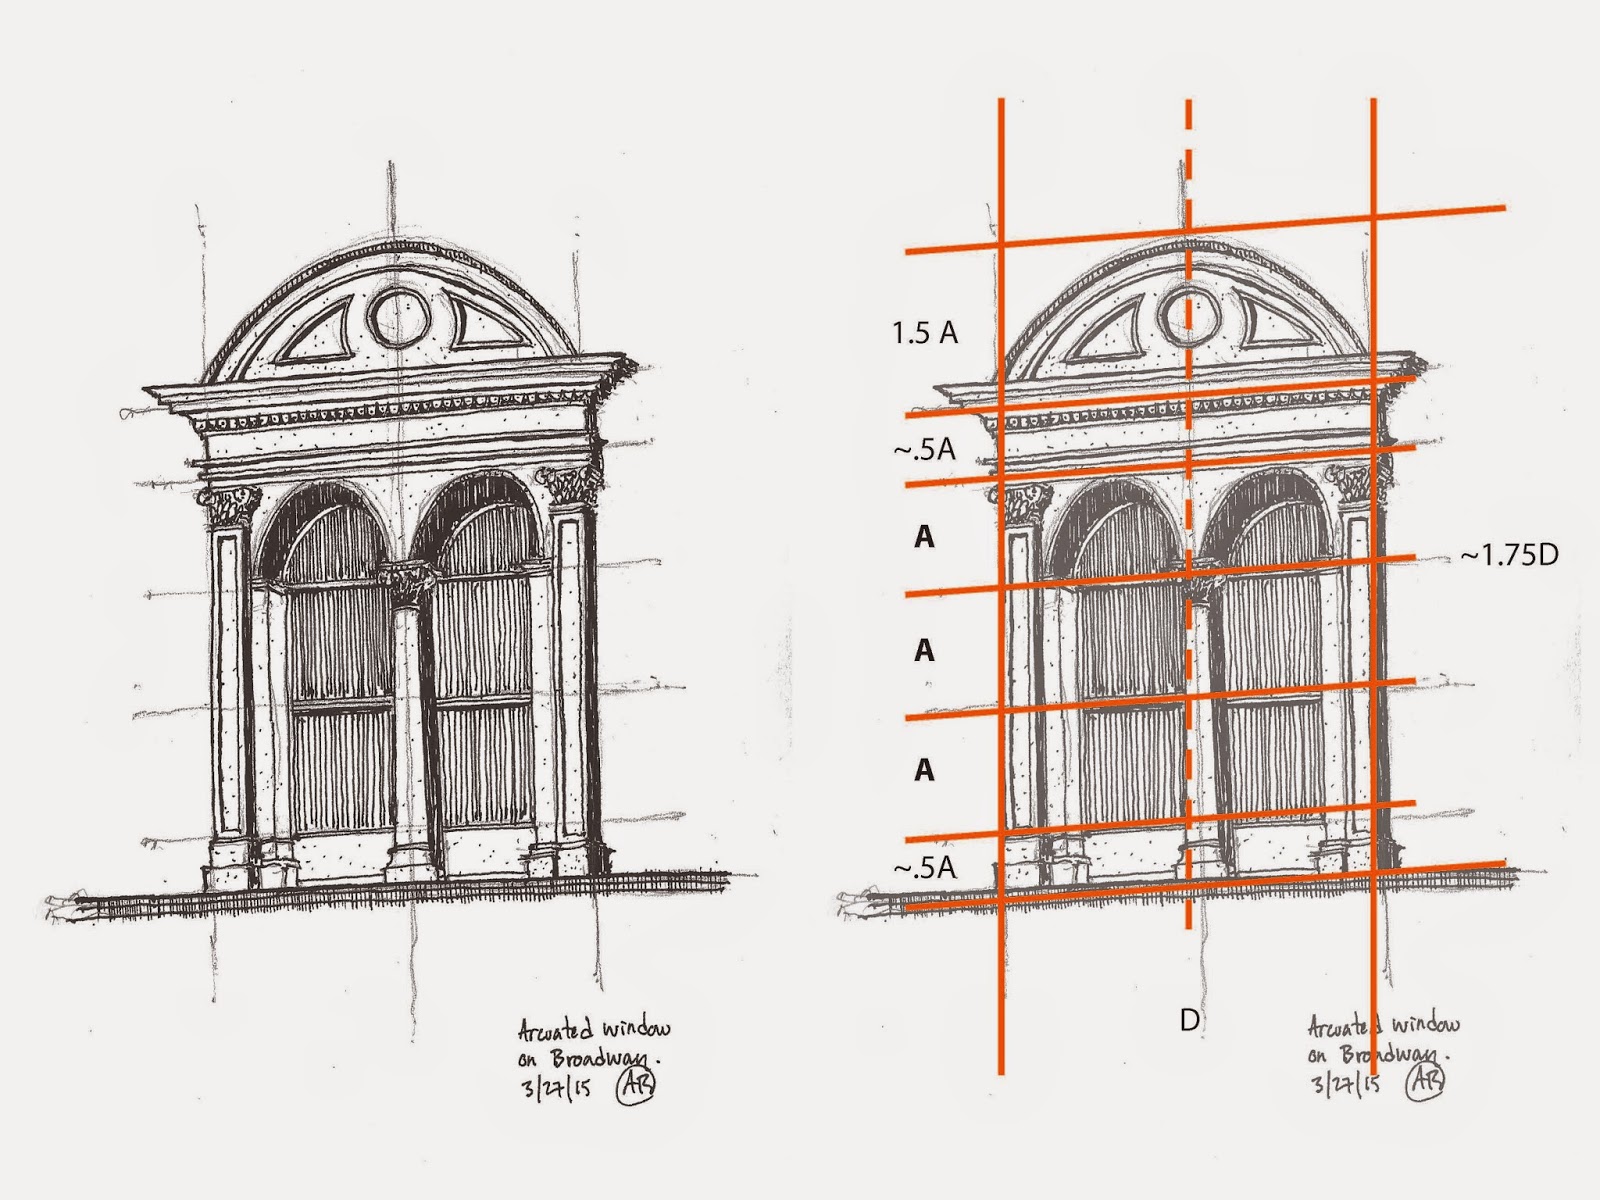
Here is the scan of my sketch.  As you can see more clearly here than in the picture above, I used several guidelines in my initial pencil sketch before adding value in ink.  I left the pencil guidelines in for aesthetics.  Personally, I like how guidelines can add to the story of a sketch.  Guidelines show your process.  They add a level of technicality to the drawing. Many of the greatest artists left pencil underlays partially visible in their masterpieces. I think guidelines give an added personal touch, but this is just my opinion.


The image to the right is fairly self explanatory, however, I will share a little bit about how I approached this drawing.

I began by drawing the center line (dashed) guideline.  Since this detail is symmetrical, the center line is the most important guide to get you started.  Recognizing that the left and right sides of the detail have the same width, I added two more vertical guides, spaced equally as far away from the center line as I could have approximated while standing up, holding the sketchbook.

After I had determined the overall width of the detail, I used the sighting technique (explained in more detail here) to approximate how many widths (D) tall the detail was.  I found that the details was about 1.75 widths (D) tall.  Basing all of the approximate sizes off of one or two of the dimensions in your detail will help you keep all of the different parts of the drawing proportional to the detail as a whole and in relationship to one another.


I then drew a few horizontal lines.  I found larger shapes that I could use as benchmarks for the detail, so to speak.  So as you can see, (bottom to top) my horizontal guidelines fell on the base of the column, the center line of the window, the top of the middle column, the top of the two side columns, the bottom of the entablature, as well as the top of the arched pediment at the top.  Like in all other forms of design, there is a method to the madness in this detail's composition, which is why the sizes of A, .5A and 1.5 A all work well together, and were easy to approximate.

I drew the guidelines at the center line of the window, the top of the middle column, and the tops of the two side columns first.  A quick approximation told me that the bottom and top portions were half the height of A, and that the curved pediment on top was about 1.5A.

Now that the major heights and widths were mapped out, I filled in all of the rest of the details. (Column capitals, window mullions, arched openings above windows, additional lines on the entablature, as well as the dentils in the molding).  I did not draw guidelines for every single detail (although if you want to you can.)  Instead, since the major sizes and proportions were laid out, I could then "eyeball" the sizes and proportions of the smaller details since enough information was already mapped out for me.

This is something that may take a while to get the hang of, but once you do it a few times it will begin to make more sense.  At first, sketching like this may take a little longer than just "winging it".  However, the more you do it, the more it will make sense and will end up increasing your sketching speed in the end.  Learning how to sight size, proportion and perspectives were the most valuable urban sketching skills I learned when I was first introduced to urban sketching.  They are skills I use in almost every sketch I do to this day.

I hope this post, along with the previous posts on sighting and perspective are helpful.  Feel free to ask any questions.

Lastly, don't forget to follow us on Twitter, Instagram, and Pinterest.  If you live in the Chicago area, connect with us through Facebook.  We sketch as a group every third weekend of each month at different locations throughout Chicago.

Andrew


Tuesday, June 11, 2013

Sketching Around Downtown Chicago

I never get over how many wonderful views this city offers. From the soaring architecture, the lakefront, to the green-garden escapes tucked in every corner. I grab my sketchbook (moleskin), pencils, and travel watercolor set whenever I can fit it in my bag. Here are a few recent sketches from around town.

Looking North in Millennium Park from the great lawn infront of the stage. June 10th
Summer nights in Chicago mean free concerts and movies in Millennium Park. I staked out my patch of lawn early for the concert this past Monday night, and sketched out a quick look at the architecture behind the stage.

View South from my 10th floor patio - May 26th
Sometimes a quick sketch can be done at home - over a recent weekend I found time to sketch on my deck which offers great views of the varied south loop architecture.
Lighthouse off Navy Pier - May 20th 2013
This sketch was done on the end of Navy Pier on a bright sunny day spent on the lakefront. I tried to catch the ever-changing shades of the water and the puffy clouds as they sped by.