Pages

Tuesday, August 26, 2014

Tuesday Tips & Tricks: "Some Advice on Giving Feedback Online"

Tuesday Tips & Tricks: "Some Advice on Giving Feedback Online"

Artists love to learn how they can get better at their skill or learn a new technique from another artist with a better idea. A big reason why we started this regular weekly post, "Tuesday Tips & Tricks" was so that we could offer free tips to this community of artists all trying to get a little bit better at some aspect of their artistic endeavor. Artists love to read how they can get better and readers love to make comments. Here's how you can make comments without being disregarded or hurting feelings.

First, let me clear up a misconception about the social media space. That "like" or "heart" button does not count as offering feedback. In fact those two buttons should really be relabeled "I Acknowledge" buttons. If you want to offer comments that will really help another artist, you are going to have to type it in.


There is a formalized critiquing process: "Describe, Analyze, Interpret and Evaluate"
The following are some more simple things to keep in mind.

"Destructive Feedback" or failed, well-intentioned sentiments can oftentimes be misinterpreted online.
  • Short, incomplete sentences sound stern and agitated.
  • ALL CAPS LOOKS LIKE YELLING or SCREAMING
  • Sarcasm is never as funny in different cultures as you might think. It all depends on how well you know the person with whom you are joking.
  • Basically, if someone cannot read your comments and work on fixing something about their art that will improve their skill or art, then you are better off not commenting at all, no matter how much the temptation.
First, start with praise:
  • "I really like your choice of colors."
  • "Your lines are confident and the composition is wonderful."
  • "I can tell that you are really passionate about this subject..."
  • Starting with a compliment will make a person more receptive to your helpful feedback.
Second, "Constructive Feedback" can sound like this:
  • Ask questions for clarification before you make assumptions or offer critique
  • Offering constructive feedback does not mean say whatever you want without compassion for the others' feelings.
  • "Would you be open to some feedback on your piece?" The key here is to make sure the other person first responds with a "yes" before you offer critique.
  • "Have you ever given any thought to using...?"
  • "What I find that has helped me in a situation like this is..." Putting your comment in first person will sound like you are sharing information as opposed to commanding the other person "YOU should do this."
Lastly, make yourself available to answer any questions or clarify your comments. I would love to hear what kind of critiquing experiences you have had and what you have learned from them.

Tuesday, August 19, 2014

Tuesday Tips & Tricks: … and We Share Our Work Online

So you went out, sketched, and your sketch turned out rather nice. You want to share it with your friends on USk Chicago group and on your blog and on ….

You took a picture of your sketch or perhaps you scanned it, and it looks like this - flat and grayed out and, for heaven's sake, crooked.


What can you do? You don't have Photoshop, you are just a regular sketcher and cannot pay prices equal to GDP of a small country for a piece of photo editing software.

The answer is  GIMP! GIMP is the GNU Image Manipulation Program. It is a freely distributed piece of software for such tasks as photo editing, image composition and image authoring. It works on many operating systems, in many languages. You can download it here - http://www.gimp.org/downloads/.

The urban legend has it that a few former Adobe cowboys/engineers with a grudge of some sort got together and produced this "almost Photoshop" amazing piece of software and put it up for everyone to use. I don't know if this is true, I read it on the Internet :). But one thing is true - GIMP is FREE under Creative Commons License.

Anyway, download your free GIMP and install it. Now you are ready for action.

Here are steps we are going to take:
  1. Rotate
  2. Crop
  3. Curves to restore contrast
  4. Unsharp Mask to sharpen details
  5. Scale to reduce size
  6. Export to save the file
Let's do it step by step. Open GIMP on your computer and open your unprocessed sketch in GIMP. Let me know if you need help with that and I will add a Step 0 to this tutorial.

Step 1 - Rotate

Click the Rotate button in the Tool Box on the left panel and you will see a grid come up over the sketch and a Rotate window open.


Grab the corner of the image with your cursor and rotate. When the level will look satisfactory release the cursor and click Rotate button in the Rotate window. The rotated image will look like this:


Step 2 - Crop

Click Rectangular Select button and drag your cursor over the sketch creating a rectangle. Manipulate the selection in such way that it is nice and tight around your meaningful image.


When satisfied with your selection, click on Image menu and then on Crop to Selection.


Your sketch will look like this. Nice!


Step 3 - Curves

Photographing or scanning an image grays out colors and and reduces contrast. We will restore that using Curves. Click on Colors menu and then click Curves.


A Curves work window will come up. The diagonal line in this window determines your values and contrasts. Play with it by dragging it with your cursor to see what happens to the sketch due to your action. When tired of playing, get back to work :)! Drag the line into a shallow S curve and nudge its curves up and down a little until contrasts and colors in your GIMP image resemble your sketch on paper in real life. Click OK when satisfied.


Step 4 - Unsharp Mask

Photographing or scanning an image not only grays out your colors and flattens values, it also reduces sharpness. We will restore it in this step. Click on Filters menu, then select Enhance, then Unsharp Mask. You could also work with Sharpen at this level, but Unsharp Mask is smoother and produces less digital noise.


A work window will come up. Drag the levels so some meaningful portion of sketch is shown in the Preview window. Set Radius to 5.0 and Amount to 0.50. Threshold can be 0 or 1, I cannot see any difference between them. These settings will give you a nicely sharpened image and will not introduce too much aberrations. Click OK when done.


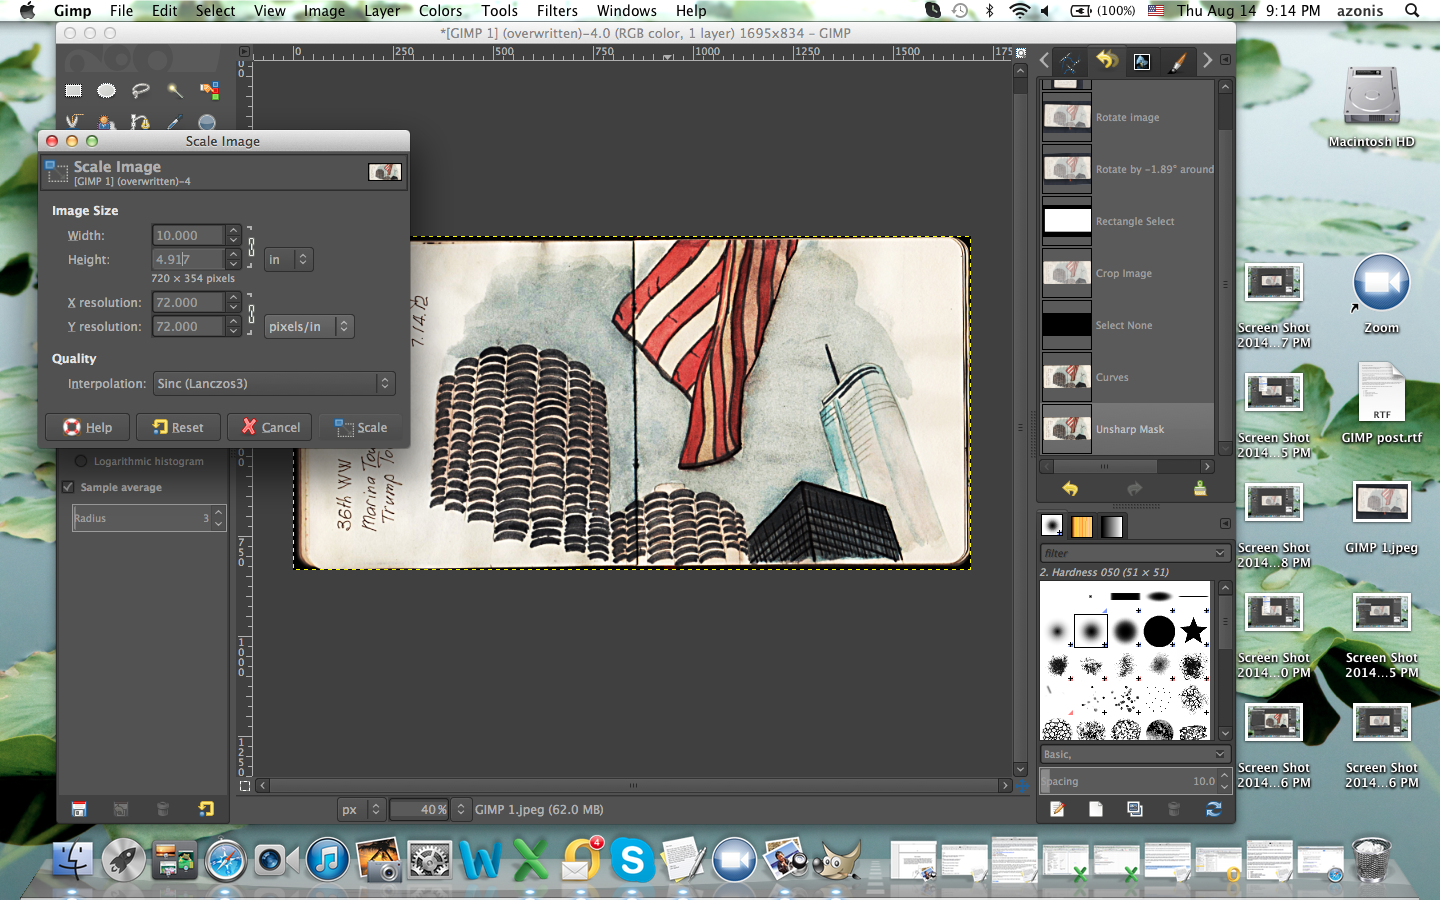
Step 5 - Scale Image

Many images coming from cameras or scanners are big, or sometimes you hear them referred to as fat. They have a lot of megabytes in them and can slow down loading pages. It makes sense to slim them down by reducing resolution and size. Click Image menu and then Scale Image.


A work window will come up. If you are preparing the image for displaying it online a resolution of 72 dpi is good, and size should not be bigger than a laptop screen. 


My images for the web usually are about 10x8" and 72 dpi. This is what we are going to do here. Click Scale when done.


Step 6 - Export

We have a very nicely processed sketch now. Time to save it. Unfortunately, some terms in GIMP are not as intuitive as we might wish, and clicking on Save will not produce a file type we want. Instead click on File menu and then select Export. This will allow to save the file in your computer directory in a JPEG format (or many other formats if you want them). But JPEG will do nicely :).


And here's our result - ready to share!


We hope this is helpful, and we will be seeing many shared sketches on USk Chicago group from now on.

Tuesday, August 12, 2014

Tuesday Tips & Tricks: On Location, Location, Location!


© Barbara Weeks

Urban Sketchers-Chicago has been happy to welcome many new members to our group. Some are new not just to USk-Chicago but to sketching in public as well. The Urban Sketchers manifesto says “we draw on location”. That may cause a little hand trembling, at least it did for me when I first started drawing out in the open. Here are a few things I’ve learned.

Tips:

What equipment? Keep your gear to the minimum. It’s easier to manage in small spaces, easier to keep track of and easier to gather up when the day is done. Check out our Pinterest board for sketch kit ideas. 

Where? A coffee shop is a great place to sketch especially when you’re just starting out. So many people are busy on their computers, tablets or phones they don’t even notice what you’re doing. Added benefits - you have a comfortable seat, a table and something to eat or drink! Outside, try to fine a spot where people can’t come up behind you. Position yourself with a wall, corner or post at your back. It gives you something to lean on, too.

© Barbara Weeks


What about the public?  People are curious when they see others sketching. They're also usually very complimentary and respectful. Children are fascinated. If you don’t want to be interrupted wear ear buds and listen to music (or pretend to) and avoid eye contact. 

© Barbara Weeks


Sketch with friends. There is a comfortability in numbers. The tab “Sketch Crawls” on this blog’s navigation bar tells you where and when we’re meeting next. Join us.

© Barbara Weeks

Post your location sketches on our FaceBook page. The encouragement and feed back from other urban sketchers is invaluable.

Benefits:
  • Sharpened powers of observation.
  • Learn to work quickly.
  • Teaches you to take risks and improvise to get the sketch down. 
  • Overcome selfconsciousness and become a more decisive painter.
  • Have fun meeting and learning from other sketchers.
  • “Show the world one sketch at a time!”

© Barbara Weeks

Tuesday, August 5, 2014

Tuesday Tips & Tricks: "Framing a Sketch"

Framing a Sketch
   
Have you ever made a sketch that you felt was missing something or was unfinished?  Couldn't figure out exactly what it needed?   A well thought through sketch can mean many different things depending on who you are talking to, but for me, one of the most important factors of a beautiful, well composed sketch is how it is framed.  I’m not talking about ripping your sketch out of your sketchbook, taking it to Michael's, having it matted, thrown in a frame and calling it done (although many of your sketches deserve to be framed), because that would be too easy and this post would be a waste of your time.

So what do I mean by framing a sketch?  Here are a few bullet points on what framing a sketch is, followed by just a few of my favorite examples and techniques:

Framing a sketch:   
  1. is to compose or arrange the subject of your sketch in a way that draws attention to the most important part of your sketch
  2. is the ability to draw your viewers eyes to what you want them to see
  3. is putting your sketch in a position to be resolved, and finished compositionally
  4. can be done not only for long, involved sketches, but ALSO for quick, on the go sketches
Examples:
Here a few of my favorite framing techniques:

Isolation:
Pick one object out of a particular scene and draw it so that it can stand alone and still look complete. Instead of capturing everything you see, just pick one object.  Here I drew the Villa Rotunda, and centered it on the page.  In order to suggest what it’s surrounding looks like, to resolve the sketch, and to give the building something to visually rest on, I drew a wavy line that very quickly begins to suggest where it is.  The line centers the building within everything that is drawn, and makes the building the focal point.
© Andrew Banks 2014

Incorporate the Subject:
This might be one of the most popular techniques.  Use your subject to your advantage.  Transform the subject into the framing device for your sketch.  Here I used two obvious options, a window and a door. Everything fits inside the openings and the frame becomes part of the sketch. 

© Andrew Banks 2014


© Andrew Banks 2014
Fading:
Fade out the edges of the sketch by using less pigmented paint, less cross hatching, less shading etc...  The detail will be concentrated in the center while the faded out edges focuses the attention where you want it to be .

© Andrew Banks 2014


Architecture:
Use architecture and architectural features such as walls, arches, colonnades, columns and even windows to frame your sketch.

The buildings on the left and right rise up on each side of the picture plane, framing the busy street scene.  © Allan B. Jacobs 2014


This column and arch is the focus of the sketch as well as a framing device for the background content of the sketch.
© Andrew Banks 2014

Landscape:
Compose the subject in a way that allows natural or built landscape features to frame the subject. Some popular and effective landscape features are trees, tree trunks, tree canopies, bushes, large plants and flowers, leaves, and street furniture (planters, benches etc...)

The tree canopy curves over the top of the entire sketch.  Combined with it's strong, dark value, it works as a strong framing device. © Allan B. Jacobs 2014
Value/ Contrast / Line weights:
Differences in value, contrasts, and line weights are perfect framing tools.  Use objects with more value or thicker/stronger line weights along the perimeters and in foregrounds of your sketches.  Lighter values and line weights will recede to the background, allowing your framing devices to be that much more evident.


Buildings in foreground, on left and right have stronger line weights than those in the background.
© Andrew Banks 2014


The contrast in value and drawing technique of the trees from the rest of the drawing emphasize them as framing devises. © Andrew Banks 2014
Literal Frame:
This is the least creative of the options, yet an option nonetheless.  Draw a literal box around your sketch. Make sure your drawing fills up the box and that parts of the sketch come into contact with the box.
© Andrew Banks 2014

A fun twist on the literal box is to break the box up and allow the subject to overflow out of it.  Here, the dropped out silhouettes of the people on the bottom become part of the continuous line border of the sketch.

© Andrew Banks 2014


I hope you find these tips to be helpful!  Feel free to comment with any questions or any of your own framing techniques!

-Andrew