Pages

Tuesday, September 30, 2014

Drawing Architecture: Sighting Size and Proportion

In my last post “Perspective for the Urban Sketcher:Sighting” I shared a technique for drawing in perspective.  With some of the feedback I received from that post, I was reminded of a related, yet different technique that can be used with sighting.  Sighting can also be used to gauge size and proportions.  In this post, I will build upon the sighting technique and show you how to draw architecture, simplifying an elevation down to large, simple shapes and using architectural features as measuring devises.

If you've ever spent time observing architecture, you've probably noticed that there are almost always some degree of pattern and relationships between different shapes and masses.  Whether they are windows, doors, columns, arches, roofs etc... they are all sized and proportioned in relationship to one another and to the building as a whole.  An urban sketcher can use different elements of a building as tools to his/her advantage, especially when sighting.

When sketching architecture, size and proportions are dependent on your distance from and relative position to your subject.  So, before getting to the steps, the following rule must be followed in order for this technique to work:

Remember, once you decide where to sit and sketch, you must stay in the same spot until you have at least marked out all sizes and proportions.  (Once you move, your distance and relative position to the subject changes, and your sighting approximations will be inconsistent).

Sighting Size and Proportions: Step by Step

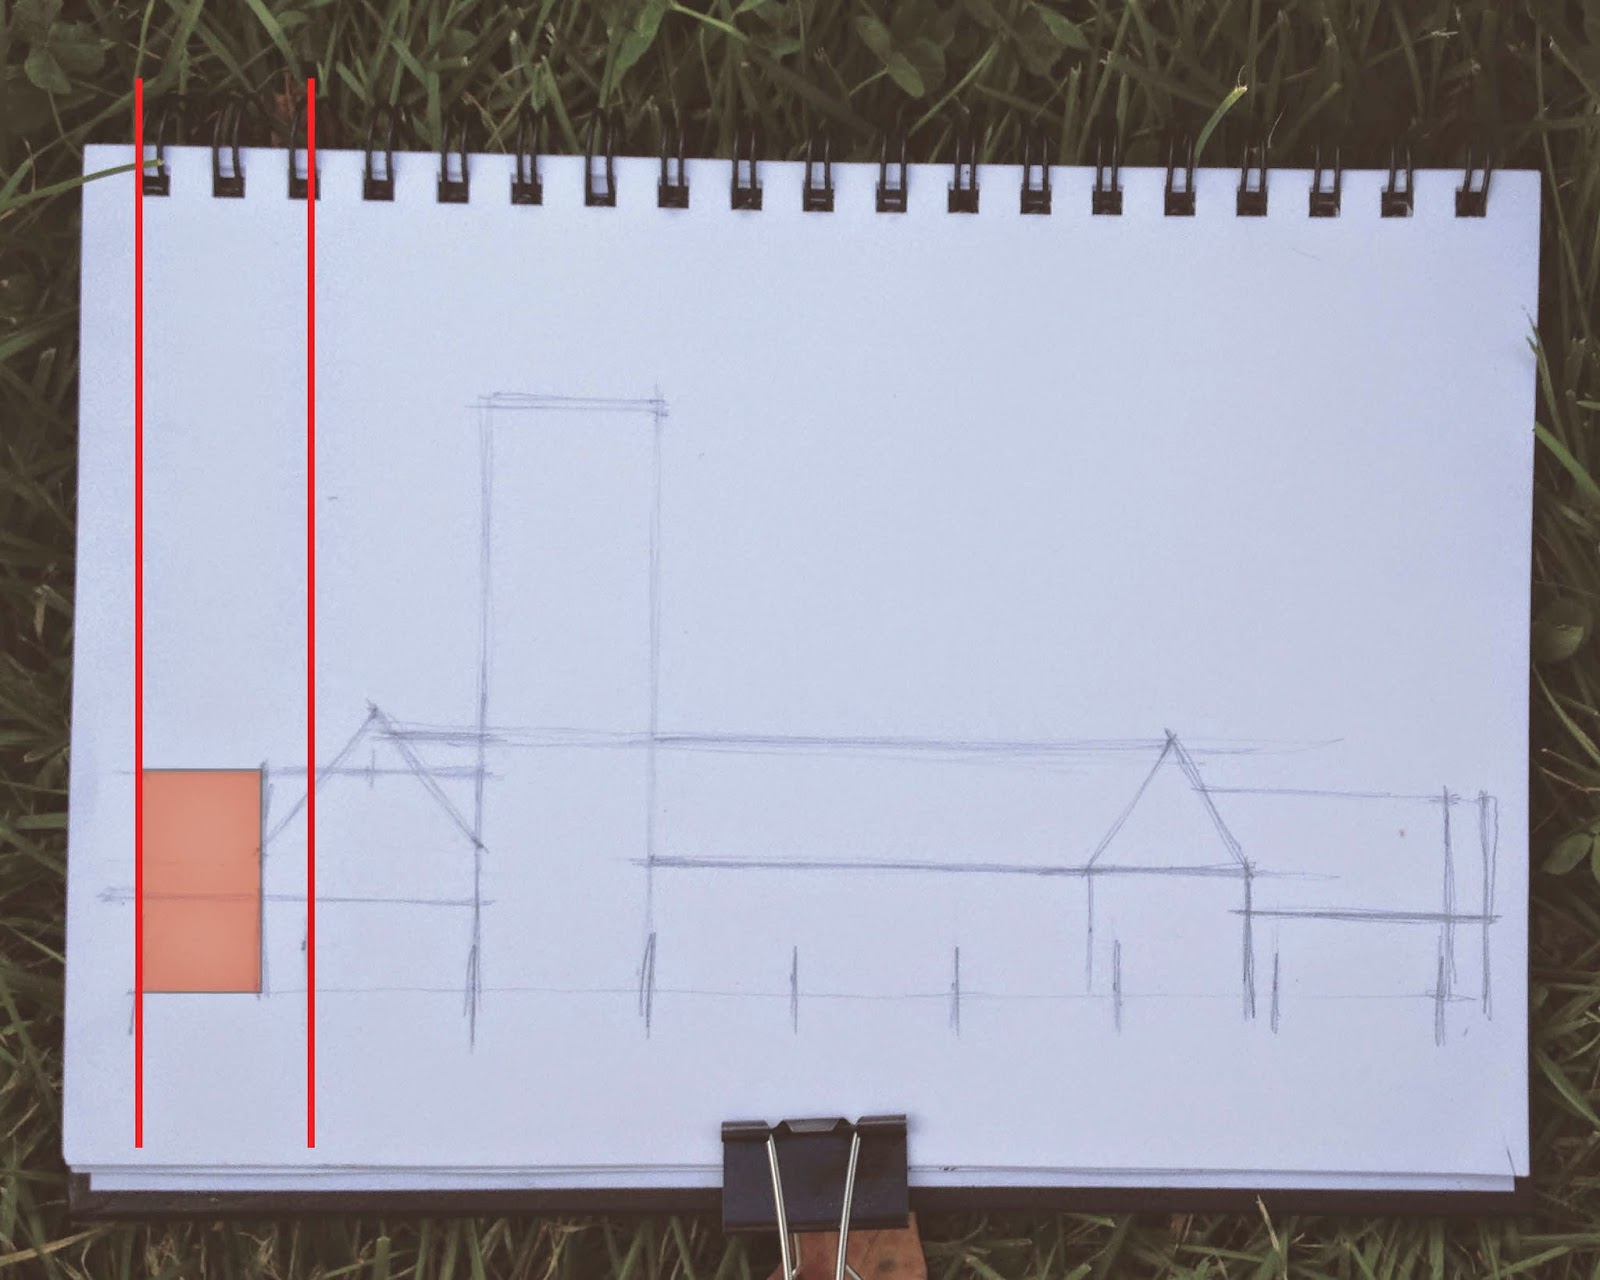
1) Take a few minutes to observe the building, pointing out some of the major shapes, structural features or patterns.  When sighting for size and proportion, you will draw your building starting with the larger masses of the building, moving down to the smallest masses and details last.


2)
Chose one feature of the building to use as a measuring unit.  I chose the width of the tower.  With your sighting tool (pencil, wooden skewer etc…), fully extend your arm out, placing it in front of the architectural feature.  (It helps to close one eye and squint).  Move your thumb along your sighting tool until it reaches the edge of the architectural feature, essentially measuring the feature’s width.  This will become the measuring unit for the majority of the sighting.  So, all measurements will be in X number of tower widths.


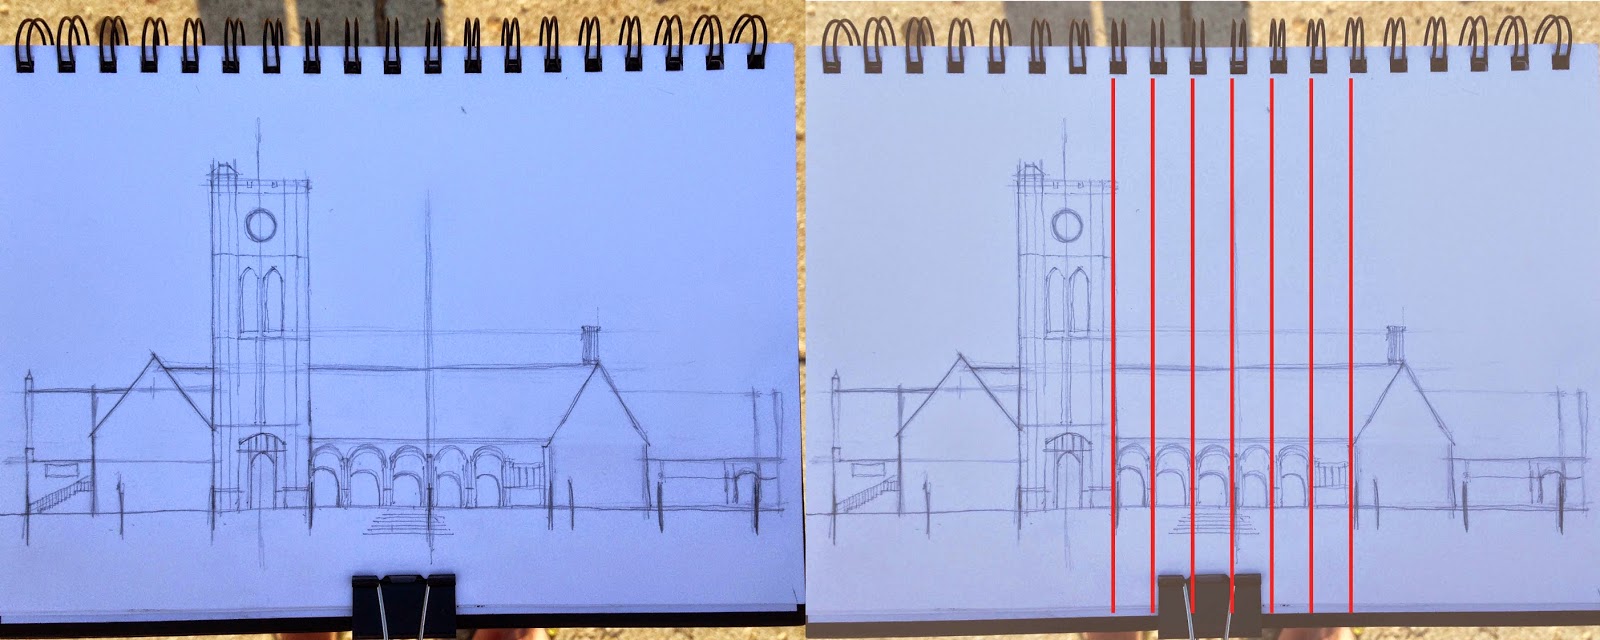
3) 
Measure the width and height of the building.  The length of this building was about 8 tower width’s wide.  The tower was 3.5 tower widths tall, and the roof heights changed at different locations, but ranged from 1.5-2 tower widths tall.  Use tick marks and guidelines to help visualize your measurements.  Here I marked out the overall length of the building at slightly more than 8 widths.  Use guidelines for all of your measurement.  You will begin to see how different parts of the building relate to one another.


 4)
Mark out all the other large masses.  In this building there were essentially 6 large masses that comprised the entire elevation.  I sized each portion based on my measuring unit, the tower width.


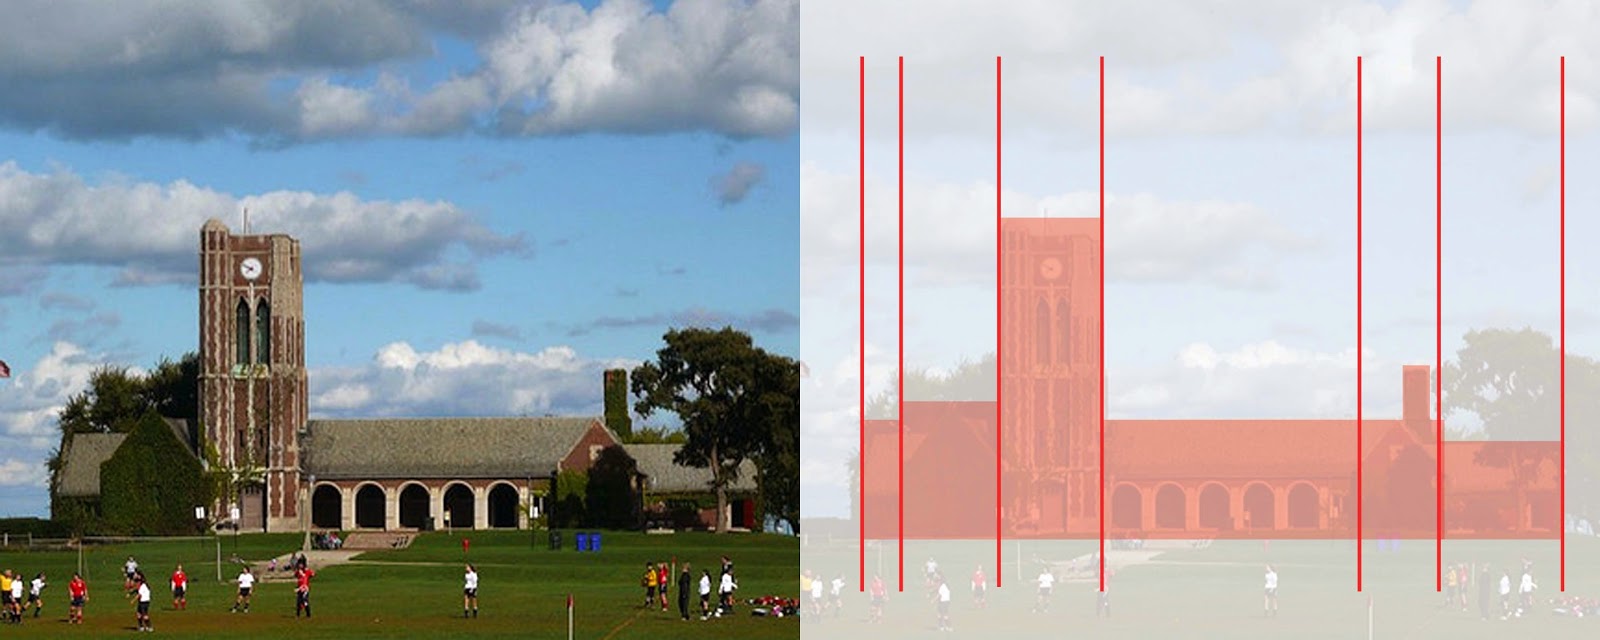
The 8 tick marks I made on the length of the building helped as guidelines.  So for example, I sighted that the first mass (farthest left) was about ¾ of 1 tower width.  Since I have the tower width marked out, I was able to draw my vertical line for that portion of the wall at ¾ of the way through the first tick mark.  Repeat these steps for the rest of the masses.


5)
Now that you've marked out the largest masses of the building, move to the medium sized masses.  For me these were the arches, windows and doors.  The colonnade of arches is nicely divided into 6 uniform bays, so I was easily able to divide the middle portion of the building up into 6 equal parts.  Use this type of logic for the rest of the details.  (If your details are not evenly spaced, simply use a smaller architectural element as your measuring unit to determine the distances and proportions you need.)


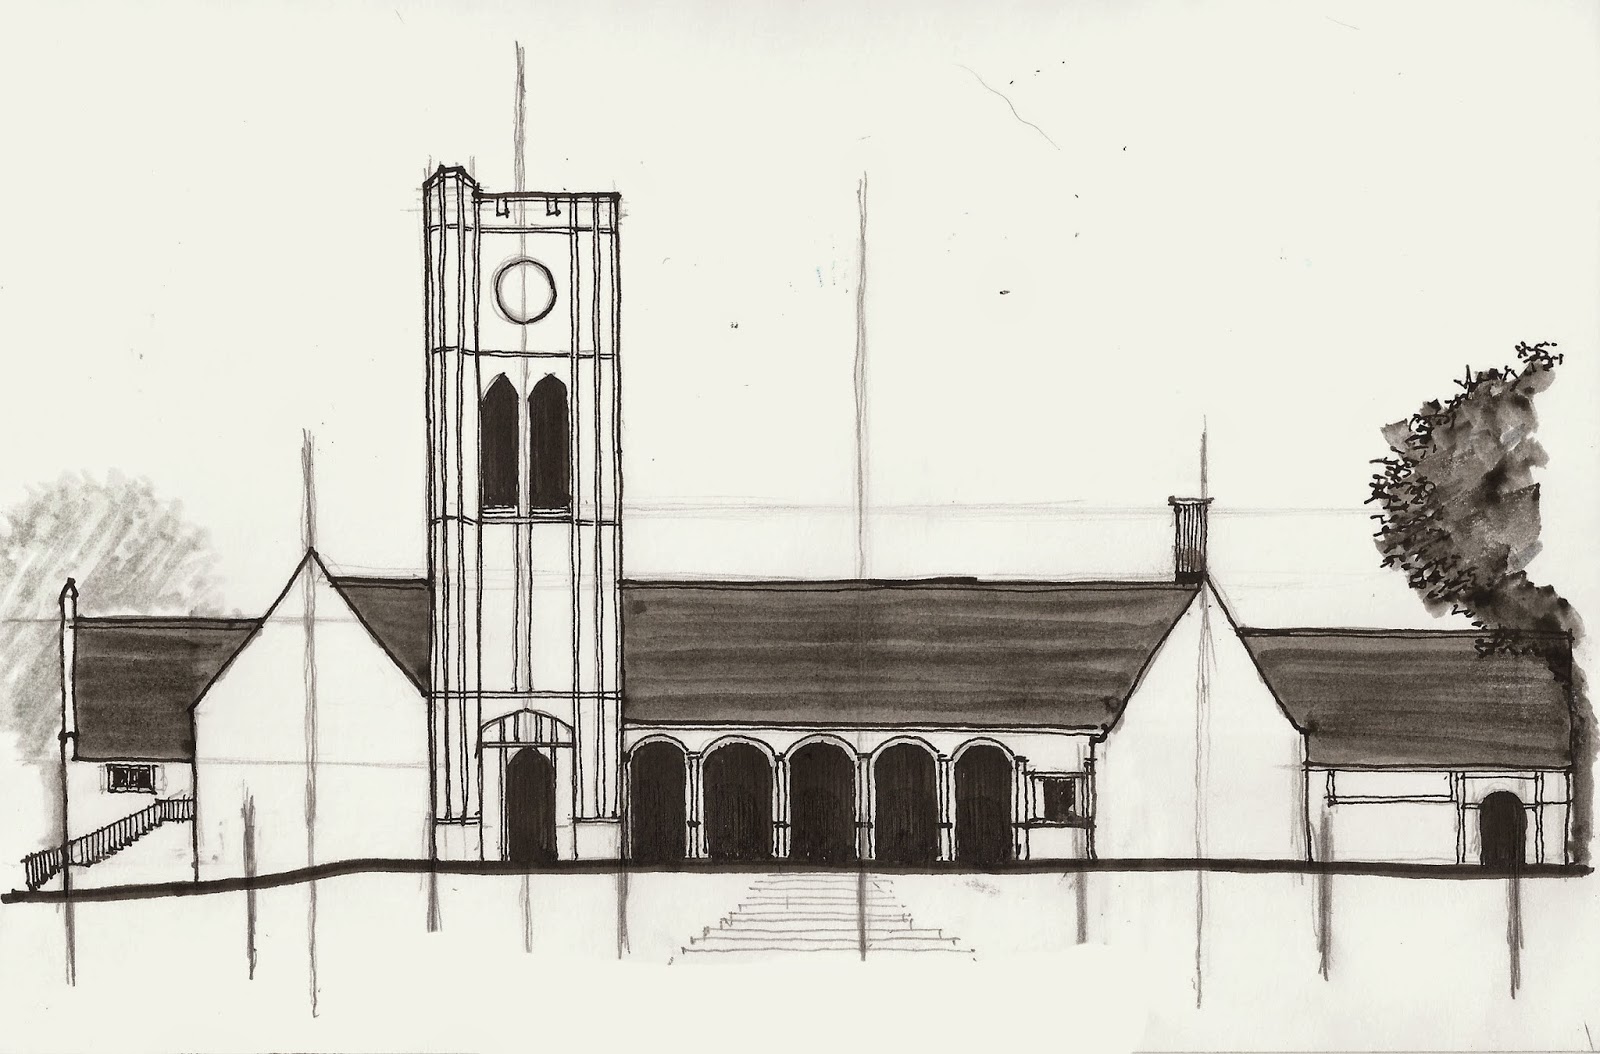
Now you can begin to add details, value, shading and shadows.


Once you feel comfortable sighting sizes and proportions on a building at a straightforward view, you will be ready to combine the techniques of perspective with those in this post.

I hope this is helpful!  As always, let me know if you have any questions!

-Andrew


Monday, September 22, 2014

Please, Have A Seat

One of the many benefits of attending an Urban Sketchers Sketch Crawl is discovering the many different ideas and workarounds that other members have developed for their particular way of sketching. Case in point: where does one sit when sketching “on location?”

The obvious answer is often “find someplace to sit and sketch what is in front of you.” This simple solution may present you with such options as a park bench, café tables, the half walls of a landscaping terrace, sidewalk curbs, a sturdy fence, a tree stump, a fire hydrant (good luck with that one), a pier or boat dock, a plastic 5 gallon bucket and the back seat of your convertible car (weather permitting, of course). It makes the most sense since most urban sketchers operate by the motto “travel light” and would prefer not to carry any extra weight.

When presented with an unknown setting, however, an experienced urban sketcher likes to come prepared. This can mean providing seating arrangements of their own to insure there is a place to sit. Therefore, I have assembled a collection of seating options which I have gathered from other savvy sketchers and perhaps you will find one that meets “The Four C’s of Sketch Chairs: Comfort, Convenience, Compartments and Cost.”

Comfort: Sketching can often take an hour or two so you want a seat that will support you without having to sit too low or cut off your circulation during that time.

Convenience: Ideally you will want a seat that will fold up to fit inside of your backpack, art bag, or large purse if you are able. Sometimes there is a trade-off for a seat that is both comfortable and convenient, so you try to find the best of both.

Compartments: Having a chair that provides some kind of storage to hold the art supplies you will be using is especially handy if the ground around you is either wet or gooey-dirty. Who wants to set their supplies in the mud and then pick it up again to use on their sketch? Pockets, zipper pouches, and cup holders are all welcome additions to a comfortable chair.

Cost: Assuming that you do not have an endless cash flow and do not possess the crafting skills to make your own perfect chair, then cost may be important for you to consider as one of the determining factors.


Many of the following chairs can be found in an assortment of outdoor, sporting goods and garden shops in addition to art supplies stores. Here then are some of the more popular personal, portable, sketch chair options and where you can find them. Find one that you like and please join us at one of our next Urban Sketchers' Chicago Sketch Crawls. Happy shopping.


Tuesday, September 16, 2014

Tuesday Tips & Tricks: Thoughts on Talent

Many times, as I am sitting sketching in a park or a cafe, someone would stop by, look over my shoulder, and then say with a wistful air "I wish I had your talent… I'd like to draw too…"

I usually hesitate to tell them, but I will tell you: I have no talent.

What I have is an incessant desire to make images. I have persistence and tenacity. I gave up on instant gratification and the need to look good right away. I bought in on an idea of 10,000 hours. But talent… no, definitely not. But let's examine the situation with more attention.

For decades I did not draw or paint or make art, because I was convinced that I had no "talent". Fairly late in life I came up with a rebellious idea that I don't actually need this thing "talent" to draw or paint. Ha! What a liberation it was! I took a pencil and did an exercise from a drawing book, the year was 2009:


I did more exercises from books, and interestingly enough my drawings got better.


Then I came across a book by Malcolm Gladwell "Outliers: The Story of Success" and read about 10,000 hours concept. The idea is that you need about 10,000 hours of practice to get good at whatever you want to get good at. I did the math: working 8 hours a day, 5 days a week, gives 2,000 hours of practice in one year. In 2010 I've barely scratched the surface… I realized that I needed 5 years of dedicated practice. I also realized that I don't need "talent", I need skill. That was doable, and I got to work.

2010


2011


2012


2013


2014

These are some examples. I did a lot more stuff than that. I painted and studied, and later on taught as well. 

Today, in 2014, I have done my 5 years - 10,000 hours. I have moved from being afraid of putting a pencil to paper to being a professional artist and a painting instructor. 

Here's one more thing to keep in mind. In the beginning of your 10,000 hours quantity is more important than quality. There once was an experiment in a pottery class of an art school. For one semester a class was divided in 2 halves. Students in the first group were asked to make one single pot each during the time of that semester, but it should be the best pot they ever made. The grade would be given based on the quality of that single pot. The second group was asked to make as many pots as they possibly can, quality and beauty not important. These students would get their grades based on the number of pots they made, the more the better. As you probably guessed, by the end of the semester pots produced by the "quantity" group  were better and more beautiful than single pots made by the "quality" group. 

This example comes from a book "Art & Fear: Observations On the Perils (and Rewards) of Artmaking" by David Bayles and Ted Orland. You can get this book from Amazon for under $4.00 used. It is a little book - 120 pages, small format - with a lot of wisdom. This will be the best art book you ever bought.

A practical and observable shift in quality of work occurs through practice and work. "Talent" is not even a part of this equation.

During my years of practice and self-study I arrived to several conclusions that I want to share with you:
  1. If you can write a grocery list - you can draw too. You have all visual and motor skills that you need.
  2. There is no such thing as talent. Talent is a man-made construct that is not really helpful.
  3. Drawing can be taught. Why do you think there are so many art schools and art teachers. Find the right one. Teaching yourself works too.
  4. Practice and time on task is all there is. Don't just trust me, try for yourself. Then come back in 6 months and thank me :).

Tuesday, September 9, 2014

Tuesday Tips & Tricks: Discovering Watercolor Pencils

Down on the Farm – Piermont, NH
Watercolor pencils have been around for a while but until recently, when a student asked me about them, I hadn’t given them a lot of thought. I love the feel of drawing with the pencil on paper and the interaction of color and water on paper in watercolor. Could this be a match made in heaven?

There are many ways to use watercolor pencils. Here are a few to get you started.
This demo sketch was done entirely with watercolor pencils. I used Derwent Inktense watercolor pencils and a moderately-textured 180# paper to explore their potential.


Techniques

1. Pick up color from the point of the watercolor pencil with a wet brush (I used a waterbrush) and apply it to the paper
That’s how I painted the sky in this sketch. I picked up the color onto the brush and ran it like a wash adding wet color as needed.

2. Apply dry pencil marks on dry paper and work with a wet brush.
The barn was done in several layers. First I applied light pencil shading in several colors then bended them with a waterbrush. When that was dry I added more dry pencil for texture and ever so lightly touched the texture with the rigor (liner) brush to activate the color a bit. The windows were added later.

3. Wet the point of the pencil and draw/make marks on the paper. I loved the feel of the wet pencil on the paper in this process! I used the waterbrush to run the different colors together. This technique gives you rich juicy color; note the trees and other darks in this sketch. The windows on the barn were added with a wet pencil point.

4. Add layers of color, shapes and textures. You can work into and push the pencil lines and washes with your brush to add interest to larger shapes.

5 & 6. Run the dry pencil back and forth on sandpaper and scatter pencil dust on the paper for added texture and interest.
5: pencil dust on wet area of the paper
6: pencil dust on dry paper then lightly sprayed with a water (Protect or block off the areas you don’t want affected by the dust and water.)

What do I hope to pass on to you in this post? 

  • Mostly, I hope to encourage you to enjoy the process of experimenting. Drawing and painting are verbs. Get lost in the process and the product will come. 
  • Discover watercolor pencils if you haven’t already. They’re a very versatile medium.
  • Brands of watercolor pencils vary in intensity and softness. Buy a few individual pencils from several brands to find which works best for you. Derwent Inktense are bright and juicy, and suit the way I work. 
  • Let the fun begin! 


I’m definitely adding a few watercolor pencils to my sketch kit (see #3).


Tuesday, September 2, 2014

Tuesday Tips & Tricks: "Perspective for the Urban Sketcher: Using the Sighting Technique"

One of the most challenging techniques to master in on-location sketching is perspective.  Many people shy away from architectural, city scenes or subjects involving vanishing points because of all of the rules involved.  Even when following the rules, it’s pretty difficult to achieve a completely accurate record of the actual scene.  Most of the time when we sketch on location we use small to medium sized sketchbooks.  More often than not, the vanishing points will fall well off of the edge of our pages, making it impossible to calculate the actual vanishing points.  Lastly, when we are urban sketching, we don’t always have a lot of time to analyze and perfect the perspective.  However, a technique I use, called Sighting, will enable you to draw in perspective quickly, and without needing to fully construct a perfect set of vanishing points.

Sighting is based off of the principles of perspective, but is a shortcut, so to speak, and a great, simple trick to use in both shorter and lengthier sketching sessions.

Before moving to the step by step explanation, there are 2 rules that must be followed in order for this to work.  Keep these in mind while reading about and using the technique.  These rules are crucial and sighting will not work unless they are followed.

Rules:
  • Once you decide where to sit and sketch, you must stay in the same spot until you have at least marked out your perspective lines.  (Once you move, your point of view changes, thus your horizon line and vanishing point(s) will change as well).

  • For consistency, hold your sketchbook in one position until you have at least marked out your perspective lines.  For example, if the sketchbook is sitting flat on your lap for the first half of the sketch, do not tilt it up for the second half of the sketch.  This will ensure consistency in the transferring of your lines.

Sighting: Step by Step

1) I use a thin, straight, wooden skewer and that I carry with me all the time in my travel kit.  A pen or pencil will work fine too, but the longer and thinner the sighting tool, the more accurate of a reading you will get and the easier it will be to see.  About 6”-8” is plenty.


2)
Hold the sighting tool at one end.

3) Fully extend your arm out and hold the sighting tool parallel with your body.  This is important.  Do not tilt the tool outward towards the subject, or inward toward your body.  You will only get an accurate reading if the tool is parallel with your body.

4)
Align the tool with the edge of the receding line.  Here I am aligning it with the roof line of the building.  (You will want to place your tool directly on top of the edge when actually doing this.  I put the tool slightly above the edge so it easier for you to see.)  Imagine the hands of a clock.  Only rotate your tool like the hands on a clock would rotate around the center point.

5) Hold the angle of the tool and slowly place the tool on your paper and draw the line.  (I do not mean to imply to use the tool as a ruler, just as a visual guide.)  I usually map out perspective line in pencil because you will need to double check and edit your lines as you go.  The more you do this, the better you will get at transferring the lines and soon enough you will not need to edit. 


Therefore, once you have drawn your line,

6) Double check your line and repeat steps 3,4 and 5 again to make a revised version of the first line.  With a line already drawn, it is easier to compare what you have drawn to what you are sighting, and you can make changes relative to what you have drawn.

7) Repeat steps 2-6 for all of the lines you do not feel comfortable free handing and remember to follow the two rules I mentioned at the beginning.

Here is quick sketch I completed using the sighting technique.  Take a look at all of the different angles that are transferred to the sketch.


I hope this is helpful!  Feel free to ask any questions!

-Andrew Banks