
TUESDAY TIPS AND TRICKS

Between Barbara Week's recent post entitled "Off The Grid - Designing a Page" which talked about guidelines as compositional tools, and a recent architectural sketch I made, I wanted to "piggy-back" off of the topic of guidelines in urban sketching and talk specifically about how guidelines can help you simplify and map out the different parts of architectural details.
Buildings and architectural details can seem like daunting subjects to draw. Thankfully, there are several observational cues to pick up on that will help you map out your drawing and establish an educated guess about the sizes, proportions, patterns and elements that make up your specific detail. You don't even need to know the technical names of the architectural elements, or how they go together. You just have to have the ability to make observations. After all, that's half the battle of urban sketching is, isn't it?
(A couple quick side notes: 1.Check out a couple of my previous and related posts for a more full set of tips on architectural sketching. "Perspective for the Urban Sketcher" and "Drawing Architecture: Sighting Size and Proportion" AND 2) these ideas can be applied to other subjects including figure drawing, landscapes, and most other types of subjects as well.)
Here is the scan of my sketch. As you can see more clearly here than in the picture above, I used several guidelines in my initial pencil sketch before adding value in ink. I left the pencil guidelines in for aesthetics. Personally, I like how guidelines can add to the story of a sketch. Guidelines show your process. They add a level of technicality to the drawing. Many of the greatest artists left pencil underlays partially visible in their masterpieces. I think guidelines give an added personal touch, but this is just my opinion.
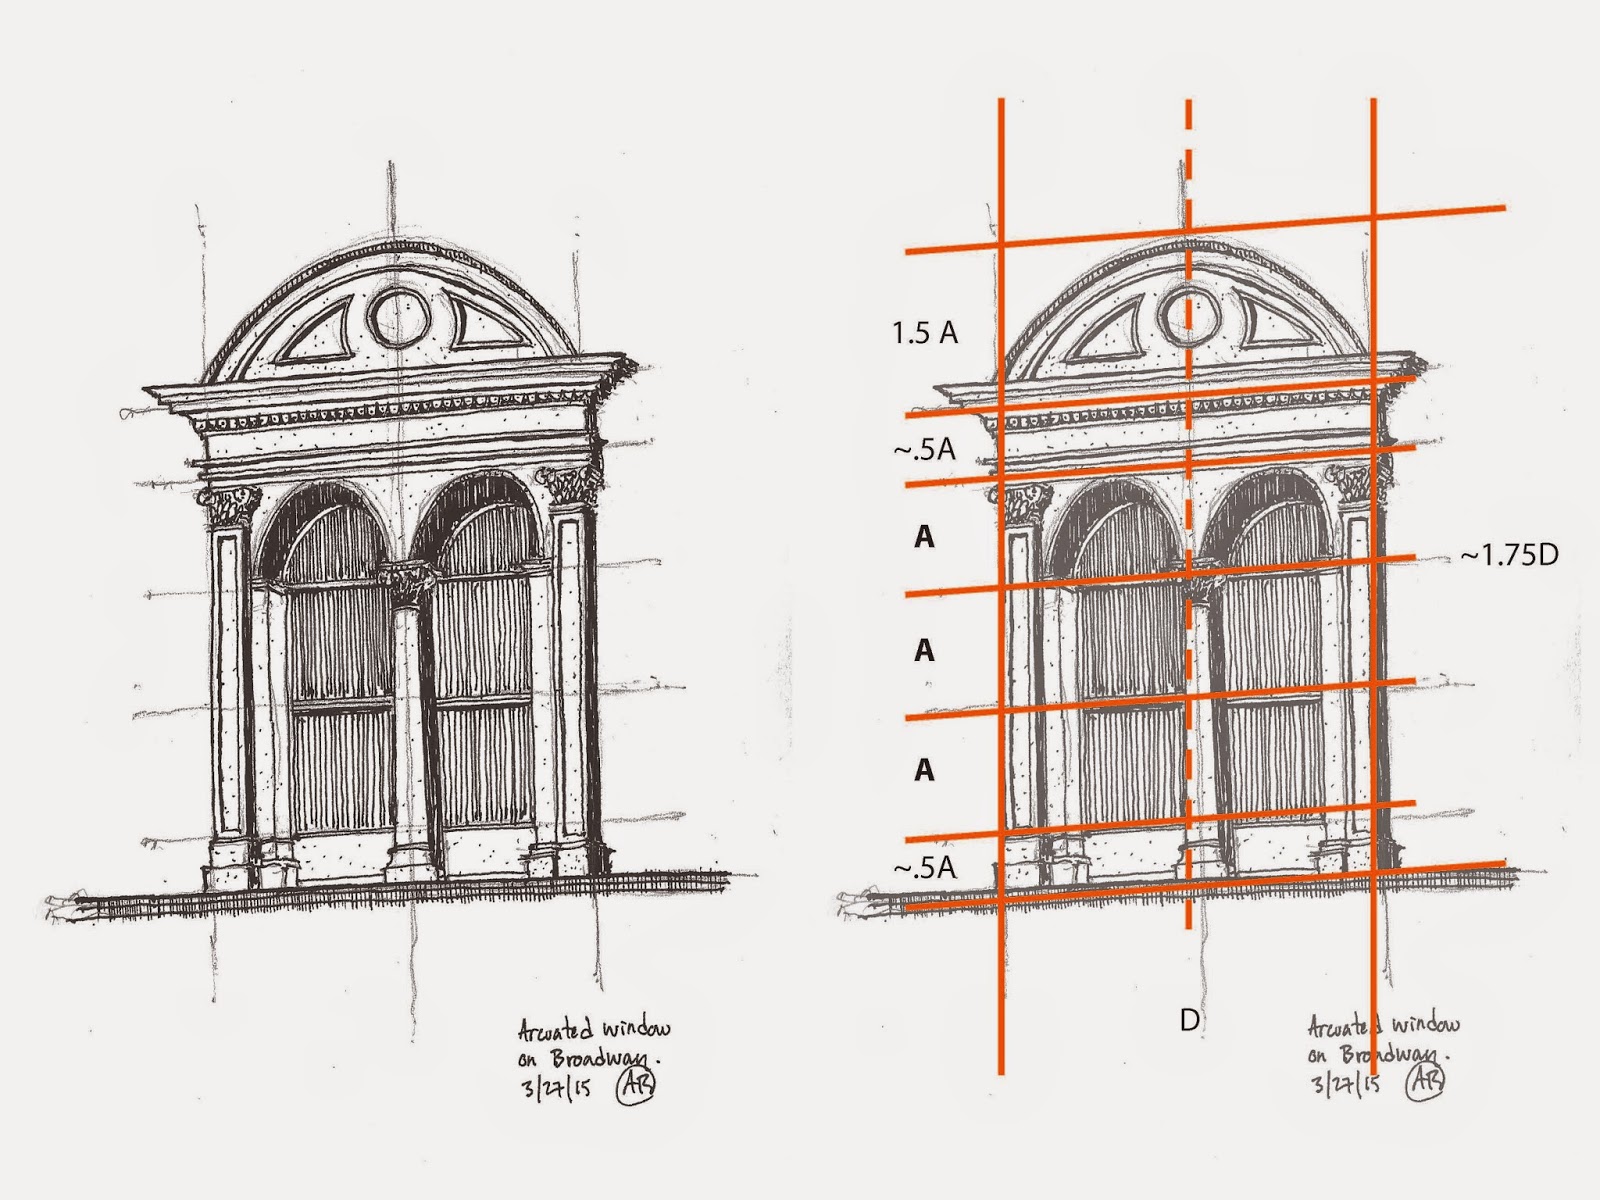
The image to the right is fairly self explanatory, however, I will share a little bit about how I approached this drawing.
I began by drawing the center line (dashed) guideline. Since this detail is symmetrical, the center line is the most important guide to get you started. Recognizing that the left and right sides of the detail have the same width, I added two more vertical guides, spaced equally as far away from the center line as I could have approximated while standing up, holding the sketchbook.
After I had determined the overall width of the detail, I used the sighting technique (explained in more detail here) to approximate how many widths (D) tall the detail was. I found that the details was about 1.75 widths (D) tall. Basing all of the approximate sizes off of one or two of the dimensions in your detail will help you keep all of the different parts of the drawing proportional to the detail as a whole and in relationship to one another.
I then drew a few horizontal lines. I found larger shapes that I could use as benchmarks for the detail, so to speak. So as you can see, (bottom to top) my horizontal guidelines fell on the base of the column, the center line of the window, the top of the middle column, the top of the two side columns, the bottom of the entablature, as well as the top of the arched pediment at the top. Like in all other forms of design, there is a method to the madness in this detail's composition, which is why the sizes of A, .5A and 1.5 A all work well together, and were easy to approximate.
I drew the guidelines at the center line of the window, the top of the middle column, and the tops of the two side columns first. A quick approximation told me that the bottom and top portions were half the height of A, and that the curved pediment on top was about 1.5A.
Now that the major heights and widths were mapped out, I filled in all of the rest of the details. (Column capitals, window mullions, arched openings above windows, additional lines on the entablature, as well as the dentils in the molding). I did not draw guidelines for every single detail (although if you want to you can.) Instead, since the major sizes and proportions were laid out, I could then "eyeball" the sizes and proportions of the smaller details since enough information was already mapped out for me.
This is something that may take a while to get the hang of, but once you do it a few times it will begin to make more sense. At first, sketching like this may take a little longer than just "winging it". However, the more you do it, the more it will make sense and will end up increasing your sketching speed in the end. Learning how to sight size, proportion and perspectives were the most valuable urban sketching skills I learned when I was first introduced to urban sketching. They are skills I use in almost every sketch I do to this day.
I hope this post, along with the previous posts on sighting and perspective are helpful. Feel free to ask any questions.
Lastly, don't forget to follow us on Twitter, Instagram, and Pinterest. If you live in the Chicago area, connect with us through Facebook. We sketch as a group every third weekend of each month at different locations throughout Chicago.
Andrew

No comments:
Post a Comment
Note: Only a member of this blog may post a comment.