Pages

Showing posts with label #Tuesday Tips &Tricks. Show all posts

Tuesday, December 29, 2015

Where Would You Like Your Art to Be a Year from Now?


Tuesday Tips &Tricks:

At the end of the year, many of us look back and take stock of the past year, what we’ve done, what we didn’t do, and maybe, what we wish we had done. I like to page through my sketchbooks and see how my sketching has changed over the year. What worked? What didn’t? What do I need to work on more? Looking at your work after not seeing it for a while, and looking at it chronologically, is interesting. There’s always a surprise or two!  Then there’s the look to the new year, where would I like my work to be a year from now?

Looking Back Over 2015

Tuesday Tips & Tricks posts have covered topics from architecture to Zen doodles and a whole lot in between! We talked about how to sketch, why to sketch, and what to sketch. We looked at color and shades of gray. We covered sharing your work on-line and in shows. and so much more. We even advised you to ruin your watercolors!  If you found a post helpful and would like to review it check out the Blog Archive in the sidebar and click on your topic of choice. The same goes for TT&Ts you may have missed.

Looking to the Future

Looking to the new year, where would you like your art to be a year from now? What are your goals? (It’s good to set them, but that’s another post.)

The next question is, how can we, at the Urban Sketchers - Chicago blog, help? Do you have a topic you’d like us to explore? Let us know. Leave a comment here with your suggestions and questions.

May we all have a Happy and Artful 2016!

Tuesday, May 19, 2015

People Who Need (Watercolor) People

Tuesday Tips and Tricks:


Often in urban sketching we focus on the architecture or landmarks we encounter to tell the story of our surroundings. There are times though, when we add people to the scene, even when they’re not the focus. They add an element that can make it easier for the viewer to connect with our visual story. People give scale, energy, life, and an invitation into the scene. When you need or want an extra spark in your landscape or cityscape including people can be the trick you need. In this post I give you tips for using watercolor to add figures to your work.  


Carrots and Rectangles

There are many approaches for quickly adding figures to watercolors. I use a combination of two different methods – carrots and rectangles. Both ways employ similar mind sets.

  • Think simple.
  • Think shape 
  • Think gesture

The Carrot:


     1. Start with simple carrot shape            2. Add a head                     3. Add a little gesture  
                                                                                                                    and shadow
The result from just four strokes, a simple basic figure!


Repeat the process and add a little embellishment. 


Now try playing with just slight changes to the gesture and size of the carrot shapes. Add more, create a crowd or a parade!


The Rectangle:


1. Paint a rectangle    2. Add two strokes for legs    3. Two strokes for arms   4. One for a   
                                                                                                                              head
Tah Dah! A person!

Urban Sketching


 Saturday Morning at the Green City Market, Chicago


Using these simple methods as a starting point you can add the attitude, personality, the
 character of a place, through it's people.

Character Builders:

  • Paint a group of carrots and rectangles together.
  • Let a few overlap and let the paint mingle.
  • What happens when the head stroke touches the shoulder line? When it doesn’t?
  • Experiment, add line to emphasize or embellish some of the shapes.
  • Try adding just a little detail.


As always, have fun!

Tuesday, September 16, 2014

Tuesday Tips & Tricks: Thoughts on Talent

Many times, as I am sitting sketching in a park or a cafe, someone would stop by, look over my shoulder, and then say with a wistful air "I wish I had your talent… I'd like to draw too…"

I usually hesitate to tell them, but I will tell you: I have no talent.

What I have is an incessant desire to make images. I have persistence and tenacity. I gave up on instant gratification and the need to look good right away. I bought in on an idea of 10,000 hours. But talent… no, definitely not. But let's examine the situation with more attention.

For decades I did not draw or paint or make art, because I was convinced that I had no "talent". Fairly late in life I came up with a rebellious idea that I don't actually need this thing "talent" to draw or paint. Ha! What a liberation it was! I took a pencil and did an exercise from a drawing book, the year was 2009:


I did more exercises from books, and interestingly enough my drawings got better.


Then I came across a book by Malcolm Gladwell "Outliers: The Story of Success" and read about 10,000 hours concept. The idea is that you need about 10,000 hours of practice to get good at whatever you want to get good at. I did the math: working 8 hours a day, 5 days a week, gives 2,000 hours of practice in one year. In 2010 I've barely scratched the surface… I realized that I needed 5 years of dedicated practice. I also realized that I don't need "talent", I need skill. That was doable, and I got to work.

2010


2011


2012


2013


2014

These are some examples. I did a lot more stuff than that. I painted and studied, and later on taught as well. 

Today, in 2014, I have done my 5 years - 10,000 hours. I have moved from being afraid of putting a pencil to paper to being a professional artist and a painting instructor. 

Here's one more thing to keep in mind. In the beginning of your 10,000 hours quantity is more important than quality. There once was an experiment in a pottery class of an art school. For one semester a class was divided in 2 halves. Students in the first group were asked to make one single pot each during the time of that semester, but it should be the best pot they ever made. The grade would be given based on the quality of that single pot. The second group was asked to make as many pots as they possibly can, quality and beauty not important. These students would get their grades based on the number of pots they made, the more the better. As you probably guessed, by the end of the semester pots produced by the "quantity" group  were better and more beautiful than single pots made by the "quality" group. 

This example comes from a book "Art & Fear: Observations On the Perils (and Rewards) of Artmaking" by David Bayles and Ted Orland. You can get this book from Amazon for under $4.00 used. It is a little book - 120 pages, small format - with a lot of wisdom. This will be the best art book you ever bought.

A practical and observable shift in quality of work occurs through practice and work. "Talent" is not even a part of this equation.

During my years of practice and self-study I arrived to several conclusions that I want to share with you:
  1. If you can write a grocery list - you can draw too. You have all visual and motor skills that you need.
  2. There is no such thing as talent. Talent is a man-made construct that is not really helpful.
  3. Drawing can be taught. Why do you think there are so many art schools and art teachers. Find the right one. Teaching yourself works too.
  4. Practice and time on task is all there is. Don't just trust me, try for yourself. Then come back in 6 months and thank me :).

Tuesday, August 26, 2014

Tuesday Tips & Tricks: "Some Advice on Giving Feedback Online"

Tuesday Tips & Tricks: "Some Advice on Giving Feedback Online"

Artists love to learn how they can get better at their skill or learn a new technique from another artist with a better idea. A big reason why we started this regular weekly post, "Tuesday Tips & Tricks" was so that we could offer free tips to this community of artists all trying to get a little bit better at some aspect of their artistic endeavor. Artists love to read how they can get better and readers love to make comments. Here's how you can make comments without being disregarded or hurting feelings.

First, let me clear up a misconception about the social media space. That "like" or "heart" button does not count as offering feedback. In fact those two buttons should really be relabeled "I Acknowledge" buttons. If you want to offer comments that will really help another artist, you are going to have to type it in.


There is a formalized critiquing process: "Describe, Analyze, Interpret and Evaluate"
The following are some more simple things to keep in mind.

"Destructive Feedback" or failed, well-intentioned sentiments can oftentimes be misinterpreted online.
  • Short, incomplete sentences sound stern and agitated.
  • ALL CAPS LOOKS LIKE YELLING or SCREAMING
  • Sarcasm is never as funny in different cultures as you might think. It all depends on how well you know the person with whom you are joking.
  • Basically, if someone cannot read your comments and work on fixing something about their art that will improve their skill or art, then you are better off not commenting at all, no matter how much the temptation.
First, start with praise:
  • "I really like your choice of colors."
  • "Your lines are confident and the composition is wonderful."
  • "I can tell that you are really passionate about this subject..."
  • Starting with a compliment will make a person more receptive to your helpful feedback.
Second, "Constructive Feedback" can sound like this:
  • Ask questions for clarification before you make assumptions or offer critique
  • Offering constructive feedback does not mean say whatever you want without compassion for the others' feelings.
  • "Would you be open to some feedback on your piece?" The key here is to make sure the other person first responds with a "yes" before you offer critique.
  • "Have you ever given any thought to using...?"
  • "What I find that has helped me in a situation like this is..." Putting your comment in first person will sound like you are sharing information as opposed to commanding the other person "YOU should do this."
Lastly, make yourself available to answer any questions or clarify your comments. I would love to hear what kind of critiquing experiences you have had and what you have learned from them.

Tuesday, August 19, 2014

Tuesday Tips & Tricks: … and We Share Our Work Online

So you went out, sketched, and your sketch turned out rather nice. You want to share it with your friends on USk Chicago group and on your blog and on ….

You took a picture of your sketch or perhaps you scanned it, and it looks like this - flat and grayed out and, for heaven's sake, crooked.


What can you do? You don't have Photoshop, you are just a regular sketcher and cannot pay prices equal to GDP of a small country for a piece of photo editing software.

The answer is  GIMP! GIMP is the GNU Image Manipulation Program. It is a freely distributed piece of software for such tasks as photo editing, image composition and image authoring. It works on many operating systems, in many languages. You can download it here - http://www.gimp.org/downloads/.

The urban legend has it that a few former Adobe cowboys/engineers with a grudge of some sort got together and produced this "almost Photoshop" amazing piece of software and put it up for everyone to use. I don't know if this is true, I read it on the Internet :). But one thing is true - GIMP is FREE under Creative Commons License.

Anyway, download your free GIMP and install it. Now you are ready for action.

Here are steps we are going to take:
  1. Rotate
  2. Crop
  3. Curves to restore contrast
  4. Unsharp Mask to sharpen details
  5. Scale to reduce size
  6. Export to save the file
Let's do it step by step. Open GIMP on your computer and open your unprocessed sketch in GIMP. Let me know if you need help with that and I will add a Step 0 to this tutorial.

Step 1 - Rotate

Click the Rotate button in the Tool Box on the left panel and you will see a grid come up over the sketch and a Rotate window open.


Grab the corner of the image with your cursor and rotate. When the level will look satisfactory release the cursor and click Rotate button in the Rotate window. The rotated image will look like this:


Step 2 - Crop

Click Rectangular Select button and drag your cursor over the sketch creating a rectangle. Manipulate the selection in such way that it is nice and tight around your meaningful image.


When satisfied with your selection, click on Image menu and then on Crop to Selection.


Your sketch will look like this. Nice!


Step 3 - Curves

Photographing or scanning an image grays out colors and and reduces contrast. We will restore that using Curves. Click on Colors menu and then click Curves.


A Curves work window will come up. The diagonal line in this window determines your values and contrasts. Play with it by dragging it with your cursor to see what happens to the sketch due to your action. When tired of playing, get back to work :)! Drag the line into a shallow S curve and nudge its curves up and down a little until contrasts and colors in your GIMP image resemble your sketch on paper in real life. Click OK when satisfied.


Step 4 - Unsharp Mask

Photographing or scanning an image not only grays out your colors and flattens values, it also reduces sharpness. We will restore it in this step. Click on Filters menu, then select Enhance, then Unsharp Mask. You could also work with Sharpen at this level, but Unsharp Mask is smoother and produces less digital noise.


A work window will come up. Drag the levels so some meaningful portion of sketch is shown in the Preview window. Set Radius to 5.0 and Amount to 0.50. Threshold can be 0 or 1, I cannot see any difference between them. These settings will give you a nicely sharpened image and will not introduce too much aberrations. Click OK when done.


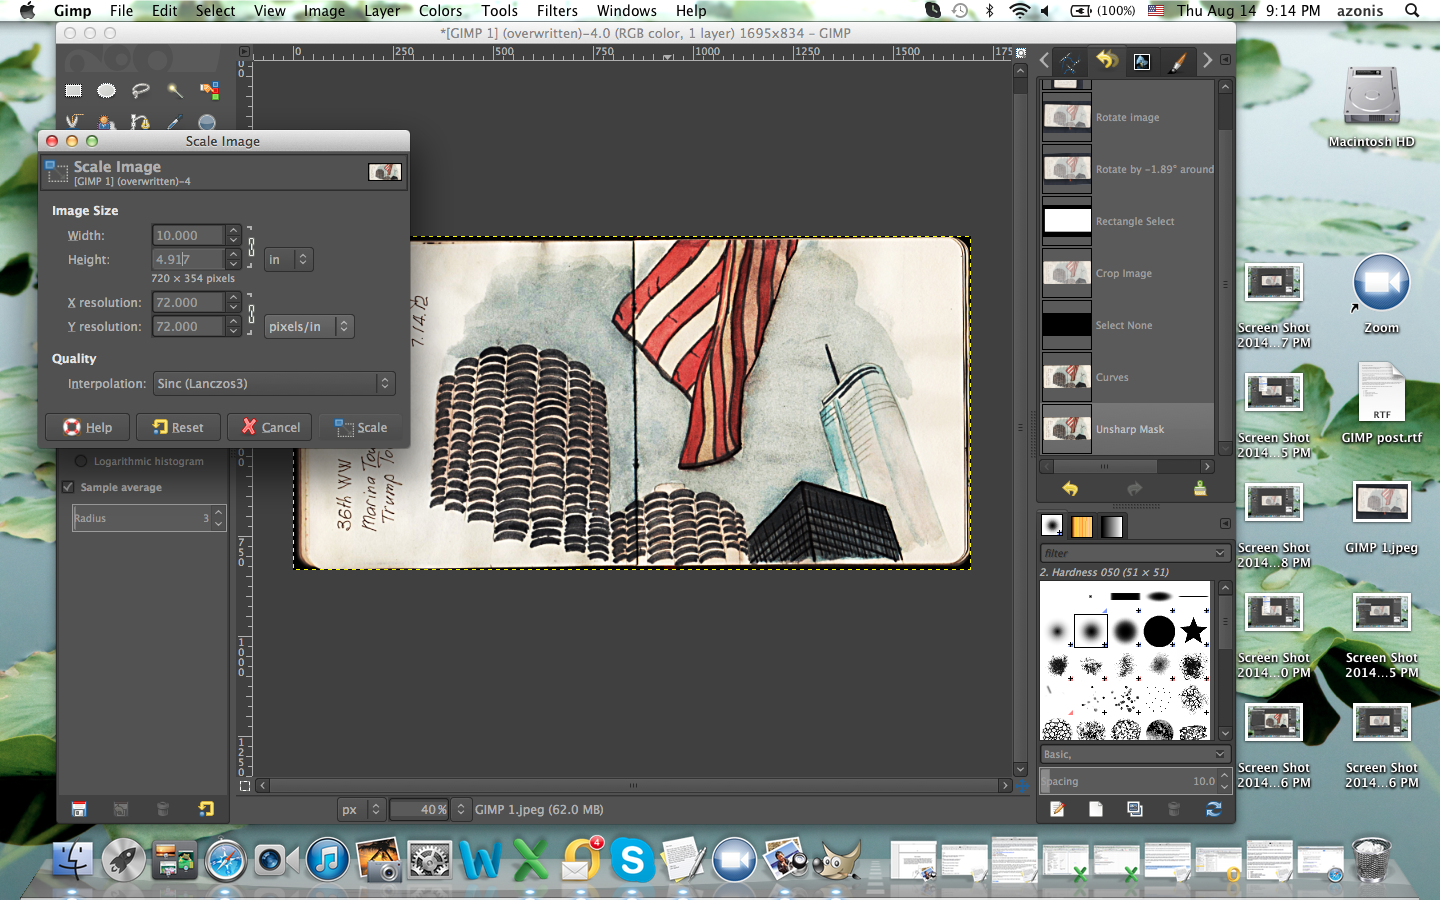
Step 5 - Scale Image

Many images coming from cameras or scanners are big, or sometimes you hear them referred to as fat. They have a lot of megabytes in them and can slow down loading pages. It makes sense to slim them down by reducing resolution and size. Click Image menu and then Scale Image.


A work window will come up. If you are preparing the image for displaying it online a resolution of 72 dpi is good, and size should not be bigger than a laptop screen. 


My images for the web usually are about 10x8" and 72 dpi. This is what we are going to do here. Click Scale when done.


Step 6 - Export

We have a very nicely processed sketch now. Time to save it. Unfortunately, some terms in GIMP are not as intuitive as we might wish, and clicking on Save will not produce a file type we want. Instead click on File menu and then select Export. This will allow to save the file in your computer directory in a JPEG format (or many other formats if you want them). But JPEG will do nicely :).


And here's our result - ready to share!


We hope this is helpful, and we will be seeing many shared sketches on USk Chicago group from now on.

Tuesday, July 22, 2014

Tuesday Tips & Tricks: Sketching Blindly in the Dark

How many times did you have to attend a boring event? Yep, me too. Often it is a fancy party or a benefit for some very noble cause you get to attend with your spouse. It is their cause, and you are just along for solidarity and support. Yawn! 
But don't fret! We got you covered! All you need is this:


A little book and a pen will fit in your evening clutch or sport coat pocket. Get them out when they will begin speeches. Keep your eyes on the speaker. It is too dark to see anything on your paper anyway. Have the pen touch the paper and go. Trace the shape of his head with your eyes and let your fingers follow with the pen. Then his neck and shoulders. What is he wearing? Trace those lapels. Is there any hair? Add it, if applicable. If you want, you can glance down at your paper every so often - this is not a test.


When you have the basic outline down add some darks. Just scribble in any way you like to create dark masses. Add facial features without being too specific. Put in some details, if you have time: a tie, a necklace if any. You are done. Turn the page and find another victim attendee.


You may find that your heads are sometimes detached from shoulders. Facial features may land outside the heads, a tie may be pinned to a shoulder like a tail on a donkey. This all is fine and even great, you don't have to show your drawings to anyone. You will also find these sketches oddly expressive and free. And you will realize that you are no longer bored. In fact you may not even notice that they finished with speeches, and it is time for the rubber chicken. Good. You can sketch that woman sitting across from you.


What you are doing is practicing blind contour drawing.  Blind contour drawing is a method of drawing where an artist draws the contour of a subject without looking at the paper. This artistic technique was introduced by Kimon Nicolaïdes in The Natural Way to Draw, and then made popular in Betty Edwards The New Drawing on the Right Side of the Brain.


Nicolaïdes instructed his students to imagine that the pencil point is actually touching the contour of the subject. He suggested that the technique improves students' drawings because it causes students to use both senses of sight and touch. Blind contour drawing trains the eye and hand to work as a team, and it helps to really see all of the details of the object. 
The drawings above I sketched blindly in the dark at a benefit for Chicago Institute of Psychoanalysis I attended with my husband. The speeches were coma inducing and the chicken awful… I had fun!

Tuesday, July 15, 2014

Tuesday Tips & Tricks: the Poetry of Speed Sketching


A Japanese poetry form, haiku focuses on moments in the environment and connects them to the human condition. They are concise, using only the number of syllables that can be said in one breath. They are expressive, capturing those fleeting moments for us to appreciate. Sounds like Urban Sketching to me!

Many of us Urban Sketchers carry a small sketchbook with us wherever we go. We capture fleeting moments of our days while waiting in line, catching a quick cup of coffee, on the train or bus. Whenever and wherever we can we draw our connection with the world around us.There is a need to be fast and concise!

HOW?

1. Think Small - about the size of a credit card or smaller.

This is a 2.25” x 2” sketch of the view from Starbucks in the Presidio in San Francisco. It's the Place of Fine Arts. I scribbled a few lines while I waited in line and threw on the color when I got back to my car. Pencil and watercolor. Total Time: 3 minutes


2. Keep It Simple - avoid details and the need for perfection. Think simple shapes and values.
This is a 3” x 4.5” (a little bigger than a credit card) sketch expressing a bitter cold evening at Navy Pier in Chicago. Simple shapes and 3 values. Pencil and watercolor. Time: 5 minutes


3. Focus - what catches your attention? Pin point your subject.


About 1x 2.5” sketches done during a long airport wait for a rental car. Continuous line drawing–I filtered out the chaos all around me and focused on the disgruntled and bored people sitting across from me. Gray, fine point Sharpie. Time: 1.5 minutes each


Hint: If you spend more than five minutes on these small sketches you may be putting in too much detail.


WHAT ARE THE BENEFITS OF SPEED SKETCHING?

1. Focus

2. Improved drawing skills

3. Increased spontaneity and freshness in your sketches

4. Rapid planning of ideas for larger sketches or future paintings

5. Great for fast travel sketching, especially when traveling with non-sketchers

6. Confidence

7. They're fun


About 2.5” wide sketches done in the car on a road trip to Ohio. Continuous line, 4 values, simple shapes, watercolor and pencil. Time: I don’t remember but they helped make the long ride go quickly!

Poetry of speed sketching –capturing fleeting moments in time and recording a reaction to them. I call them Tone Poems.