Pages

Showing posts with label #OnLocationSketching. Show all posts

Tuesday, December 8, 2015

An Urbansketching Field Guide


TIPS AND TRICKS TUESDAY - By Angie Hauch

I LOVE to draw in nature. When I'm outside, I never run out of inspiration.  The solitude and tranquility of the outdoors allow me the luxury of close observation.  And when I'm not satisfied with my reference or imagination, I turn to a nature field guide to fill in the gaps and give me some background behind the beauty of what I'm drawing. 


In the past couple of years, I've expanded my sketch-cersizing to urban settings.  Traffic, commotion, claustrophobia, and the anxiety of drawing in public can quickly cloud the beauty the city has to offer.  It's not always easy to experience the same natural peacefulness when drawing in an urban setting.  When I feel the frustrations of urbansketching setting in, I've found it helpful to mimic my outdoor art-making rituals.


Field Notes # 1  Getting Started
Often I start by... simply starting!  I walk around a bit, but I don't let myself get caught up seconding guessing the location, scenery, or problematic perspective... I just start. In this image, I drew the house "blindly" if you will, not thinking about what was important.  After looking at the sketch postmortem, I wanted to know more about the meter reader.   On the following page, I zeroed in on my subject of interest and tried out a few texture techniques.


Field Notes # 2  Challenge Yourself with a Close Up
When my sketch starts to develop, there's usually something; an object, or person, or area on the page that I keep coming back to.  Sometimes I overdevelop it, sometimes under... not knowing exactly how to translate the imagery into my book. Subconsciously in almost every sketch, there is something my brain is forcing my eyes to re-examine.  Instead of overworking an area, work out your curiosity on a new page, or utilize the blank space of your page to create a collage of close ups.  Field guides often revisit an idea multiple times on one page showing different sizes, angles, and levels of detail.


Field Notes # 3  It's art, not science.
If you haven't picked up a field guide in a while, go check one out at the library.  


The detailed line work and accuracy of field guide sketches are simply amazing, but don't let them intimidate you!  These books are meant to be factual and scientific.  As urbansketchers, we have the liberty of interpretation.  Don't miss out on the potential for growth because you want your page to look pretty or professional.  An artist's sketchbook/field guide might include things like color palettes, ink splats, texture try-outs, and value scales.  

In this image I needed to see the palette literally right on the page.  Even after drawing 8 tomatoes, I still wanted to show something even more bulbous. 


What would be in your field guide? Comment below and share your sketches!

Tuesday, September 8, 2015

September Morn – Nudging the Muse

Sea Grass, Long Boat Key

Tuesday Tips & Tricks:

It’s been a long time since I’ve gone to school or even had children in school, but to me September is still the beginning of the New Year. It signals not only the end of summer but a fresh start filled with growth and possibilities.

Here on the USk-Chicago blog September is the beginning of a new round of Tuesday Tips & Tricks, aka #TTT. We’ve added two new contributors to our Tuesday ranks. Welcome, Angie Hauch and Ted Gordon! If you were a participant in their workshops at our summer seminar you know why we’re excited to add them to our roster!

A September Ritual

For me, September is the time I examine my creative rituals and make sure they haven’t become just unproductive habits. Dancers have warm-up routines before taking the stage. A singer vocalizes before a performance. Athletes have rituals, too. Think of a golfer, getting ready, stepping up to the tee or batter to the plate. Each goes through a ritual and the swing follows. Why do I have rituals? (I mean besides keeping me from falling down the social media rabbit hole of FB, Instagram, Twitter, and email.) They act as warm-ups for the day or project and flip the creative switch to ON. Do they always work? No, just ask the golfer in the sand trap, but it’s good to have a familiar process to help face the blank page.

Nudging the Muse

Here's a ritual I've followed for a long time when sketching and painting on location. It’s a four-step process.
  1. Take a few minutes to look around the area, to walk around if possible.
  2. Focus and ask, “What jumps out at me?” “What’s the story of this place?”
  3. Scribble two or three quick thumbnails of step 2.
  4. Choose one of the thumbnails to be the basis of a larger sketch and begin.
Long Boat Key, thumbnails

Sometimes I don’t get to step 4. I don’t even think about it. The switch has
been flipped. The ritual has done its job. I’m lost in the process and enjoying the ride.

Long Boat Key, thumbnails

#TTT

Research shows that performance and creative rituals have real benefits for those who practice them. They give us focus, create a positive mindset, and help win the procrastination war. If you don't have one give it a try. Do you remember something you did before a particularly fruitful creative session? That's a good place to start. It can be as simple as lighting a candle or listening to a particular piece of music.

In planning a creative ritual:
  1. Keep it simple and easy
  2. Make it unique to the action you want to trigger
  3. Use it. Repeated use reinforces the connection with your desired endeavor
  4. Enjoy the process

If you do have a creative habit that works for you, share it here! love reading about the creative habits of others. 

 Recommended Reads:

Anything by Danny Gregory           

Thursday, August 20, 2015

Urban Sketching Tells The Story of Our Surroundings

USK Chicago SketchCrawl at Blick Art Materials, Evanston, IL: 
In case some of you missed the story behind this sketch, this great old 1958 Triumph TR3 was sitting across from Clark's on Clark Street in Evanston. Thank you Lee Solock for pointing it out to me smile emoticon


I met the owner of the car, a woman named Amanda, when I was about halfway done with the sketch and she and her friend came out of Clark's. As they loaded into the car, I thanked her for letting me sketch her car. Surprised, she asked to see the sketch (which was only halfway done at the time) and she told me that this car has always been in the family and it was most recently her late father Chuck's. In her words "I'd really rather have my dad, but at least I get to drive his car around." He also loved to eat so now she honors her dad by driving this car out to eat someplace. 

I told her that now I was honoring him by sketching his car. Actually leaving the scene required a can of starting ether from the glove box and undoing the hood latches. Isn't it nice when a lady knows her way around a vintage car like this?


After I had finished this sketch, I scanned it and sent a copy to Amanda and she told me the rest of the story. It turns out that this little car was recently shipped in a U-Haul from Wisconsin (because a normal car carrier is too wide) and that I happened to capture this car on its maiden voyage since that trip. She said that the trip to Clark's was intentional and she had no idea that I would be there to artistically record this special day. 


Urban Sketchers Manifesto (from UrbanSketchers.org)
  1. We draw on location, indoors or out, capturing what we see from direct observation.
  2. Our drawings tell the story of our surroundings, the places we live and where we travel.
  3. Our drawings are a record of time and place.
  4. We are truthful to the scenes we witness.
  5. We use any kind of media and cherish our individual styles.
  6. We support each other and draw together.
  7. We share our drawings online.
  8. We show the world, one drawing at a time.

Tuesday, August 19, 2014

Tuesday Tips & Tricks: … and We Share Our Work Online

So you went out, sketched, and your sketch turned out rather nice. You want to share it with your friends on USk Chicago group and on your blog and on ….

You took a picture of your sketch or perhaps you scanned it, and it looks like this - flat and grayed out and, for heaven's sake, crooked.


What can you do? You don't have Photoshop, you are just a regular sketcher and cannot pay prices equal to GDP of a small country for a piece of photo editing software.

The answer is  GIMP! GIMP is the GNU Image Manipulation Program. It is a freely distributed piece of software for such tasks as photo editing, image composition and image authoring. It works on many operating systems, in many languages. You can download it here - http://www.gimp.org/downloads/.

The urban legend has it that a few former Adobe cowboys/engineers with a grudge of some sort got together and produced this "almost Photoshop" amazing piece of software and put it up for everyone to use. I don't know if this is true, I read it on the Internet :). But one thing is true - GIMP is FREE under Creative Commons License.

Anyway, download your free GIMP and install it. Now you are ready for action.

Here are steps we are going to take:
  1. Rotate
  2. Crop
  3. Curves to restore contrast
  4. Unsharp Mask to sharpen details
  5. Scale to reduce size
  6. Export to save the file
Let's do it step by step. Open GIMP on your computer and open your unprocessed sketch in GIMP. Let me know if you need help with that and I will add a Step 0 to this tutorial.

Step 1 - Rotate

Click the Rotate button in the Tool Box on the left panel and you will see a grid come up over the sketch and a Rotate window open.


Grab the corner of the image with your cursor and rotate. When the level will look satisfactory release the cursor and click Rotate button in the Rotate window. The rotated image will look like this:


Step 2 - Crop

Click Rectangular Select button and drag your cursor over the sketch creating a rectangle. Manipulate the selection in such way that it is nice and tight around your meaningful image.


When satisfied with your selection, click on Image menu and then on Crop to Selection.


Your sketch will look like this. Nice!


Step 3 - Curves

Photographing or scanning an image grays out colors and and reduces contrast. We will restore that using Curves. Click on Colors menu and then click Curves.


A Curves work window will come up. The diagonal line in this window determines your values and contrasts. Play with it by dragging it with your cursor to see what happens to the sketch due to your action. When tired of playing, get back to work :)! Drag the line into a shallow S curve and nudge its curves up and down a little until contrasts and colors in your GIMP image resemble your sketch on paper in real life. Click OK when satisfied.


Step 4 - Unsharp Mask

Photographing or scanning an image not only grays out your colors and flattens values, it also reduces sharpness. We will restore it in this step. Click on Filters menu, then select Enhance, then Unsharp Mask. You could also work with Sharpen at this level, but Unsharp Mask is smoother and produces less digital noise.


A work window will come up. Drag the levels so some meaningful portion of sketch is shown in the Preview window. Set Radius to 5.0 and Amount to 0.50. Threshold can be 0 or 1, I cannot see any difference between them. These settings will give you a nicely sharpened image and will not introduce too much aberrations. Click OK when done.


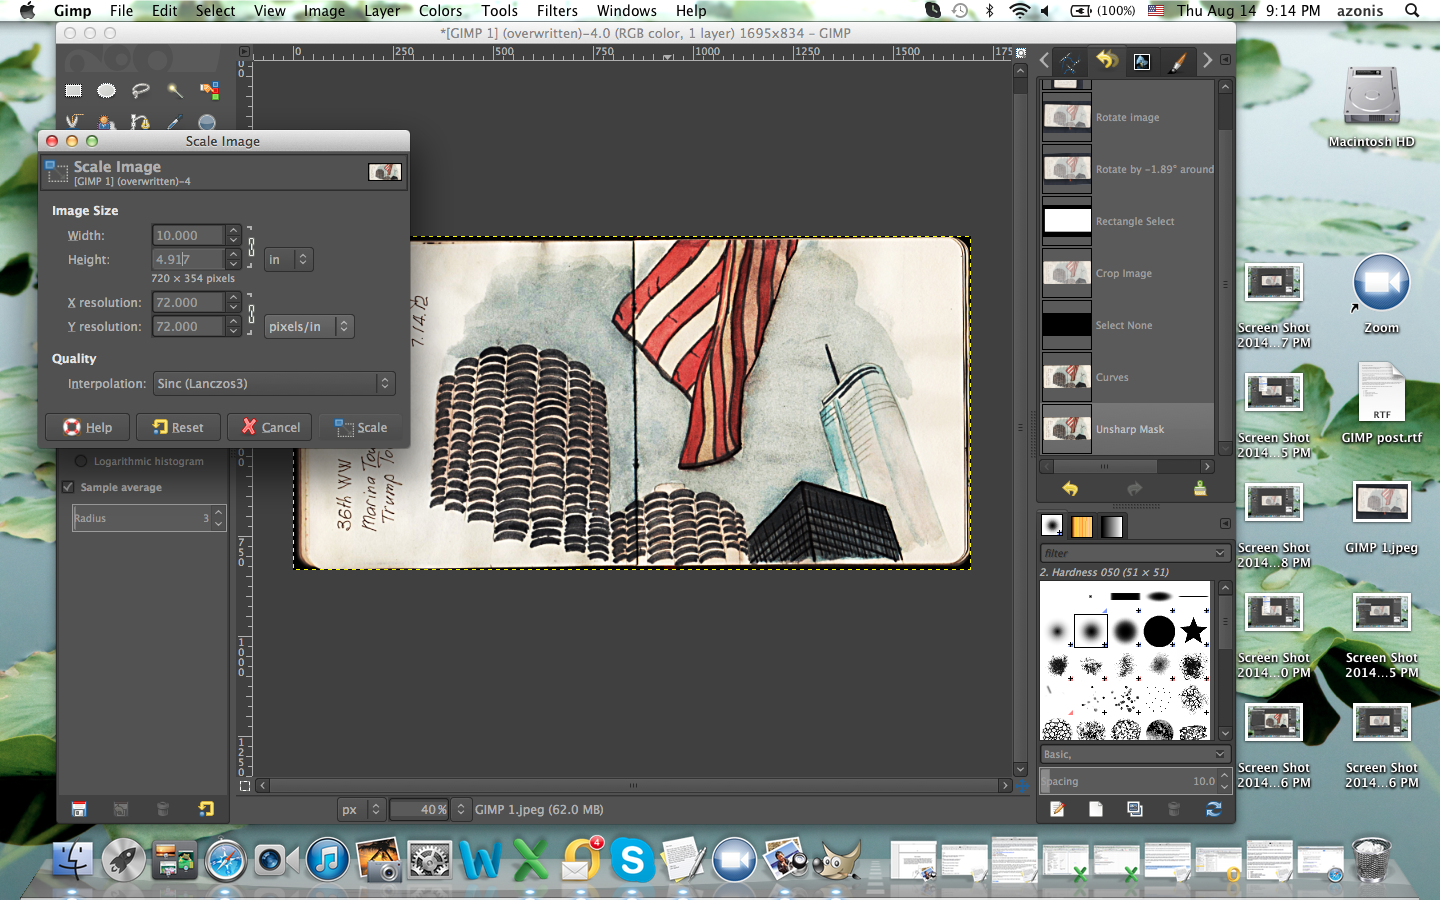
Step 5 - Scale Image

Many images coming from cameras or scanners are big, or sometimes you hear them referred to as fat. They have a lot of megabytes in them and can slow down loading pages. It makes sense to slim them down by reducing resolution and size. Click Image menu and then Scale Image.


A work window will come up. If you are preparing the image for displaying it online a resolution of 72 dpi is good, and size should not be bigger than a laptop screen. 


My images for the web usually are about 10x8" and 72 dpi. This is what we are going to do here. Click Scale when done.


Step 6 - Export

We have a very nicely processed sketch now. Time to save it. Unfortunately, some terms in GIMP are not as intuitive as we might wish, and clicking on Save will not produce a file type we want. Instead click on File menu and then select Export. This will allow to save the file in your computer directory in a JPEG format (or many other formats if you want them). But JPEG will do nicely :).


And here's our result - ready to share!


We hope this is helpful, and we will be seeing many shared sketches on USk Chicago group from now on.

Tuesday, July 22, 2014

Tuesday Tips & Tricks: Sketching Blindly in the Dark

How many times did you have to attend a boring event? Yep, me too. Often it is a fancy party or a benefit for some very noble cause you get to attend with your spouse. It is their cause, and you are just along for solidarity and support. Yawn! 
But don't fret! We got you covered! All you need is this:


A little book and a pen will fit in your evening clutch or sport coat pocket. Get them out when they will begin speeches. Keep your eyes on the speaker. It is too dark to see anything on your paper anyway. Have the pen touch the paper and go. Trace the shape of his head with your eyes and let your fingers follow with the pen. Then his neck and shoulders. What is he wearing? Trace those lapels. Is there any hair? Add it, if applicable. If you want, you can glance down at your paper every so often - this is not a test.


When you have the basic outline down add some darks. Just scribble in any way you like to create dark masses. Add facial features without being too specific. Put in some details, if you have time: a tie, a necklace if any. You are done. Turn the page and find another victim attendee.


You may find that your heads are sometimes detached from shoulders. Facial features may land outside the heads, a tie may be pinned to a shoulder like a tail on a donkey. This all is fine and even great, you don't have to show your drawings to anyone. You will also find these sketches oddly expressive and free. And you will realize that you are no longer bored. In fact you may not even notice that they finished with speeches, and it is time for the rubber chicken. Good. You can sketch that woman sitting across from you.


What you are doing is practicing blind contour drawing.  Blind contour drawing is a method of drawing where an artist draws the contour of a subject without looking at the paper. This artistic technique was introduced by Kimon Nicolaïdes in The Natural Way to Draw, and then made popular in Betty Edwards The New Drawing on the Right Side of the Brain.


Nicolaïdes instructed his students to imagine that the pencil point is actually touching the contour of the subject. He suggested that the technique improves students' drawings because it causes students to use both senses of sight and touch. Blind contour drawing trains the eye and hand to work as a team, and it helps to really see all of the details of the object. 
The drawings above I sketched blindly in the dark at a benefit for Chicago Institute of Psychoanalysis I attended with my husband. The speeches were coma inducing and the chicken awful… I had fun!

Tuesday, July 15, 2014

Tuesday Tips & Tricks: the Poetry of Speed Sketching


A Japanese poetry form, haiku focuses on moments in the environment and connects them to the human condition. They are concise, using only the number of syllables that can be said in one breath. They are expressive, capturing those fleeting moments for us to appreciate. Sounds like Urban Sketching to me!

Many of us Urban Sketchers carry a small sketchbook with us wherever we go. We capture fleeting moments of our days while waiting in line, catching a quick cup of coffee, on the train or bus. Whenever and wherever we can we draw our connection with the world around us.There is a need to be fast and concise!

HOW?

1. Think Small - about the size of a credit card or smaller.

This is a 2.25” x 2” sketch of the view from Starbucks in the Presidio in San Francisco. It's the Place of Fine Arts. I scribbled a few lines while I waited in line and threw on the color when I got back to my car. Pencil and watercolor. Total Time: 3 minutes


2. Keep It Simple - avoid details and the need for perfection. Think simple shapes and values.
This is a 3” x 4.5” (a little bigger than a credit card) sketch expressing a bitter cold evening at Navy Pier in Chicago. Simple shapes and 3 values. Pencil and watercolor. Time: 5 minutes


3. Focus - what catches your attention? Pin point your subject.


About 1x 2.5” sketches done during a long airport wait for a rental car. Continuous line drawing–I filtered out the chaos all around me and focused on the disgruntled and bored people sitting across from me. Gray, fine point Sharpie. Time: 1.5 minutes each


Hint: If you spend more than five minutes on these small sketches you may be putting in too much detail.


WHAT ARE THE BENEFITS OF SPEED SKETCHING?

1. Focus

2. Improved drawing skills

3. Increased spontaneity and freshness in your sketches

4. Rapid planning of ideas for larger sketches or future paintings

5. Great for fast travel sketching, especially when traveling with non-sketchers

6. Confidence

7. They're fun


About 2.5” wide sketches done in the car on a road trip to Ohio. Continuous line, 4 values, simple shapes, watercolor and pencil. Time: I don’t remember but they helped make the long ride go quickly!

Poetry of speed sketching –capturing fleeting moments in time and recording a reaction to them. I call them Tone Poems.