Pages

Showing posts with label Sketch. Show all posts

Tuesday, December 1, 2015

Ditch Your Eraser

USk Chicago: Tuesday Tips & Tricks by Ted Gordon

What’s the fastest way to improve your drawing?
Ditch your eraser.

How can I get a decent image of my pencil sketch online?
While you are at it, ditch your pencil; draw in ink.

GOING ERASERLESS:
The more you do something, the better you get at it. When you are studying what something looks like and practicing rendering it, you are improving your drawing ability. When you are erasing those marks, you are practicing erasing, not drawing. Don’t worry about stray marks, just keep drawing.

Another way I like to put this:
Everyone has thousands of terrible drawings in them. The sooner you get them out, the better. Erasing will only slow you down.

INK:
Committing to eraser-free drawing is easier, if you draw with something difficult to erase.

A huge benefit of drawing in ink is that it photographs well! You don’t have to sharpen an ink drawing, adjust its contrast or do anything! If you do, it handles those adjustments much more simply and clearly than a graphite drawing.

Create cleaner drawings. Ink, compared to graphite, stays where it’s put and doesn't need fixative applied to make that happen. It’s less likely to smudge and, depending on which ink you use, can be more or less waterproof.

Draw with Confidence!
If you are nervous about abandoning your eraser, you may be surprised how drawing with ink can make your marks more bold - in more ways than one.
Using a pen encourages you to be more deliberate. That creates a cleaner, more elegant line, in my opinion.
Conversely, if that ‘tightens you up’, go nuts. Put all those lines down there. As long as you are looking and drawing, you are improving.

CONCLUSION
In conclusion, I highly recommend drawing without your eraser, if you haven’t. You’ll notice that many Urban Sketchers are drawing in ink already. My recommendation comes from the advice of greater artists that have preceded us as well as my own experience, seeing this improve my drawing and the drawings of my students.

You can see my Urban Sketches and Plein Air Paintings here: http://www.tedgordonart.com/ http://instagram.com/motionimpossible

What do you think? Have you experimented with leaving your eraser out of the picture? What other reasons do you like to draw without your eraser, or in ink?

Tuesday, October 27, 2015

How Urban Sketching and Plein Air Painting Compare and Contrast

TUESDAY TIPS & TRICKS, by Ted Gordon


How are the Urban Sketchers and Plein Air Painting movements related?

As an artist with a hand in both and with our upcoming combined show, the Urban Sketchers Chicago Holiday Showcase, with Featured Guests, Plein Air Painters of Chicago 11/21-12/13/2015, let’s examine similarities and differences.


HISTORY
Technology had something to do with the formation of both. Plein Air means "in the open air" or simply, “outdoors.” The technological advance of paint in tubes allowed artists in the mid 1800s to explore nature and capture the effects of sunlight in the moment. Urban Sketchers is about drawing on location, in a supportive, global community. The internet was key to its formation and is integral to the global sharing aspect.


Plein Air: Elephant Vigil at Showmen's Rest, A Plein Air painting in a limited palette of Richeson casein
SIMILARITIES
Both groups create images on location, in the moment.
With some exceptions, the size of our drawings and paintings tend to be small, for reasons of both portability and time.
We travel with our materials. Watermedia (watercolor, gouache, and casein) and digital tools are used in either. Of all of these, watercolor is the most popular crossover medium in my experience.
We’re both interested in capturing the Truth of a place and time, exploring the world around us.


Fountain of the Muses, Rio De Janeiro, in Winsor & Newton watercolor
DIFFERENCES
There are exceptions to all of these items, however, in general, the differences tend to be about time and materials. Plein Air Painting tends to take much more time per image and is painted with paint or pastels. Urban Sketches can be created in much less time and may use any material.


Urban Sketches tend to be even smaller than a typical plein air painting. When you consider that an Urban Sketch might be drawn on a pocket-sized sketchbook while waiting in line, as opposed to being created on an easel set up for several hours, you can understand why.


Urban Sketches, without question, can also be drawn indoors. Cafes, museums, and concert venues are all typical Urban Sketchers venues. Exceptions prove how similar these efforts are. In both Plein Air Painting and Urban Sketchers, the world is our studio.


Based in its journalistic roots, Urban Sketchers aims to tell the story of our surroundings. Urban Sketches are far more likely to contain text within the work than in a Plein Air painting.
The story of a Plein Air painting can be much less literally narrative. For instance, the story could be about what the sunlight is doing during your painting or how intensely blue that boat is.


Plein Air is almost always done on an easel. Urban Sketching sometimes is, but often isn’t, for mobility and quickness.


While Plein Air paintings are made with paint or pastels, Urban Sketchers draw with any kind of media and wildly individual styles. Plein Air styles, while they can be quite varied, aren’t as divergent as the Urban Sketchers styles can be, in my opinion.


Urban Sketchers tends to be more casual, mobile, and quick. Urban Sketchers’ subjects are more likely to have a person or an action as the subject. In contrast, plein air paintings often take much more time to complete and are more likely to contain natural environmental or architectural subjects.


Plein Air painters are more likely to edit an environment for aesthetic purposes. A tree might move or wires might be omitted without feeling that the truth of the place had been compromised in plein air.


Lindberg Park, painted in Winsor & Newton watercolor on location. Are these Plein Air or Urban Sketches? Yes!

CONCLUSION
In conclusion, I think that some of the differences are superficial, while others are very strong. Which you are doing at a given time may have more to do with your equipment and intention than anything else. There are definitely times when the lines are blurred. To be clear, I don't make a value judgement between the two and there's no reason you can't do each in the same day.
For artists that like to experiment, I encourage you to try both!


You can see more of my work, Urban Sketches and Plein Air Paintings here:

What do you think? In what other ways are Urban Sketchers and Plein Air Painting similar or different?

Tuesday, October 6, 2015

One Spot - Two Different Subjects

A couple weeks ago I had the opportunity to spend an afternoon in the loop, riding my bike, sketching and taking photos.  One of the reasons I love living in the city is the ability to hop on Lake Shore Drive bike path and just ride and see where the day takes me.  After a recent guided kayaking tour I took with my wife on the Chicago River, I was inspired to return to one of the major stops, near Merchandise Mart and the recently finished river walkway.  I found a nice spot on the Franklin Street Bridge.  With a great view east, down the river towards Michigan Avenue, I started off with this loose ink sketch of the skyline.  I normally like to lay out my sketches in pencil, but just decided to go for it in ink with this one.  I tend to be a perfectionist.  I like to spend my time making a sketch work well, often times, too much time.  However, diving right into this ink drawing was a real nice change of pace and really freeing, creative experience.  Instead of making sure each line was completely straight, I allowed the pace of my drawing to dictate the characteristics of the sketch.  All in all, I was really pleased with how it turned out and was able to capture the essence of the skyline with gestural lines, stippling and some hatching.


The beautiful thing about being in the Loop is that there is nearly an endless supply of things to sketch.  Having finished the skyline sketch, I stayed in the same spot and sketched the Franklin Street Bridge House, which was a lot closer to me and allowed for some greater attention to material, proportion and detail.  The lighting and shadows were changing very fast so I penciled in a rough outline and indicated where the shadows were at the time.  By the time I finished the pencil sketch, the shadows had already changed and disappeared.  I then inked the drawing with a fountain pen and Faber Castell Cold Grey IV 233 PITT artist pen.


These two sketches were both done in a Stillman and Birn Epsilon sketchbook, which has become my go to sketchbook for pen and ink sketching.  For a long time, I have had a tendency to go back and forth between one sketchbook and another.  I would bounce between a sketchbook geared toward watercolor, to one with ivory colored paper to another with grey toned paper.  But, I've enjoyed this Epsilon paper so much, I've been diligent in filling it up.  This sketchbook is shaping up to be one of my favorite collections of sketches yet.   I look forward to filling it up and seeing where the rest of the pages take me.

You can see more of my work and sketches on Instagram: @abillustrator and my professional website www.AndrewBanksIllustration.com.

I am trying to savor the last precious days of nice outdoor sketching weather before Chicago winter returns.

Until next time!

Andrew

Tuesday, September 30, 2014

Drawing Architecture: Sighting Size and Proportion

In my last post “Perspective for the Urban Sketcher:Sighting” I shared a technique for drawing in perspective.  With some of the feedback I received from that post, I was reminded of a related, yet different technique that can be used with sighting.  Sighting can also be used to gauge size and proportions.  In this post, I will build upon the sighting technique and show you how to draw architecture, simplifying an elevation down to large, simple shapes and using architectural features as measuring devises.

If you've ever spent time observing architecture, you've probably noticed that there are almost always some degree of pattern and relationships between different shapes and masses.  Whether they are windows, doors, columns, arches, roofs etc... they are all sized and proportioned in relationship to one another and to the building as a whole.  An urban sketcher can use different elements of a building as tools to his/her advantage, especially when sighting.

When sketching architecture, size and proportions are dependent on your distance from and relative position to your subject.  So, before getting to the steps, the following rule must be followed in order for this technique to work:

Remember, once you decide where to sit and sketch, you must stay in the same spot until you have at least marked out all sizes and proportions.  (Once you move, your distance and relative position to the subject changes, and your sighting approximations will be inconsistent).

Sighting Size and Proportions: Step by Step

1) Take a few minutes to observe the building, pointing out some of the major shapes, structural features or patterns.  When sighting for size and proportion, you will draw your building starting with the larger masses of the building, moving down to the smallest masses and details last.


2)
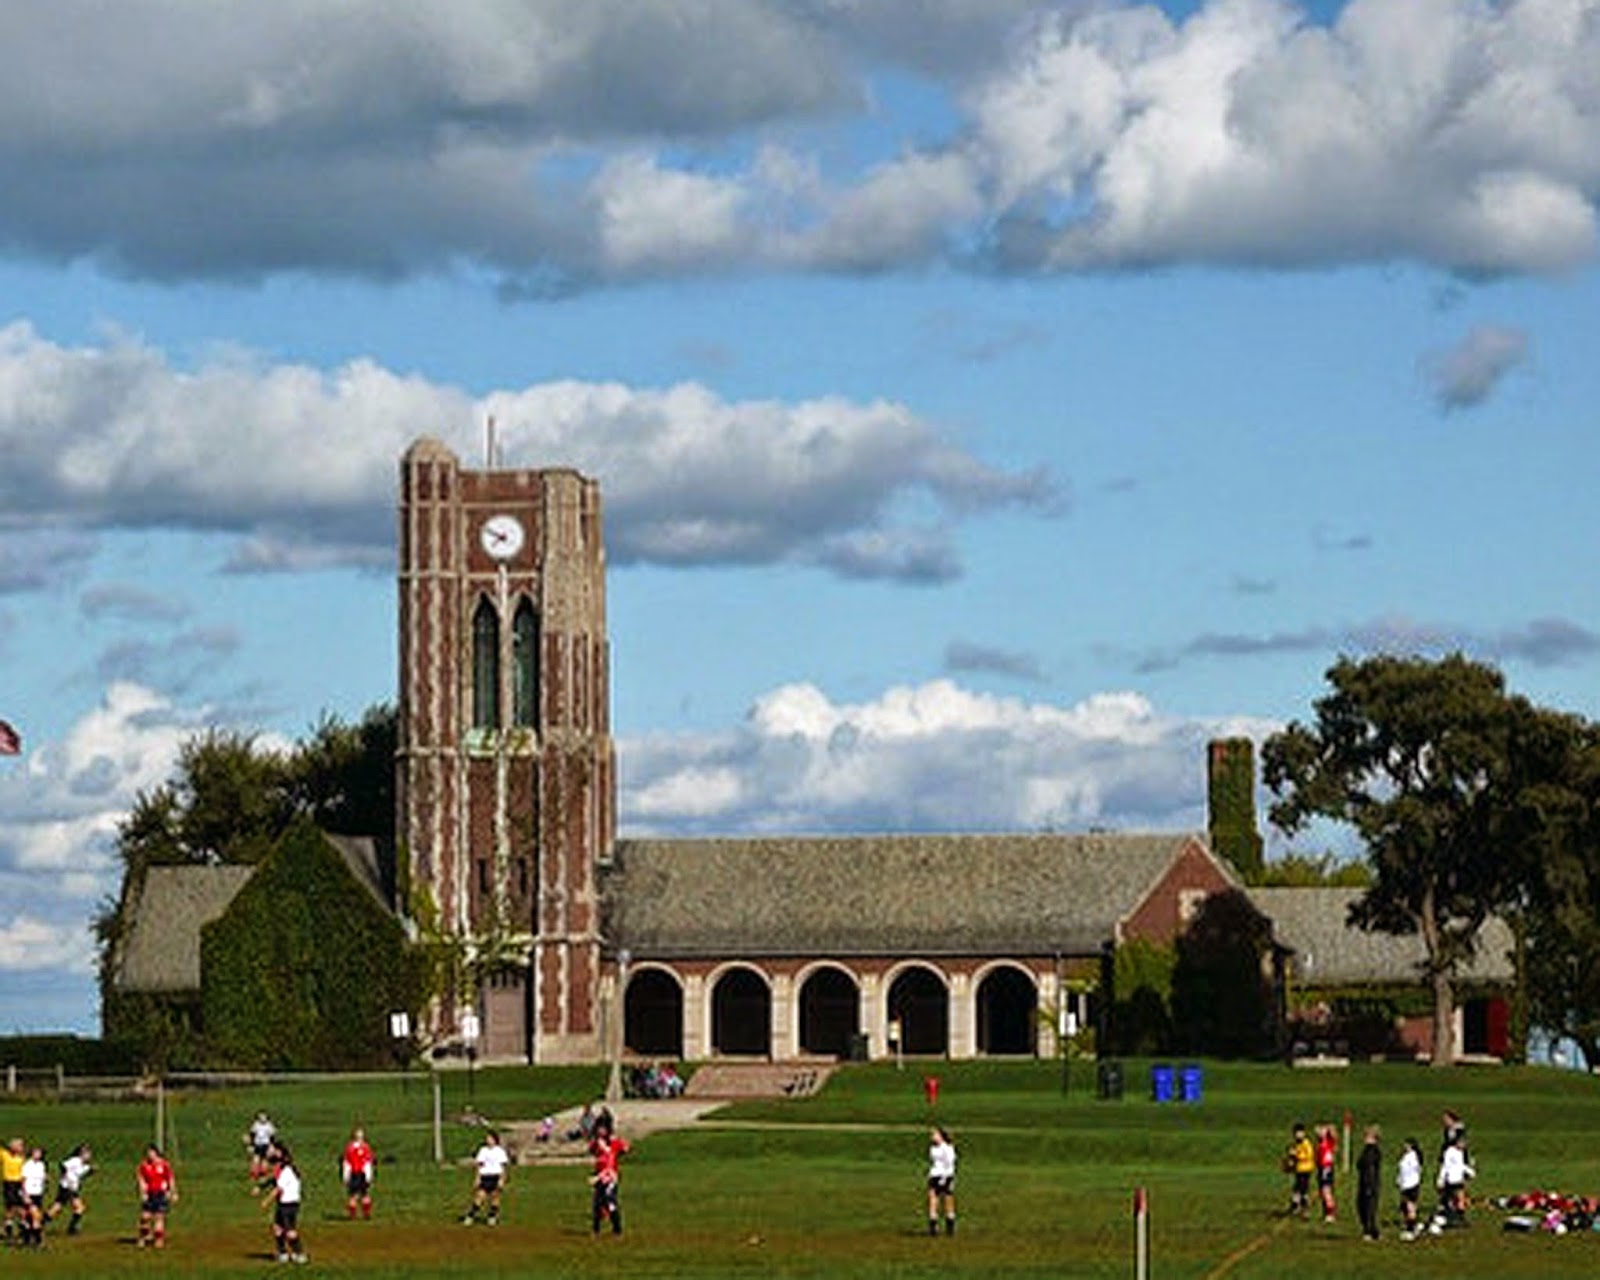
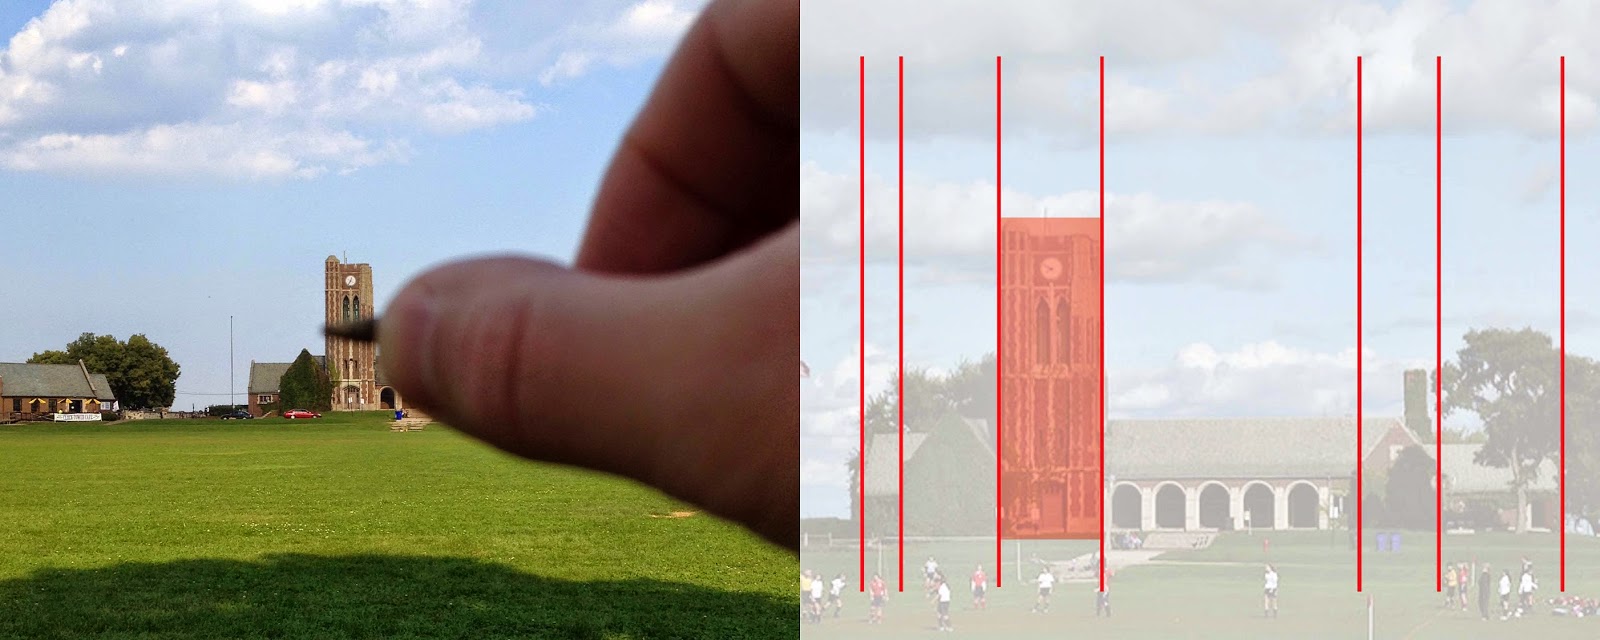
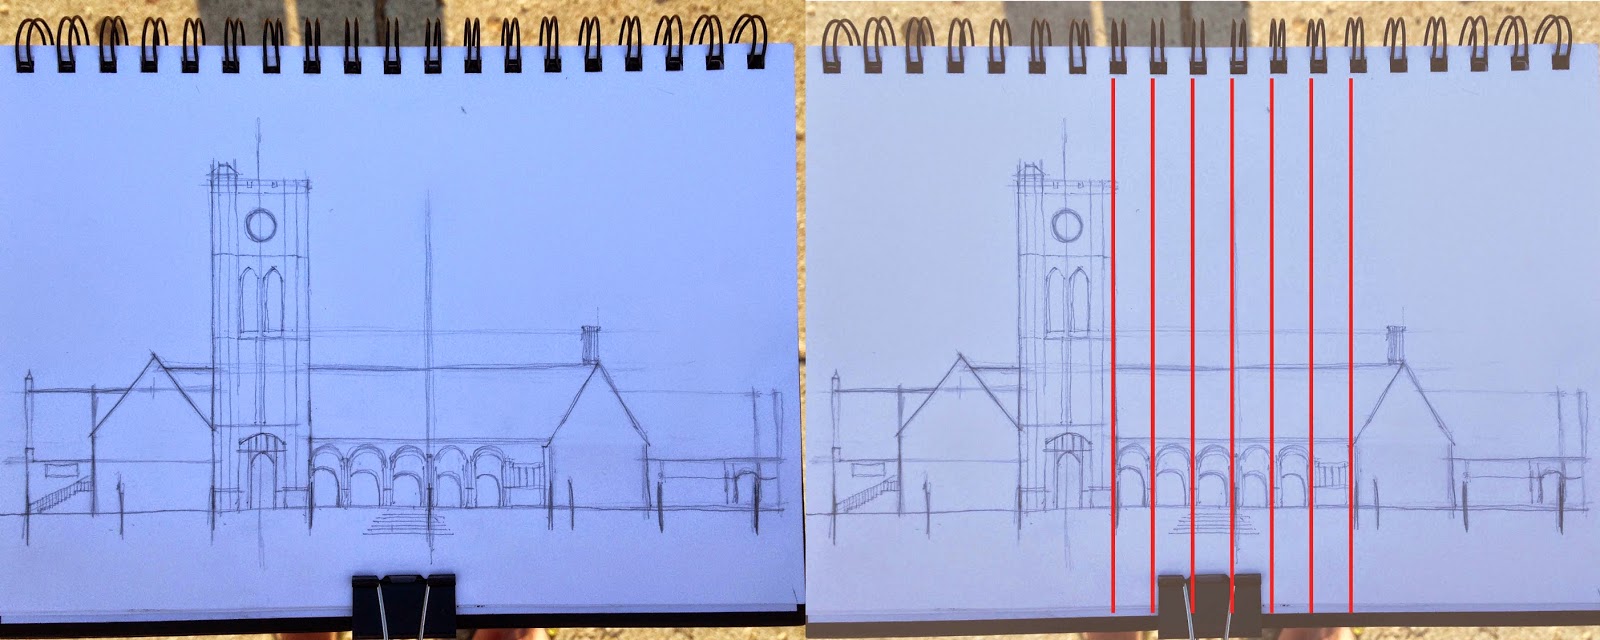
Chose one feature of the building to use as a measuring unit.  I chose the width of the tower.  With your sighting tool (pencil, wooden skewer etc…), fully extend your arm out, placing it in front of the architectural feature.  (It helps to close one eye and squint).  Move your thumb along your sighting tool until it reaches the edge of the architectural feature, essentially measuring the feature’s width.  This will become the measuring unit for the majority of the sighting.  So, all measurements will be in X number of tower widths.


3) 
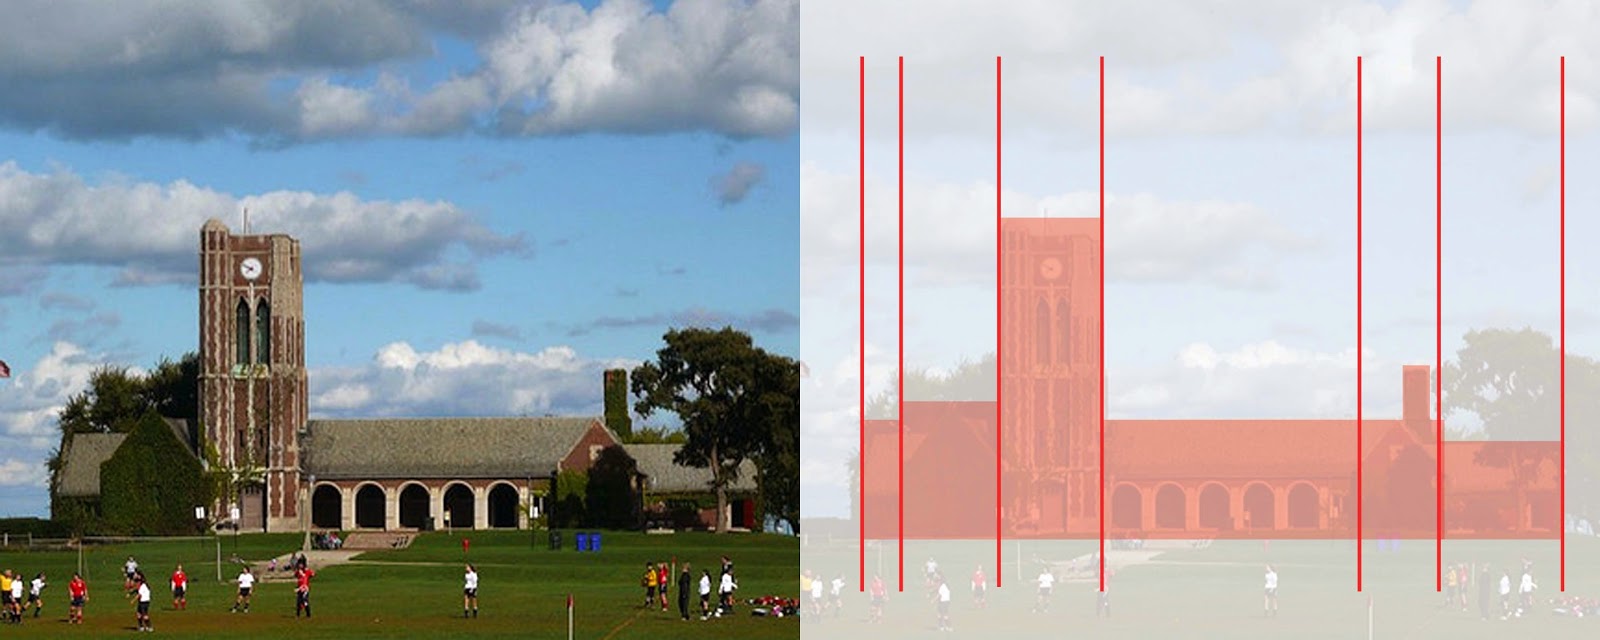
Measure the width and height of the building.  The length of this building was about 8 tower width’s wide.  The tower was 3.5 tower widths tall, and the roof heights changed at different locations, but ranged from 1.5-2 tower widths tall.  Use tick marks and guidelines to help visualize your measurements.  Here I marked out the overall length of the building at slightly more than 8 widths.  Use guidelines for all of your measurement.  You will begin to see how different parts of the building relate to one another.


 4)
Mark out all the other large masses.  In this building there were essentially 6 large masses that comprised the entire elevation.  I sized each portion based on my measuring unit, the tower width.


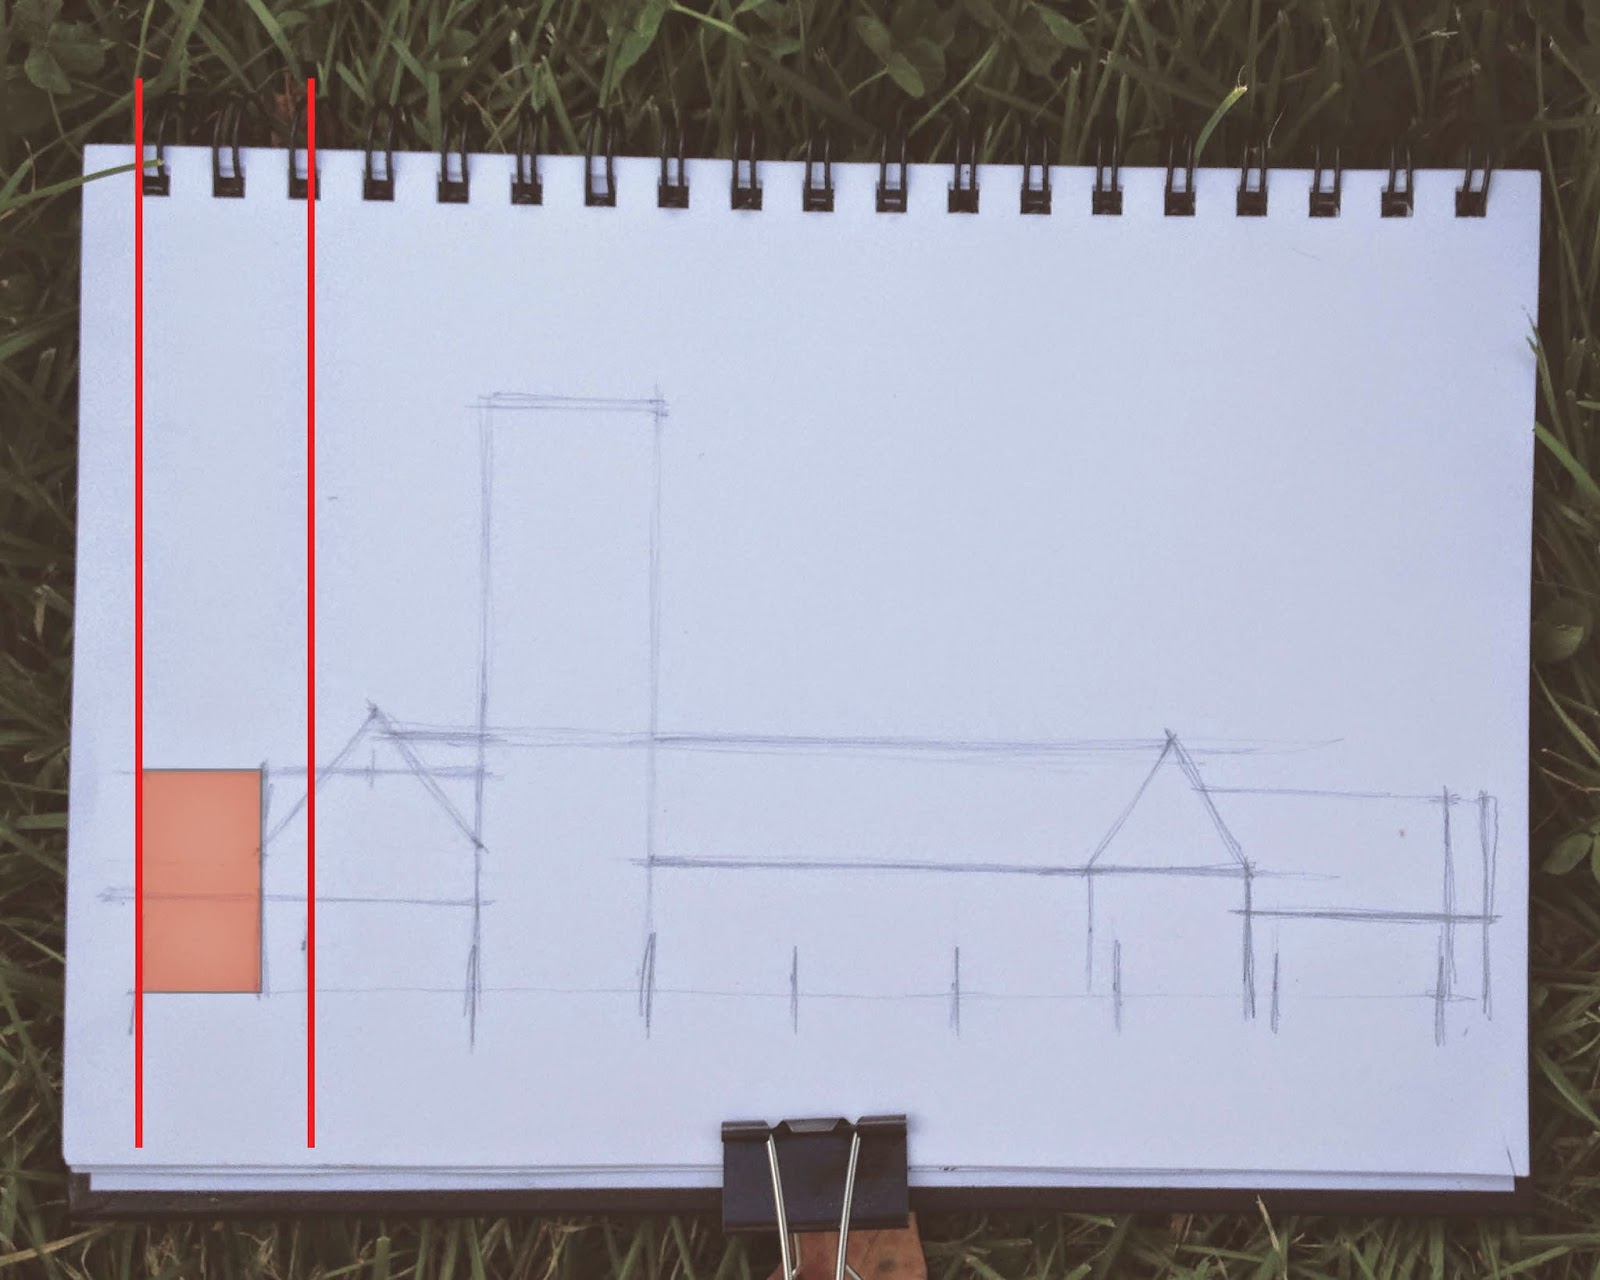
The 8 tick marks I made on the length of the building helped as guidelines.  So for example, I sighted that the first mass (farthest left) was about ¾ of 1 tower width.  Since I have the tower width marked out, I was able to draw my vertical line for that portion of the wall at ¾ of the way through the first tick mark.  Repeat these steps for the rest of the masses.


5)
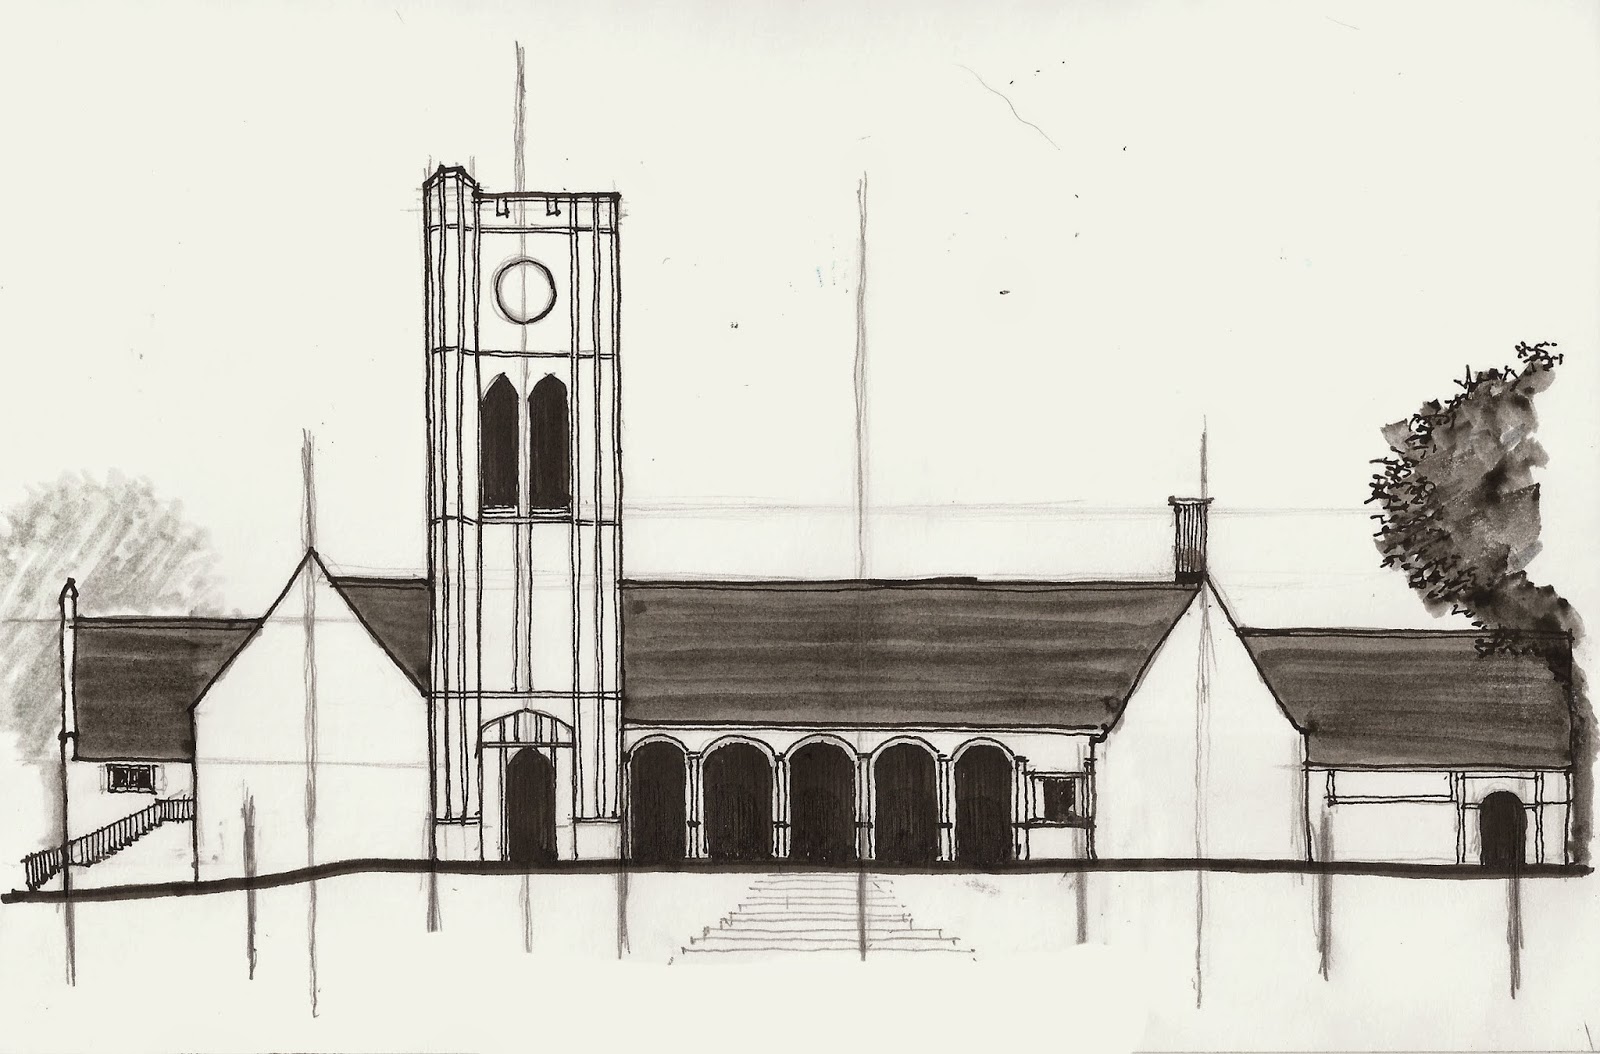
Now that you've marked out the largest masses of the building, move to the medium sized masses.  For me these were the arches, windows and doors.  The colonnade of arches is nicely divided into 6 uniform bays, so I was easily able to divide the middle portion of the building up into 6 equal parts.  Use this type of logic for the rest of the details.  (If your details are not evenly spaced, simply use a smaller architectural element as your measuring unit to determine the distances and proportions you need.)


Now you can begin to add details, value, shading and shadows.


Once you feel comfortable sighting sizes and proportions on a building at a straightforward view, you will be ready to combine the techniques of perspective with those in this post.

I hope this is helpful!  As always, let me know if you have any questions!

-Andrew


Tuesday, September 2, 2014

Tuesday Tips & Tricks: "Perspective for the Urban Sketcher: Using the Sighting Technique"

One of the most challenging techniques to master in on-location sketching is perspective.  Many people shy away from architectural, city scenes or subjects involving vanishing points because of all of the rules involved.  Even when following the rules, it’s pretty difficult to achieve a completely accurate record of the actual scene.  Most of the time when we sketch on location we use small to medium sized sketchbooks.  More often than not, the vanishing points will fall well off of the edge of our pages, making it impossible to calculate the actual vanishing points.  Lastly, when we are urban sketching, we don’t always have a lot of time to analyze and perfect the perspective.  However, a technique I use, called Sighting, will enable you to draw in perspective quickly, and without needing to fully construct a perfect set of vanishing points.

Sighting is based off of the principles of perspective, but is a shortcut, so to speak, and a great, simple trick to use in both shorter and lengthier sketching sessions.

Before moving to the step by step explanation, there are 2 rules that must be followed in order for this to work.  Keep these in mind while reading about and using the technique.  These rules are crucial and sighting will not work unless they are followed.

Rules:
  • Once you decide where to sit and sketch, you must stay in the same spot until you have at least marked out your perspective lines.  (Once you move, your point of view changes, thus your horizon line and vanishing point(s) will change as well).

  • For consistency, hold your sketchbook in one position until you have at least marked out your perspective lines.  For example, if the sketchbook is sitting flat on your lap for the first half of the sketch, do not tilt it up for the second half of the sketch.  This will ensure consistency in the transferring of your lines.

Sighting: Step by Step

1) I use a thin, straight, wooden skewer and that I carry with me all the time in my travel kit.  A pen or pencil will work fine too, but the longer and thinner the sighting tool, the more accurate of a reading you will get and the easier it will be to see.  About 6”-8” is plenty.


2)
Hold the sighting tool at one end.

3) Fully extend your arm out and hold the sighting tool parallel with your body.  This is important.  Do not tilt the tool outward towards the subject, or inward toward your body.  You will only get an accurate reading if the tool is parallel with your body.

4)
Align the tool with the edge of the receding line.  Here I am aligning it with the roof line of the building.  (You will want to place your tool directly on top of the edge when actually doing this.  I put the tool slightly above the edge so it easier for you to see.)  Imagine the hands of a clock.  Only rotate your tool like the hands on a clock would rotate around the center point.

5) Hold the angle of the tool and slowly place the tool on your paper and draw the line.  (I do not mean to imply to use the tool as a ruler, just as a visual guide.)  I usually map out perspective line in pencil because you will need to double check and edit your lines as you go.  The more you do this, the better you will get at transferring the lines and soon enough you will not need to edit. 


Therefore, once you have drawn your line,

6) Double check your line and repeat steps 3,4 and 5 again to make a revised version of the first line.  With a line already drawn, it is easier to compare what you have drawn to what you are sighting, and you can make changes relative to what you have drawn.

7) Repeat steps 2-6 for all of the lines you do not feel comfortable free handing and remember to follow the two rules I mentioned at the beginning.

Here is quick sketch I completed using the sighting technique.  Take a look at all of the different angles that are transferred to the sketch.


I hope this is helpful!  Feel free to ask any questions!

-Andrew Banks 

Tuesday, August 5, 2014

Tuesday Tips & Tricks: "Framing a Sketch"

Framing a Sketch
   
Have you ever made a sketch that you felt was missing something or was unfinished?  Couldn't figure out exactly what it needed?   A well thought through sketch can mean many different things depending on who you are talking to, but for me, one of the most important factors of a beautiful, well composed sketch is how it is framed.  I’m not talking about ripping your sketch out of your sketchbook, taking it to Michael's, having it matted, thrown in a frame and calling it done (although many of your sketches deserve to be framed), because that would be too easy and this post would be a waste of your time.

So what do I mean by framing a sketch?  Here are a few bullet points on what framing a sketch is, followed by just a few of my favorite examples and techniques:

Framing a sketch:   
  1. is to compose or arrange the subject of your sketch in a way that draws attention to the most important part of your sketch
  2. is the ability to draw your viewers eyes to what you want them to see
  3. is putting your sketch in a position to be resolved, and finished compositionally
  4. can be done not only for long, involved sketches, but ALSO for quick, on the go sketches
Examples:
Here a few of my favorite framing techniques:

Isolation:
Pick one object out of a particular scene and draw it so that it can stand alone and still look complete. Instead of capturing everything you see, just pick one object.  Here I drew the Villa Rotunda, and centered it on the page.  In order to suggest what it’s surrounding looks like, to resolve the sketch, and to give the building something to visually rest on, I drew a wavy line that very quickly begins to suggest where it is.  The line centers the building within everything that is drawn, and makes the building the focal point.
© Andrew Banks 2014

Incorporate the Subject:
This might be one of the most popular techniques.  Use your subject to your advantage.  Transform the subject into the framing device for your sketch.  Here I used two obvious options, a window and a door. Everything fits inside the openings and the frame becomes part of the sketch. 

© Andrew Banks 2014


© Andrew Banks 2014
Fading:
Fade out the edges of the sketch by using less pigmented paint, less cross hatching, less shading etc...  The detail will be concentrated in the center while the faded out edges focuses the attention where you want it to be .

© Andrew Banks 2014


Architecture:
Use architecture and architectural features such as walls, arches, colonnades, columns and even windows to frame your sketch.

The buildings on the left and right rise up on each side of the picture plane, framing the busy street scene.  © Allan B. Jacobs 2014


This column and arch is the focus of the sketch as well as a framing device for the background content of the sketch.
© Andrew Banks 2014

Landscape:
Compose the subject in a way that allows natural or built landscape features to frame the subject. Some popular and effective landscape features are trees, tree trunks, tree canopies, bushes, large plants and flowers, leaves, and street furniture (planters, benches etc...)

The tree canopy curves over the top of the entire sketch.  Combined with it's strong, dark value, it works as a strong framing device. © Allan B. Jacobs 2014
Value/ Contrast / Line weights:
Differences in value, contrasts, and line weights are perfect framing tools.  Use objects with more value or thicker/stronger line weights along the perimeters and in foregrounds of your sketches.  Lighter values and line weights will recede to the background, allowing your framing devices to be that much more evident.


Buildings in foreground, on left and right have stronger line weights than those in the background.
© Andrew Banks 2014


The contrast in value and drawing technique of the trees from the rest of the drawing emphasize them as framing devises. © Andrew Banks 2014
Literal Frame:
This is the least creative of the options, yet an option nonetheless.  Draw a literal box around your sketch. Make sure your drawing fills up the box and that parts of the sketch come into contact with the box.
© Andrew Banks 2014

A fun twist on the literal box is to break the box up and allow the subject to overflow out of it.  Here, the dropped out silhouettes of the people on the bottom become part of the continuous line border of the sketch.

© Andrew Banks 2014


I hope you find these tips to be helpful!  Feel free to comment with any questions or any of your own framing techniques!

-Andrew


Tuesday, August 20, 2013

Chinatown Revisited


Sunday, I went sketching with the Urban Sketchers Chicago group.  It was really wonderful to meet some sketchers I had not met before.  We revisited Chinatown, where we had sketched last year.  We are thinking this should be a yearly event.
I arrived early (really?), so while I waited for the others to appear, I did a few sketches, sitting on Cermak Road, facing north.  The first sketch is a portion of the Three Happiness Restaurant, and the view up Wentworth Avenue.
(Pencil, Micron pen, watercolor in Holbein post card book)

Next, I sketched people who were passing by or standing around.  I loved the young woman who was listening to a tour group leader giving a lecture.  The young woman kept fidgeting her legs around, while keeping her arms crossed.  Even from across the street, it was obvious that she was bored out of her mind!
(Pencil, Micron pen, watercolor)

The next two sketches were done at Chinatown Square, a block or two north of Cermak Road, on the west side of Wentworth Avenue.  We were happy to discover that there was a Chinatown Festival happening – and it was very festive!  We were entertained with music, young children dancing, many different people and even a procession of monks.  I set up my little, bum-numbing stool, and began to draw.
When I finished the drawing of the horse sculpture, I acquired a small fan club – two young girls, around 10 and 11 years old, and their twin cousins, the most adorable four-year-old boys.  The older girl asked me to draw Angry Birds.  (I had to use my phone to find an Angry Bird to draw – the red one, of course!)  Then the boys had to have Angry Birds as well.  One of the boys asked me to draw a big house.  (The house I drew could only have been inhabited with stick figures!)  While I was drawing and looking down at the paper, one of the boys kept putting his face under mine, bringing our foreheads together, and staring into my eyes.  I’m not sure what that was about!  Then the younger girl asked me to draw flowers.  I drew everything and gave them the pictures.  They hung around for about an hour – a very appreciative audience – and I enjoyed it immensely!

(Both pages done with pencil, Staedtler pens, Micron pen, and watercolor 
in an Arches Travel Book, 140 lb. paper)

I copied the symbol for “horse” from the base of the sculpture.  Then, the oldest member of my fan club asked if she could draw the “new” symbol on my page.  I was delighted with that!  All in all, a great day with the Urban Sketchers!


Monday, August 12, 2013

Tree sketch at Westchester Woods

I have driven by this park with this gorgeous gnarled tree for years vowing to go sketch the tree one day. Well, Saturday was the day. I used copic markers and pastel pencil.


Monday, February 25, 2013