Pages

Showing posts with label sketchbook. Show all posts

Tuesday, October 11, 2016

Urban Sketching at "The Bean"

URBAN SKETCHING AT "THE BEAN"
By: Andrew Banks

Urban Sketchers Chicago is excited to be hosting the 2017 Urban Sketchers 8th Annual Symposium. We'll be welcoming over 450 urban sketchers from around the world to meet, sketch, and share our city! As a teaser of all the sights in store for you next year, over the next few weeks, we'll be sharing some of our sketches (both new and old) of our beautiful, diverse, and exciting Chicago.
The Bean.  Fountain pen and Faber Castell PITT pens in a 5.5"x8.5" Stillman and Birn Epsilon soft cover sketchbook. © Andrew Banks
The Bean.  Millienium Park.  Sears Tower....  If you are visiting Chicago these are probably just a few of your must do's and must see's.  If you are a local, however, you've probably been there and done that.  You commute past these architectural landmarks on a daily basis and after a while they may start to blend in with the rest of the buildings and sights in the city.  Not for me...

Even after having lived in Chicago for 6 years now, urban sketching has kept all of the "touristy" places in Chicago intriguing and enjoyable for me to visit.  I've sketched here before, but there is always new inspiration for capturing it differently than before.  I've found that as my skill sets develop, and as I continue to explore different media, there is always some new or improved way of seeing and representing a scene.  These iconic spaces, structures and views aren't recognized around the world for no reason.  If you have even have the smallest interest in design, art, or architecture, it will be hard not to have a great time in Chicago.

This sketch took about 45 minutes, and as I sat on the ground, on a particularly busy day at The Bean, I had the chance to chat with several people who were interested in what I was working on.  I always enjoy sharing my work, and popular public places like this are great for introducing people to your work and to the Urban Sketchers community.
The Bean.  Fountain pen and Faber Castell PITT pens in a 5.5"x8.5" Stillman and Birn Epsilon soft cover sketchbook. © Andrew Banks

See more of my work:

Thursday, September 15, 2016

The Hidden Beauty of Chinatown Chicago

Urban Sketchers Chicago is excited to be hosting the 2017 Urban Sketchers 8th Annual Symposium. We'll be welcoming over 450 urban sketchers from around the world to meet, sketch, and share our city! As a teaser of all the sights in store for you next year, over the next few weeks, we'll be sharing some of our sketches (both new and old) of our beautiful, diverse, and exciting Chicago. 

Chicago's Chinatown is easily accessible with many forms of public transportation and my favorite mode is the Chicago Water Taxi. There is something relaxing about taking a boat ride on the South Annex of the Chicago River to arrive at this bounty of color and detail. It is not the same as riding a San-Pan in China, but equally as nice.

Arriving at the Water Taxi stop in Chinatown sets you at the doorstep of Ping Tom Memorial Park and a dramatic red and yellow pagoda-styled pavilion. I was immediately captivated by the graphic nature of the lines, curves and exquisite details of the tiny dragon figures located on each apex. 

If sketching plants and foliage is your thing, then you have to check out this one-of-a-kind dwelling so covered with vines that it should be called a tree house. Located just steps from the Ping Tom Memorial Park and a sight to see in person.


Tuesday, October 6, 2015

One Spot - Two Different Subjects

A couple weeks ago I had the opportunity to spend an afternoon in the loop, riding my bike, sketching and taking photos.  One of the reasons I love living in the city is the ability to hop on Lake Shore Drive bike path and just ride and see where the day takes me.  After a recent guided kayaking tour I took with my wife on the Chicago River, I was inspired to return to one of the major stops, near Merchandise Mart and the recently finished river walkway.  I found a nice spot on the Franklin Street Bridge.  With a great view east, down the river towards Michigan Avenue, I started off with this loose ink sketch of the skyline.  I normally like to lay out my sketches in pencil, but just decided to go for it in ink with this one.  I tend to be a perfectionist.  I like to spend my time making a sketch work well, often times, too much time.  However, diving right into this ink drawing was a real nice change of pace and really freeing, creative experience.  Instead of making sure each line was completely straight, I allowed the pace of my drawing to dictate the characteristics of the sketch.  All in all, I was really pleased with how it turned out and was able to capture the essence of the skyline with gestural lines, stippling and some hatching.


The beautiful thing about being in the Loop is that there is nearly an endless supply of things to sketch.  Having finished the skyline sketch, I stayed in the same spot and sketched the Franklin Street Bridge House, which was a lot closer to me and allowed for some greater attention to material, proportion and detail.  The lighting and shadows were changing very fast so I penciled in a rough outline and indicated where the shadows were at the time.  By the time I finished the pencil sketch, the shadows had already changed and disappeared.  I then inked the drawing with a fountain pen and Faber Castell Cold Grey IV 233 PITT artist pen.


These two sketches were both done in a Stillman and Birn Epsilon sketchbook, which has become my go to sketchbook for pen and ink sketching.  For a long time, I have had a tendency to go back and forth between one sketchbook and another.  I would bounce between a sketchbook geared toward watercolor, to one with ivory colored paper to another with grey toned paper.  But, I've enjoyed this Epsilon paper so much, I've been diligent in filling it up.  This sketchbook is shaping up to be one of my favorite collections of sketches yet.   I look forward to filling it up and seeing where the rest of the pages take me.

You can see more of my work and sketches on Instagram: @abillustrator and my professional website www.AndrewBanksIllustration.com.

I am trying to savor the last precious days of nice outdoor sketching weather before Chicago winter returns.

Until next time!

Andrew

Wednesday, August 5, 2015

You're Invited To Join Our Book Club

For years I was always jealous of how my wife enjoyed a festive get-together with her book club. The thing is, I am not that fast of a reader and one sure-fire way to get me to fall asleep is to put a book in my hand that does not have any pictures in it. Does that happen to you too? Therefore, I have always kept at arm's distance from book clubs, but count me in on the drinks and snacks.


When I joined Urban Sketchers Chicago, I had already been carrying various spiral-bound sketchbooks of varying sizes and quality with the sole intention of keeping various doodles, notes, ticket stubs, receipts and vacation photos. I guess you call my sketchbooks journals or scrapbooks, not sketchbooks. After a few months of being part of urban sketchers, I soon began to adopt a new mentality of making sketches that told the stories of my surroundings and recorded the events of my life. Now whenever people look at my sketchbooks and point to a sketch and ask "what was happening in this sketch?" I launch into the story behind it.


In Urban Sketchers, there are hundreds and hundreds of stories behind each sketch. Sometimes you can deduct the story by just looking at the sketch and other times the story behind the sketch really needs to be delivered by the artist who captured that moment. And these are stories that come from the unique perspective of one particular artist and the sketchbook (or as we like to call them, our storybooks) have a very short print run of "one."


If you have always wanted to be part of a book club and have a strength in "communicating through your visual literacy" (as professional artist Don Colley would say), you should check out our book club to learn more about the Urban Sketchers Chicago Sketch Seminars, the art supplies we use, and our monthly Sketch Crawls. Send us a quick note to Urban Sketchers Chicago at urbansketcherschicago@gmail.com or check out Urban Sketchers Chicago's Facebook page: https://www.facebook.com/groups/UrbanSketchersChicago/.

If you want the best sketchbooks for your sketch novel, check out Blick Art Supplies, Stillman and Birn and Hahnemuhle USA. Thanks for checking us out. 

Wes Douglas

Top photo: © 2015 Wes Douglas
Middle photo: © 2015 Alex Zonis
Bottom photo: ©2015 Andrew Banks

Tuesday, May 5, 2015

Choosing the Right Paper

TUESDAY TIPS AND TRICKS


One of the fun parts about urban sketching is experimenting with different sketching materials, finding which you enjoy using the most, testing how each react with one another and even which compliment your personal sketching style.  While many sketching kit reviews tend to focus on pens, paints, inks, markers, brushes or other materials we use to draw or paint with, not nearly as many reviews (at least from what I have seen) talk about different types of paper.

Here are some things to consider when deciding on the next, all important sketchbook or paper purchase:

FORMAT & SIZE

  • Do you want a sketchbook that fits in your back pocket or a larger one to carry in a backpack or purse?  
  • Do you prefer loose leaf paper or a sketchbook?
  • Do you want to use a square or rectangular paper/sketchbook?  Scrap paper?  Paper cups?
  • If a sketchbook, spiral bound or hardbound?
COLOR
  • What color paper do you use?
  • Is your paper bright white or toned grey?  Off white? Tan?  Black?
  • How does the color of your favorite ink, marker colored pencil or watercolor paint appear differently on two different colored papers?
  • How does the color of the paper help tell a story about the scene you are sketching?
TYPE
  • Is your paper smooth or textured?  
  • How much texture is there?
  • Hot pressed or cold pressed?
  • Thick or thin?
  • What is the weight of the paper?
  • Can it be painted on?
  • Which papers are best for ink?  For pencil?
  • Is your paper water resistant??  Yes, there is water resistant paper...
CHARACTERISTICS & EFFECTS
  • How strong is the paper?
  • How many times can you shade that one specific spot before you rip a hole in the paper?
  • Does watercolor buckle the paper?  How many washes can it take?  How fast does it dry?
  • How fast does your ink dry on the paper?  Does it smudge?
  • Does the paper enhance or dull out your drawing?
  • Does your sketch bleed through to the other side or even on to the next page?
  • Does your pen or marker glide across the paper or feather and skip?  Which do you like and why?
  • Do you feel feedback on the nib of your pen, tip of your pencil or hairs of your brush?
Perhaps you are new to urban sketching and you have never considered any of these questions.  Or you are a long time sketcher but have never considered why you use the paper you have been using all these years.

I have been an active sketcher since 2008. One of the biggest observations I have made over the years is in which types of papers I like to sketch with.  There are so many different factors that come into play when selecting the right type of paper.  I hope that these questions give you a preview of the next installment of Choosing the Right Paper, where I will give some more specific tips that will help you think about the paper you have been using, why and how you have been using it, and how to develop and expand your sketching skills in light of all of the different types of sketching papers and options available to us.

Until next time, do any of the questions above resonate with you?  How has your experimentation with different paper types evolved since you started sketching?  Which brands do you prefer and why?

Andrew Banks


Tuesday, March 31, 2015

Sketching Architectural Details

TUESDAY TIPS AND TRICKS


If you have ever finished a sketch, held it up and compared it to the actual subject only to realize that something about your sketch was just not right, this post is for you.

Between Barbara Week's recent post entitled "Off The Grid - Designing a Page" which talked about guidelines as compositional tools, and a recent architectural sketch I made, I wanted to "piggy-back" off of the topic of guidelines in urban sketching and talk specifically about how guidelines can help you simplify and map out the different parts of architectural details.

Buildings and architectural details can seem like daunting subjects to draw.  Thankfully, there are several observational cues to pick up on that will help you map out your drawing and establish an educated guess about the sizes, proportions, patterns and elements that make up your specific detail.  You don't even need to know the technical names of the architectural elements, or how they go together.  You just have to have the ability to make observations.  After all, that's half the battle of urban sketching is, isn't it?

(A couple quick side notes: 1.Check out a couple of my previous and related posts for a more full set of tips on architectural sketching.  "Perspective for the Urban Sketcher" and "Drawing Architecture: Sighting Size and Proportion" AND 2) these ideas can be applied to other subjects including figure drawing, landscapes, and most other types of subjects as well.)

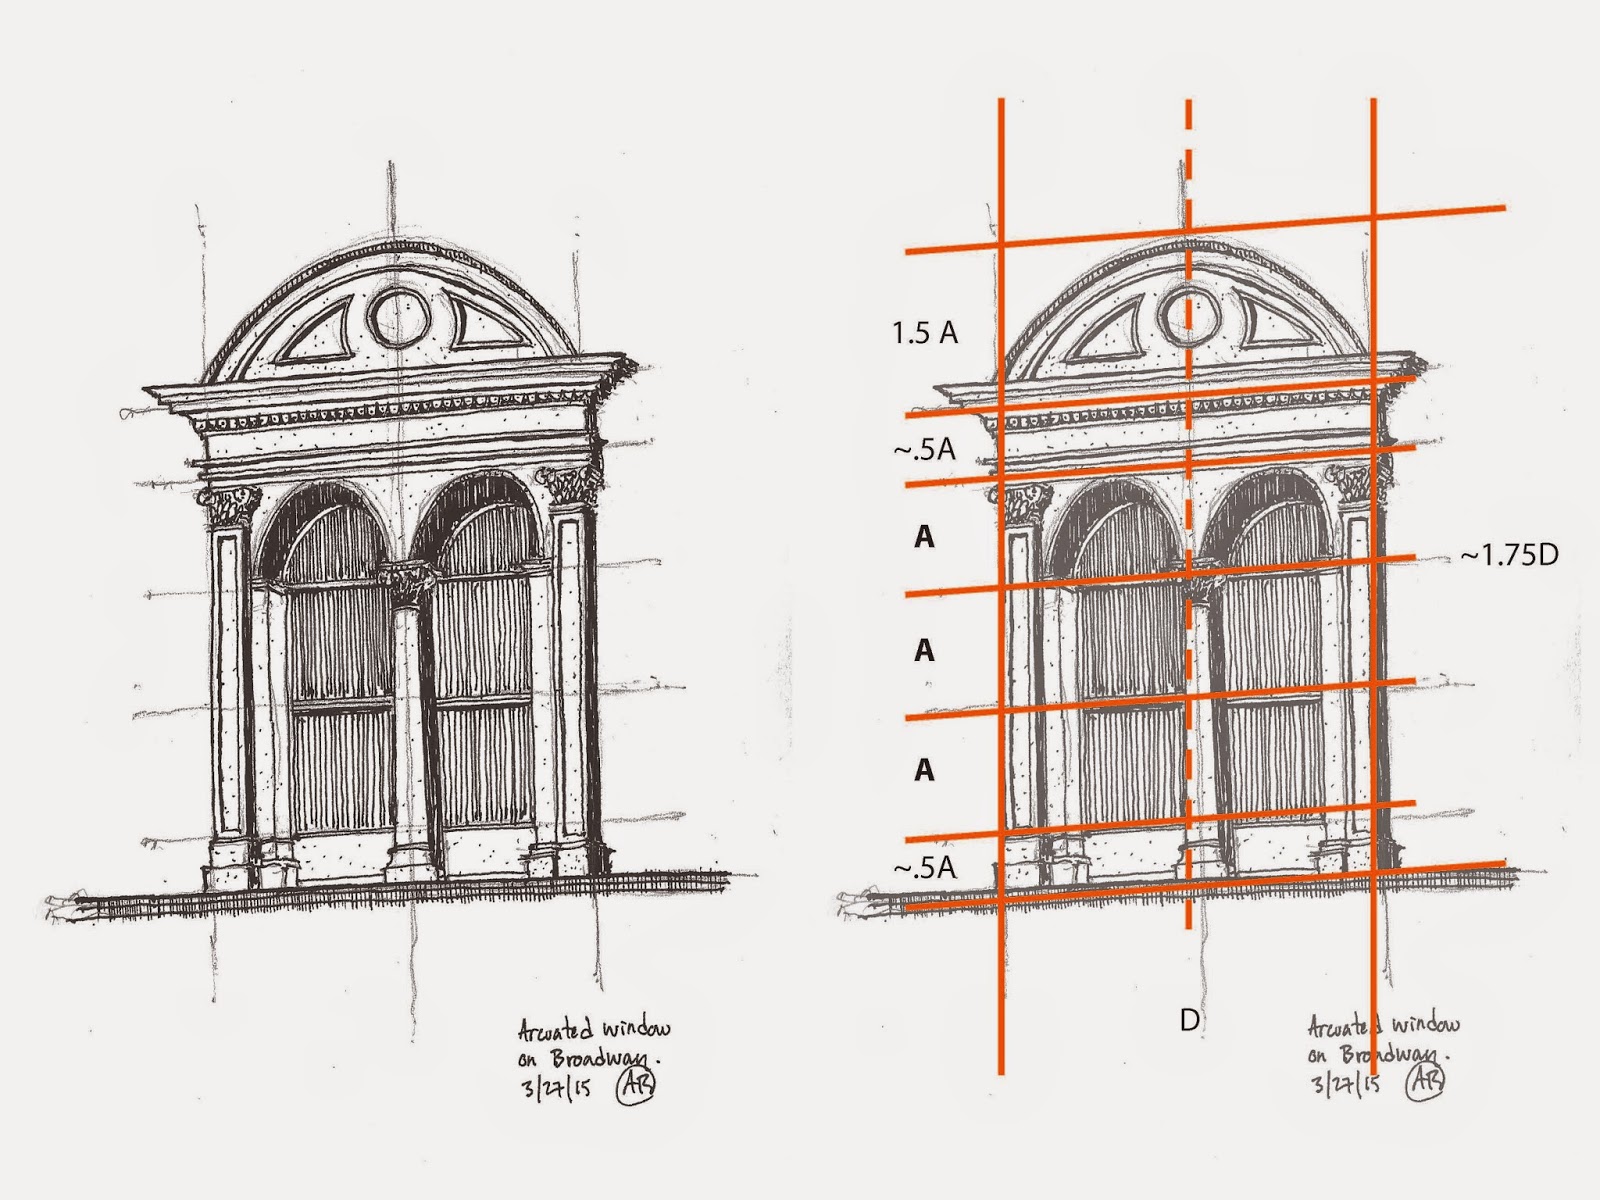
Here is the scan of my sketch.  As you can see more clearly here than in the picture above, I used several guidelines in my initial pencil sketch before adding value in ink.  I left the pencil guidelines in for aesthetics.  Personally, I like how guidelines can add to the story of a sketch.  Guidelines show your process.  They add a level of technicality to the drawing. Many of the greatest artists left pencil underlays partially visible in their masterpieces. I think guidelines give an added personal touch, but this is just my opinion.


The image to the right is fairly self explanatory, however, I will share a little bit about how I approached this drawing.

I began by drawing the center line (dashed) guideline.  Since this detail is symmetrical, the center line is the most important guide to get you started.  Recognizing that the left and right sides of the detail have the same width, I added two more vertical guides, spaced equally as far away from the center line as I could have approximated while standing up, holding the sketchbook.

After I had determined the overall width of the detail, I used the sighting technique (explained in more detail here) to approximate how many widths (D) tall the detail was.  I found that the details was about 1.75 widths (D) tall.  Basing all of the approximate sizes off of one or two of the dimensions in your detail will help you keep all of the different parts of the drawing proportional to the detail as a whole and in relationship to one another.


I then drew a few horizontal lines.  I found larger shapes that I could use as benchmarks for the detail, so to speak.  So as you can see, (bottom to top) my horizontal guidelines fell on the base of the column, the center line of the window, the top of the middle column, the top of the two side columns, the bottom of the entablature, as well as the top of the arched pediment at the top.  Like in all other forms of design, there is a method to the madness in this detail's composition, which is why the sizes of A, .5A and 1.5 A all work well together, and were easy to approximate.

I drew the guidelines at the center line of the window, the top of the middle column, and the tops of the two side columns first.  A quick approximation told me that the bottom and top portions were half the height of A, and that the curved pediment on top was about 1.5A.

Now that the major heights and widths were mapped out, I filled in all of the rest of the details. (Column capitals, window mullions, arched openings above windows, additional lines on the entablature, as well as the dentils in the molding).  I did not draw guidelines for every single detail (although if you want to you can.)  Instead, since the major sizes and proportions were laid out, I could then "eyeball" the sizes and proportions of the smaller details since enough information was already mapped out for me.

This is something that may take a while to get the hang of, but once you do it a few times it will begin to make more sense.  At first, sketching like this may take a little longer than just "winging it".  However, the more you do it, the more it will make sense and will end up increasing your sketching speed in the end.  Learning how to sight size, proportion and perspectives were the most valuable urban sketching skills I learned when I was first introduced to urban sketching.  They are skills I use in almost every sketch I do to this day.

I hope this post, along with the previous posts on sighting and perspective are helpful.  Feel free to ask any questions.

Lastly, don't forget to follow us on Twitter, Instagram, and Pinterest.  If you live in the Chicago area, connect with us through Facebook.  We sketch as a group every third weekend of each month at different locations throughout Chicago.

Andrew


Tuesday, March 3, 2015

Lessons From Your Own Sketchbooks

Tuesday Tips & Tricks


With only 17 days until spring, there is light at the end of this wintry tunnel, and before you know it you will be able to sketch this incredible city outdoors again.  Every year around this time, I start getting antsy for the upcoming spring and summer months. After being cooped up and restricted by the subzero temperatures, short days and lake effect snow I am ready to get back outside and fill up new sketchbooks.  I am sure all of the Chicago sketchers can relate.  For those of you who have the privilege of sketching in a warm climate all year round, this may enlighten you to the struggles of a Chicago sketcher in the winter:

You might be a Chicago sketcher if....
  • You have sketched the view from your living room window this winter more times than you can remember.
  • You look out this same window hoping something new to sketch magically appears so you can satisfy your sketching needs.
  • you have had to out-sketch mother nature freezing the ink in your pens or watercolor pallets
  • you have put on more than three layers of clothing just to stay warm on a sketch outing
  • you have spent hours flipping through sketching blogs, galleries, books and old sketchbooks in anticipation for warmer weather and more sketching opportunities....
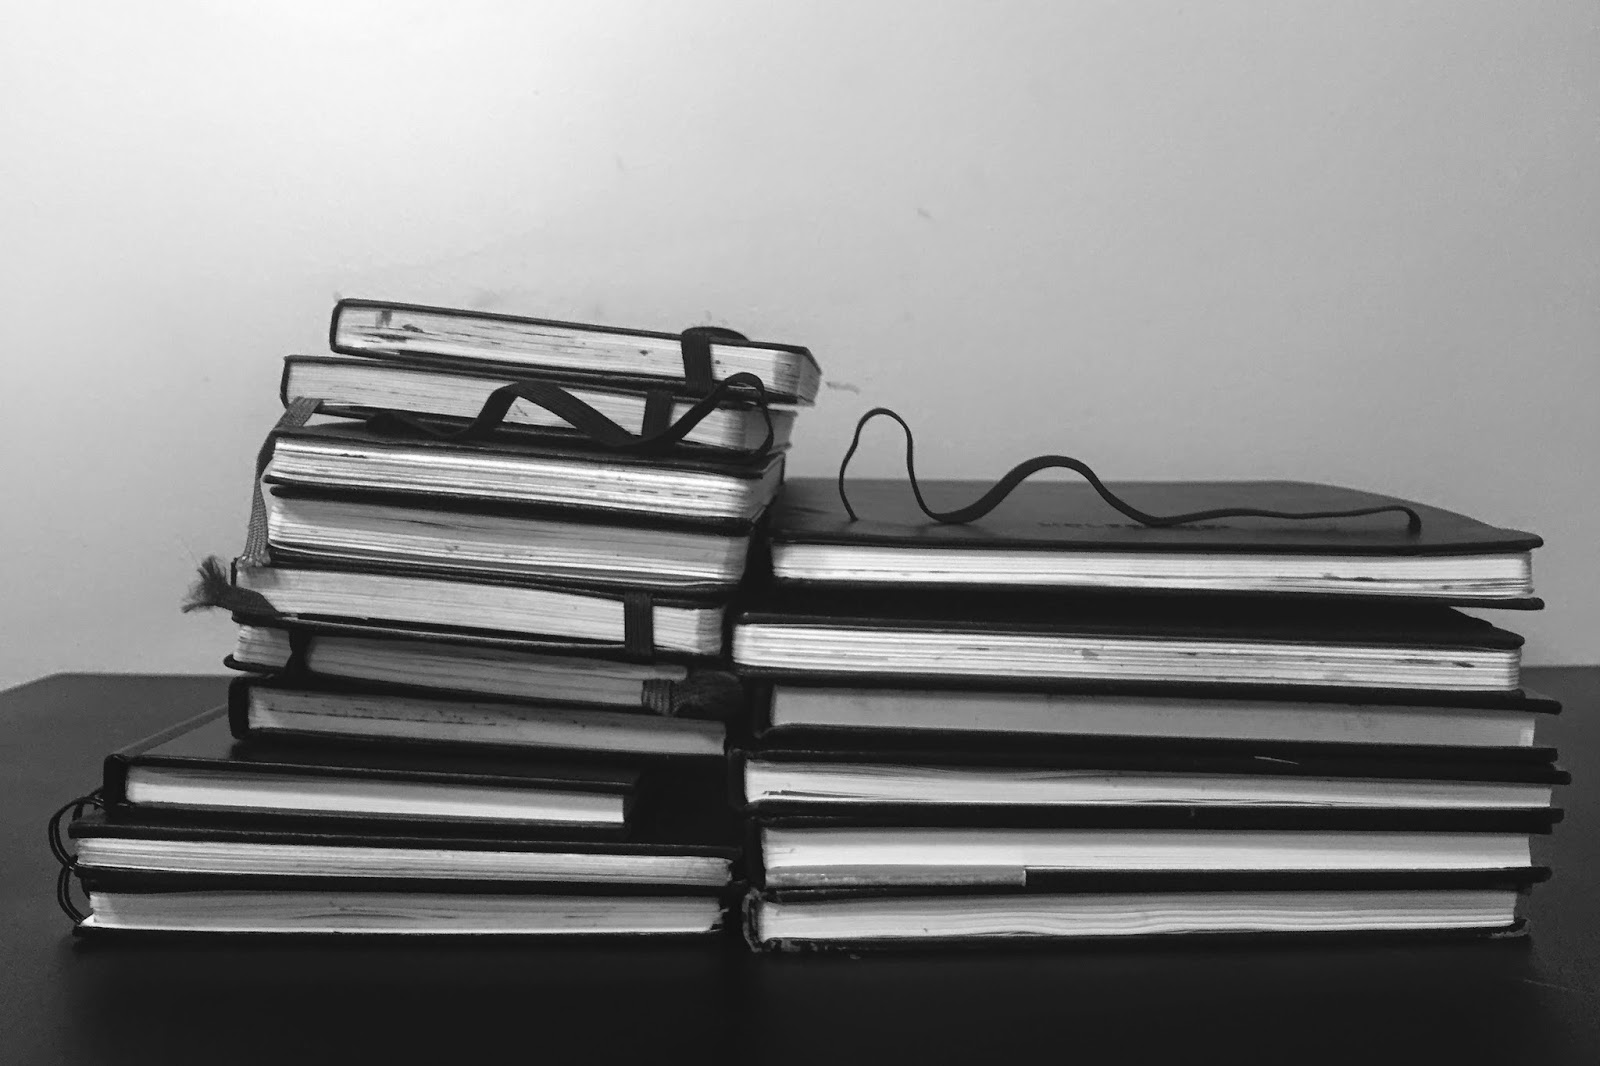
If you have been thinking about urban sketching  more than actually sketching lately, you have also likely thought about your personal sketching style and at some point wondered how you could develop it, improve it or take it in a different direction.  I know I have, and as I recently flipped through my collection of sketchbooks I was reminded of how incredibly valuable our own sketchbooks are as teaching tools.  So much of urban sketching is about experimentation, trial and error, process and spontaneity.  Whether you realize it or not, each sketch you create is a compilation of countless artistic decisions.  These decisions shape your sketching style and express the way you see the world around you on paper.

Every once in a while it is well worth our time to look back at old sketchbooks to see where our sketching journey began, what artistic thoughts were running through our mind, what types of media we were experimenting with, and which techniques worked and which didn't.  Did you take notes about some valuable insight you discovered in the process of creating a particular sketch?  The nature of urban sketching is so spontaneous that we often move onto the next sketch, forgetting all about the sparks of genius that happened in our past sketches.  There are so many opportunities for us to learn from and build upon our own work.  Taking a look at our past sketches is a great way to see how much we have grown, to be reminded of where our creative process was at different stages of our lives and how it has evolved.  

So, while we wait through the rest of what Chicago winter has to throw as us, my challenge for you is to dig up the very first sketchbook you ever kept and flip through it.  


Go through the rest of your sketchbooks until you get to your current sketchbook (or most recent sketches).  What are your gut reactions?  You will be reminded of all of the great work you have already done, all of of the places you have seen, and all of the techniques you have tested.  Here are some more questions to ask yourself while doing this.  I hope these will start turning some wheels about how much you can learn from your own sketchbooks:
  • What kind of things did I sketch?  Do I need to add variety to my choice of subject matter?
    • Have I challenged myself by choosing subject matter that is out of my comfort zone?
  • What different types of media have I tried?  
    • What have I learned about my favorite pens, paints, markers etc...and how they react to different types of paper?
  • What kinds of improvements do I see in my technique and how can I continue to build upon this?
    • Which artists or sketchers influenced my work early on, and who influences my work now?
  • What are 2-3 techniques I have always wanted to learn more about, but still have never gotten around to trying?
I hope that those questions begin to allow your sketchbooks to teach you.  Remember not to be too hard on yourself.  We can often be our own worst critics.  If you are looking to pick up some new sketching skills, USk Chicago will be hosting it's second annual Sketching Seminar in July.  More details about this will be on their way in the near future...

Best,
Andrew Banks


Tuesday, December 2, 2014

Every Visual Creative Should Keep a Sketchbook

Tuesday Tips & Tricks


Thanks to an invitation from Don Yang, Alex Zonis, Wes Douglas, and I recently spoke at the American Academy of Art in Chicago as part of their Visiting Artist Series. My section of the presentation dealt with the value and habit of keeping a sketchbook. I want to share my thoughts with you, too.

I’ve been involved with art for my livelihood since graphic design was called commercial art and cut and paste was literally cut and paste. My first job right out of college was with a small ad agency in Hackensack, New Jersey and let me tell you, I rejoice, everyday, for the miracle of the digital age. 
BUT…
Every Visual Creative Should Keep a Sketchbook!

There are as many different kinds of sketchbooks and as many reasons for keeping them, as there are sketchers but I’m only going to give you five.


Five Reasons to Keep a Sketchbook


1. Practice – the most obvious, 
Drawing is a skill and must be developed. Great athletes, musicians, actors, and artists, we all need to practice to improve and hone our performance. 

2. Record ideas
Keep your sketchbook with you always. Do it! Ideas can be fleeting. How many times have you thought, “Wow, what a great idea. That will come in handy later,” and when later came the great idea was gone? Jot it down or scribble a quick sketch!

What kind of ideas? A scribbled gesture, an eavesdropped conversation, a fleeting image or thought, a color scheme – anything!

Above the Clouds


Leonardo Da Vinci only made a few paintings but we all know him and revere him because of the ideas he recorded in his sketchbooks.

3.Experimentation 
Try out and practice with new media or tools, compositions, play with new styles– again, ANYTHING! 


Disappearing Hancock Building


4. View progress
 Overall progress – the strides you make in your artistic development over a    
  period of time, whether it’s months or years.
• Idea development – the evolution of an idea from the first scribble to finished 
  concept or product.
Family Farmed Button


5. Cheaper than a psychiatrist
This reason may be my own little reason but I share it with you. Waiting used to be a time of aggravation and annoyance for me. Now, I think, “Oh good I can sketch.” I also have more sketches done in hospital emergency rooms than I care to think about  but they kept me calm and sane. And sometimes when I’m “in the zone” it’s like meditation.


At Evanston Hospital


Five Tips for Developing the Sketchbook Habit


1. Love your sketchbook (but not too much.) I’ve had  beautiful books given to me, and some I’ve bought myself and saved them for  something special because they’re “too good” – that’s very inhibiting. It’s one more excuse not to start. Get a sketchbook you like but won’t be upset if you spill your coffee on it or the cover gets scratch etc. Get one that you will  actually use.

2. Carry it with you always (I know I’m repeating myself. It’s that important.) and use it!
I use several sketchbooks at one time, all different sizes. Some are themed – like Urban Sketchers or travel. Some are for convenience or size, a small one in the glove compartment of my car, a tiny one that fits in an evening bag, one  near the TV and the best of all my daily workhorse that is also part journal, part agenda. That’s the one that is in my bag, on my desk and beside my bed. 


3. Get over the first page fear 
If a fancy new sketchbook can be “too precious” the first page in any sketchbook can be intimidating. 
Some ideas that I’ve had success with in getting over the first page roadblock:
• Skip the first couple of pages, go back to them later if at all
• Paint the palette, brush, pencil, the tools that you’re using now
• Set up an index that you can fill in as you go along
• Write a favorite or motivating quote

4. It isn’t for sketches only  (the workhorse) 
Write in it – grocery lists, phone numbers, quotes, notes
Glue stuff in it – business cards, ephemera, travel info, maps, napkin drawings,         random scribbled ideas and thoughts etc.


Granddog- Burling

5. Share some of your sketches 
There is a remarkable community of artists all over the world who connect by sharing their work online. They make hospitable and willing companions to sketch with wherever you may find yourself. They’re only FaceBook post away. Sharing your sketches whether it’s Twitter, FB, Pinterest, or wherever, is also a great motivator and you’ll find inspiration in the work of others. 

The sketchbook habit develops our drawing skills and cultivates that spontaneous work on location that is urban sketching. By keeping a sketchbook and acquiring the sketching habit, urban sketching isn’t something we do but it becomes part of who we are – Urban Sketchers.

Tuesday, September 30, 2014

Drawing Architecture: Sighting Size and Proportion

In my last post “Perspective for the Urban Sketcher:Sighting” I shared a technique for drawing in perspective.  With some of the feedback I received from that post, I was reminded of a related, yet different technique that can be used with sighting.  Sighting can also be used to gauge size and proportions.  In this post, I will build upon the sighting technique and show you how to draw architecture, simplifying an elevation down to large, simple shapes and using architectural features as measuring devises.

If you've ever spent time observing architecture, you've probably noticed that there are almost always some degree of pattern and relationships between different shapes and masses.  Whether they are windows, doors, columns, arches, roofs etc... they are all sized and proportioned in relationship to one another and to the building as a whole.  An urban sketcher can use different elements of a building as tools to his/her advantage, especially when sighting.

When sketching architecture, size and proportions are dependent on your distance from and relative position to your subject.  So, before getting to the steps, the following rule must be followed in order for this technique to work:

Remember, once you decide where to sit and sketch, you must stay in the same spot until you have at least marked out all sizes and proportions.  (Once you move, your distance and relative position to the subject changes, and your sighting approximations will be inconsistent).

Sighting Size and Proportions: Step by Step

1) Take a few minutes to observe the building, pointing out some of the major shapes, structural features or patterns.  When sighting for size and proportion, you will draw your building starting with the larger masses of the building, moving down to the smallest masses and details last.


2)
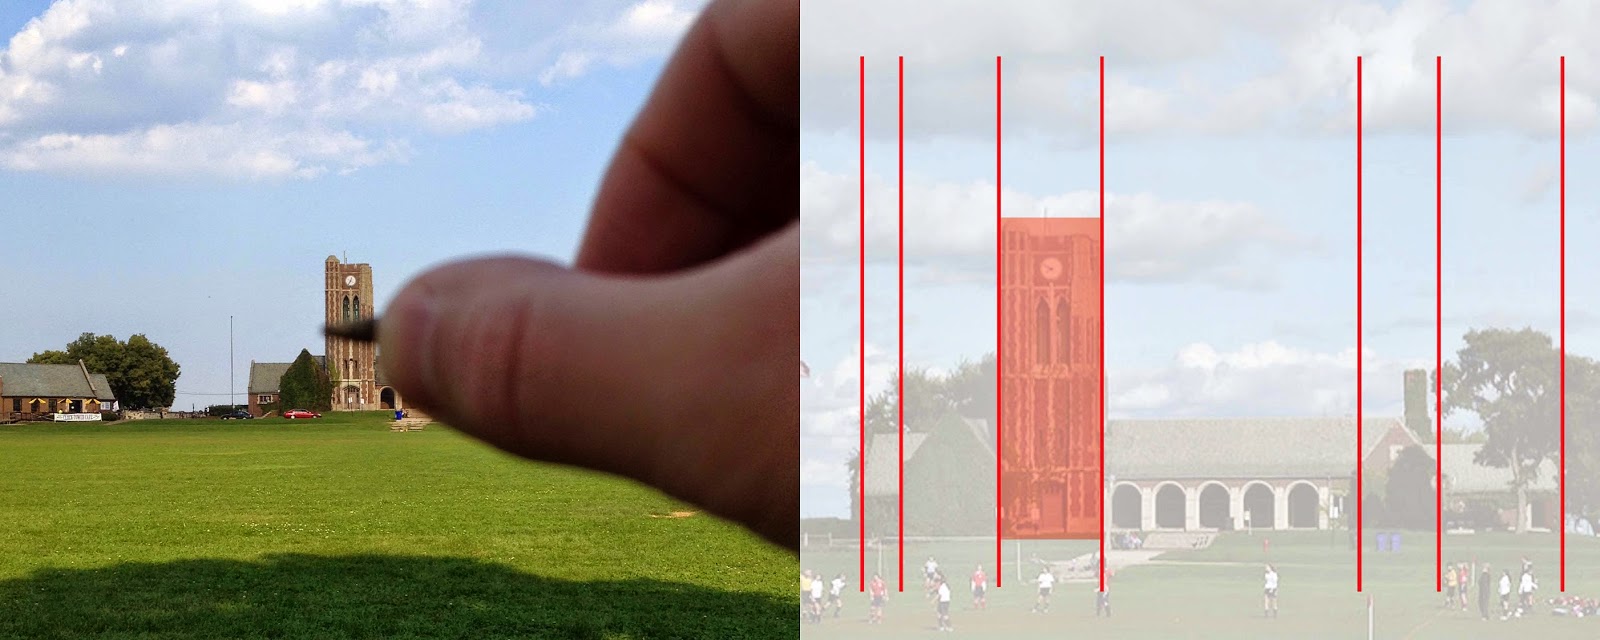
Chose one feature of the building to use as a measuring unit.  I chose the width of the tower.  With your sighting tool (pencil, wooden skewer etc…), fully extend your arm out, placing it in front of the architectural feature.  (It helps to close one eye and squint).  Move your thumb along your sighting tool until it reaches the edge of the architectural feature, essentially measuring the feature’s width.  This will become the measuring unit for the majority of the sighting.  So, all measurements will be in X number of tower widths.


3) 
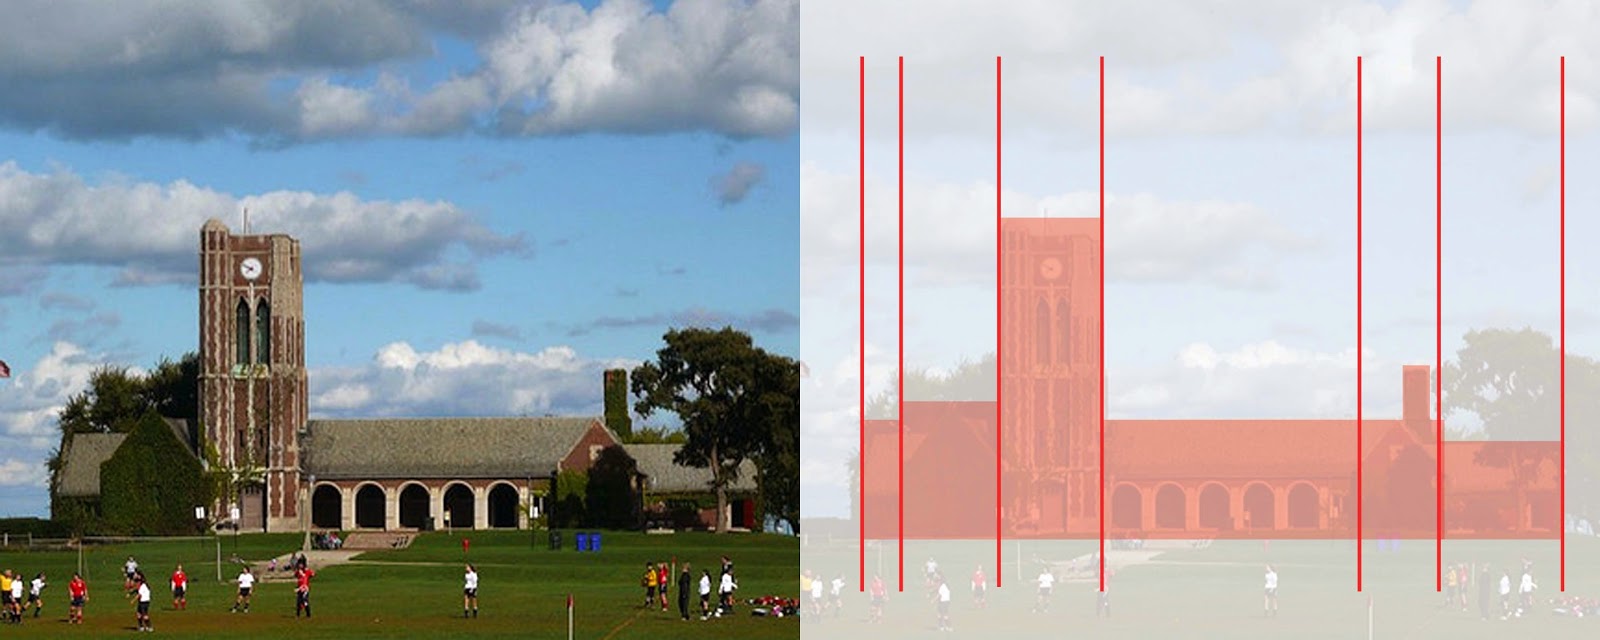
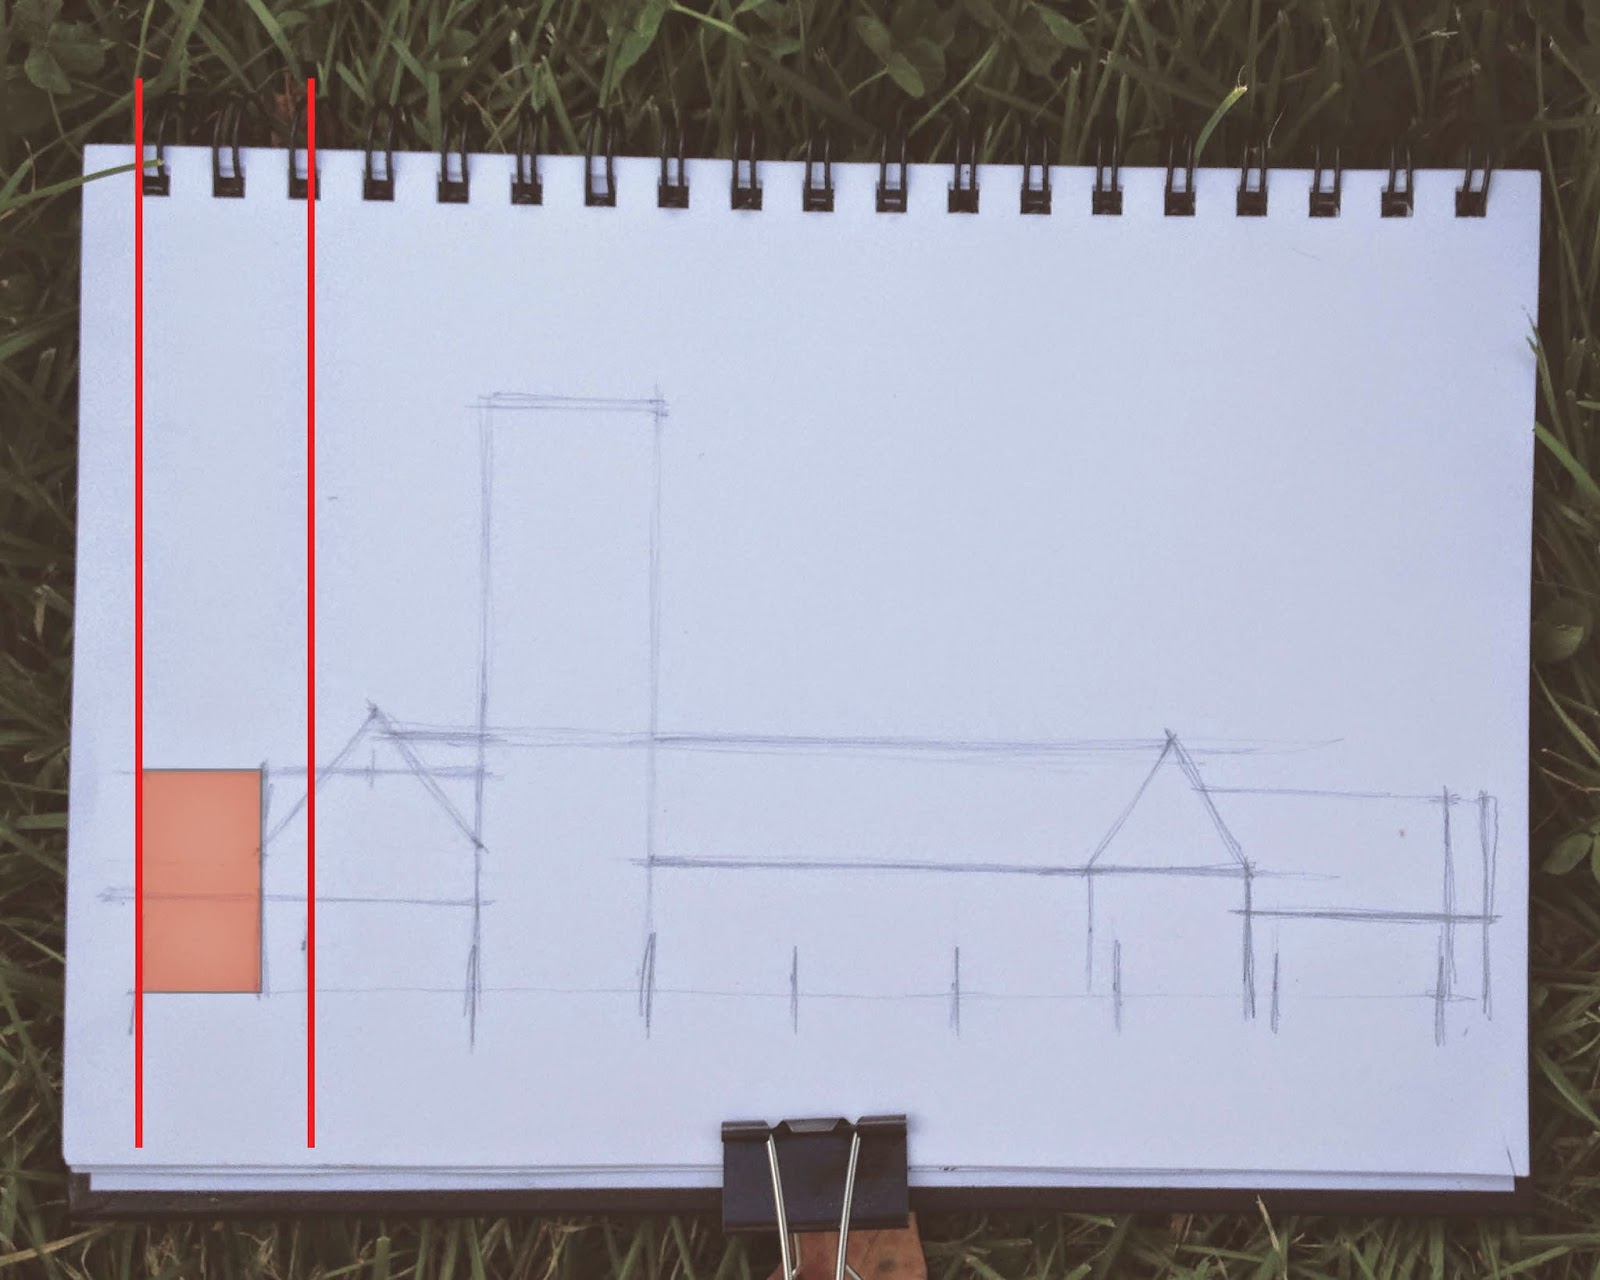
Measure the width and height of the building.  The length of this building was about 8 tower width’s wide.  The tower was 3.5 tower widths tall, and the roof heights changed at different locations, but ranged from 1.5-2 tower widths tall.  Use tick marks and guidelines to help visualize your measurements.  Here I marked out the overall length of the building at slightly more than 8 widths.  Use guidelines for all of your measurement.  You will begin to see how different parts of the building relate to one another.


 4)
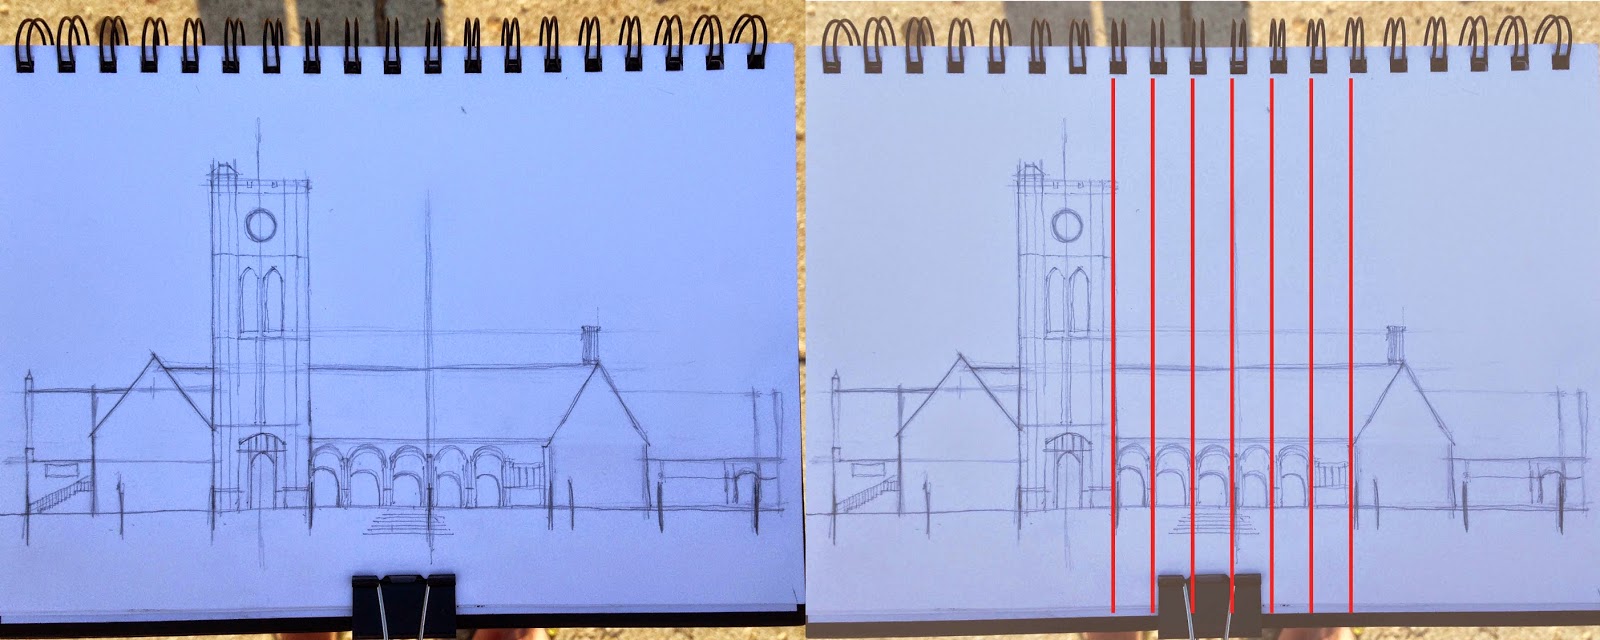
Mark out all the other large masses.  In this building there were essentially 6 large masses that comprised the entire elevation.  I sized each portion based on my measuring unit, the tower width.


The 8 tick marks I made on the length of the building helped as guidelines.  So for example, I sighted that the first mass (farthest left) was about ¾ of 1 tower width.  Since I have the tower width marked out, I was able to draw my vertical line for that portion of the wall at ¾ of the way through the first tick mark.  Repeat these steps for the rest of the masses.


5)
Now that you've marked out the largest masses of the building, move to the medium sized masses.  For me these were the arches, windows and doors.  The colonnade of arches is nicely divided into 6 uniform bays, so I was easily able to divide the middle portion of the building up into 6 equal parts.  Use this type of logic for the rest of the details.  (If your details are not evenly spaced, simply use a smaller architectural element as your measuring unit to determine the distances and proportions you need.)


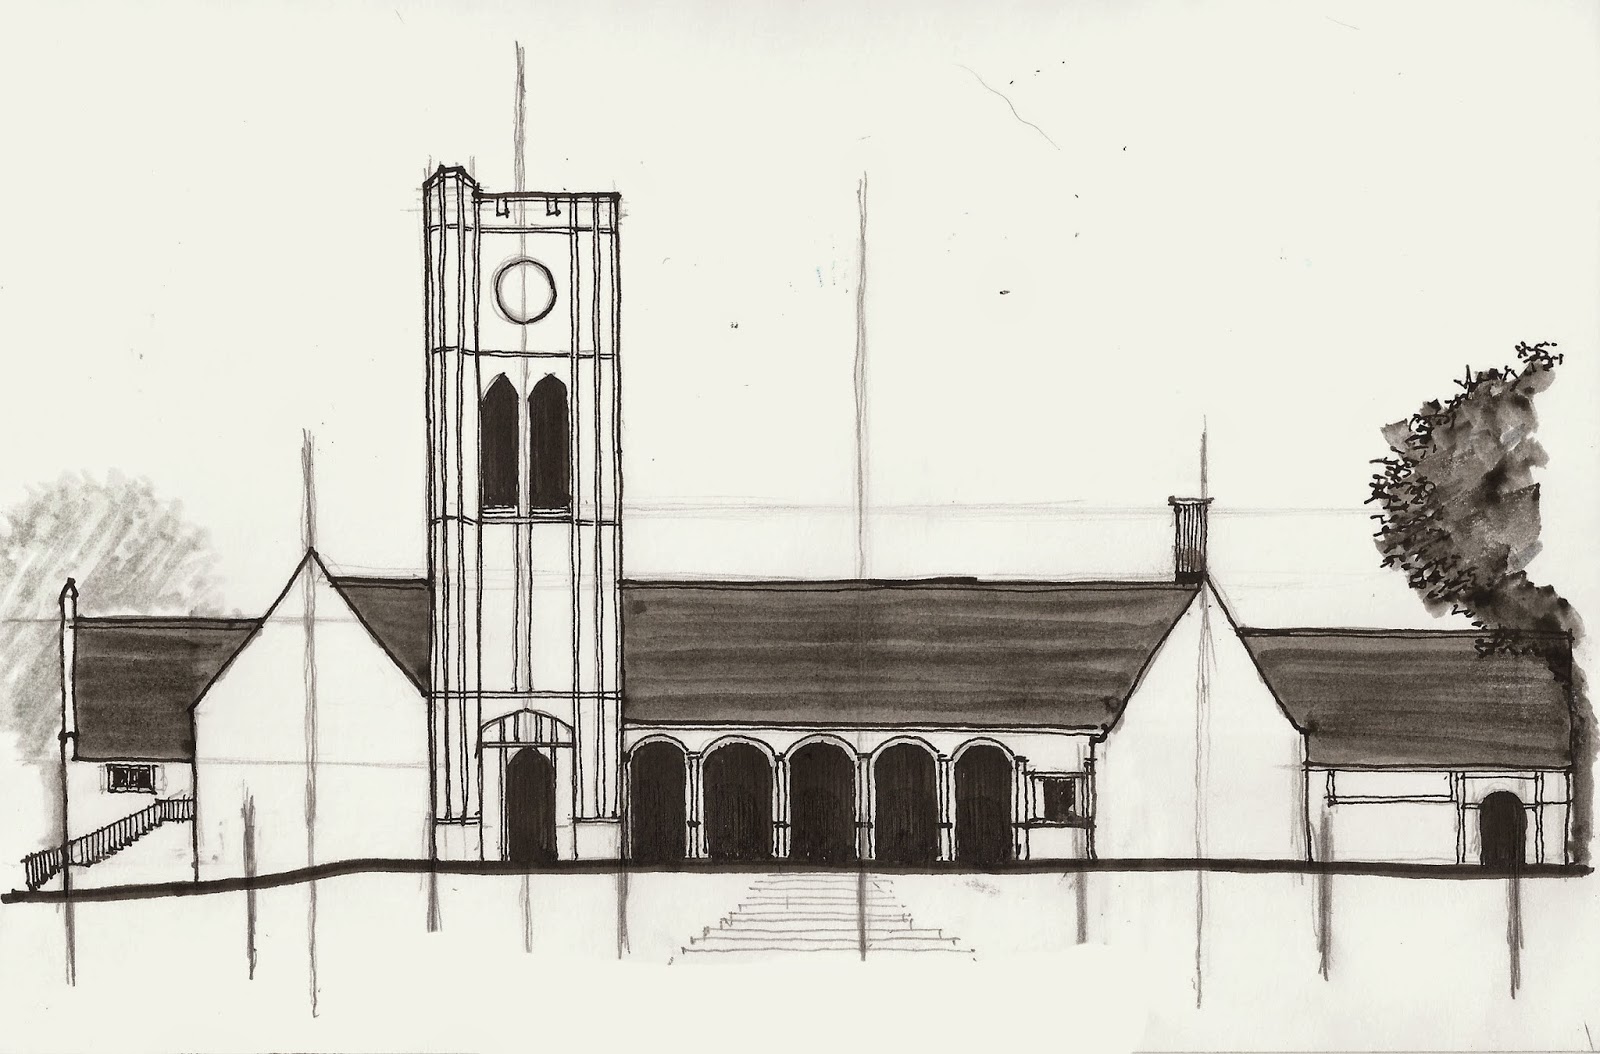
Now you can begin to add details, value, shading and shadows.


Once you feel comfortable sighting sizes and proportions on a building at a straightforward view, you will be ready to combine the techniques of perspective with those in this post.

I hope this is helpful!  As always, let me know if you have any questions!

-Andrew


Tuesday, September 2, 2014

Tuesday Tips & Tricks: "Perspective for the Urban Sketcher: Using the Sighting Technique"

One of the most challenging techniques to master in on-location sketching is perspective.  Many people shy away from architectural, city scenes or subjects involving vanishing points because of all of the rules involved.  Even when following the rules, it’s pretty difficult to achieve a completely accurate record of the actual scene.  Most of the time when we sketch on location we use small to medium sized sketchbooks.  More often than not, the vanishing points will fall well off of the edge of our pages, making it impossible to calculate the actual vanishing points.  Lastly, when we are urban sketching, we don’t always have a lot of time to analyze and perfect the perspective.  However, a technique I use, called Sighting, will enable you to draw in perspective quickly, and without needing to fully construct a perfect set of vanishing points.

Sighting is based off of the principles of perspective, but is a shortcut, so to speak, and a great, simple trick to use in both shorter and lengthier sketching sessions.

Before moving to the step by step explanation, there are 2 rules that must be followed in order for this to work.  Keep these in mind while reading about and using the technique.  These rules are crucial and sighting will not work unless they are followed.

Rules:
  • Once you decide where to sit and sketch, you must stay in the same spot until you have at least marked out your perspective lines.  (Once you move, your point of view changes, thus your horizon line and vanishing point(s) will change as well).

  • For consistency, hold your sketchbook in one position until you have at least marked out your perspective lines.  For example, if the sketchbook is sitting flat on your lap for the first half of the sketch, do not tilt it up for the second half of the sketch.  This will ensure consistency in the transferring of your lines.

Sighting: Step by Step

1) I use a thin, straight, wooden skewer and that I carry with me all the time in my travel kit.  A pen or pencil will work fine too, but the longer and thinner the sighting tool, the more accurate of a reading you will get and the easier it will be to see.  About 6”-8” is plenty.


2)
Hold the sighting tool at one end.

3) Fully extend your arm out and hold the sighting tool parallel with your body.  This is important.  Do not tilt the tool outward towards the subject, or inward toward your body.  You will only get an accurate reading if the tool is parallel with your body.

4)
Align the tool with the edge of the receding line.  Here I am aligning it with the roof line of the building.  (You will want to place your tool directly on top of the edge when actually doing this.  I put the tool slightly above the edge so it easier for you to see.)  Imagine the hands of a clock.  Only rotate your tool like the hands on a clock would rotate around the center point.

5) Hold the angle of the tool and slowly place the tool on your paper and draw the line.  (I do not mean to imply to use the tool as a ruler, just as a visual guide.)  I usually map out perspective line in pencil because you will need to double check and edit your lines as you go.  The more you do this, the better you will get at transferring the lines and soon enough you will not need to edit. 


Therefore, once you have drawn your line,

6) Double check your line and repeat steps 3,4 and 5 again to make a revised version of the first line.  With a line already drawn, it is easier to compare what you have drawn to what you are sighting, and you can make changes relative to what you have drawn.

7) Repeat steps 2-6 for all of the lines you do not feel comfortable free handing and remember to follow the two rules I mentioned at the beginning.

Here is quick sketch I completed using the sighting technique.  Take a look at all of the different angles that are transferred to the sketch.


I hope this is helpful!  Feel free to ask any questions!

-Andrew Banks