Pages

Showing posts with label usk. Show all posts

Monday, March 2, 2020

What You've Been Waiting For!


Workshop Lineups and Descriptions!

 Over the next two weeks the workshop lineup and descriptions will be gradually be posted on the Seminar Blog.  The descriptions, learning goals, and supply lists for each workshop will be posted in plenty of time to help you decide which classes you'd like to take before registration on April 11. Be sure to check them out!

 You can keep up with Seminar news at the USk Chicago Sketch Seminar 2020 blog. Of course we will keep you posted here, too.


Registration will open on April 11.


The new blog posts will be mentioned in the Facebook group but if you’d like to keep up to date by email just fill in your email address in the place provided in the upper right corner under the banner. We look forward to hearing from you.


Sunday, September 4, 2016

USk Chicago Spotlight Sunday - Aaron Elswick

Spotlight Sunday is a series of interviews designed to introduce and highlight Chicago Urban Sketchers individually. Now that our chapter has over 500 members it has become more of a challenge to meet every sketcher in person and have a conversation. These posts concentrate on individuals and speak in their own words and sketches.


Interviewed by Andrew Banks.

Hi Aaron, thanks again for taking the time to be this week's spotlight feature and for sharing a little bit about yourself with the group!

Andrew Banks:
How did you first hear about the Urban Sketchers community and what made you decide to join Urban Sketching Chicago?


Aaron Elswick: A couple of years back I was sketching commuters on the Metra and I ran into Peggy Condon.  She noticed what I was doing and suggested I join Urban Sketching Chicago. Until then I thought I was the only weirdo that did this.

Andrew: That's awesome. I always enjoy hearing about how people find out about the group.  Sometimes it's through our social media accounts, or through a Google search, but these in-person introductions are always the most memorable.


Andrew: Did you sketch before finding USk Chicago?  If so, when did you start sketching?

Aaron Elswick: I have drawn and painted most of my life. My primary subject matter has always been sharks (most often drawn from reference photos).  I began sketching on location a little over 3 years ago to become a better urban designer. It was the summer before I started my Masters of Urban Design and I didn’t know much about architecture at the time. 

I decided going out and drawing architecture would be a great way to learn what I could before school started. During this same period of time I was interning as a landscape architect. I noticed that my boss – the lead designer –  was always the one drawing throughout the design process. I realized that summer that if I ever wanted to be the one drawing (and I did) I was going to have to draw as fast and legibly loose as my boss did when creating (her “cartoons,” as she calls them). 

Andrew: Can you tell us a little bit about your background? Does urban sketching ever have an impact on your day job? If so, how?

Aaron Elswick: I have a professional degree in Landscape Architecture from the University of Kentucky and a Masters of Urban Design from the Savannah College of Art and Design. I am presently employed as a Site Architect at Terry Guen Design Associates, a local landscape architecture and urban design firm. To explain what we do as simply as possible I like to say: "If you’re not standing inside of a building, then you are standing in exactly what we do." At TGDA we call this “Design for Life,” viewing our work as the backdrop, or stage, for the play of life to unfold. Our objective with every project is to design a sustainable environment that allows for the most acts of the play to occur, be it social, environmental, or economic. Urban sketching is the foundation of my design process and on a daily basis it helps me imagine, draw, and design for the future.

The Bean Context, my first attempt at using markers on location. This sketch was drawn during Wes Douglas’ 2016 UskChicago Sketch Seminar Workshop- Markers for Beginners. Mediums include: Stabilo fine 0.4 pen, ultra fine sharpie, and Chartpak Design Markers. (~40mins)

When I am sketching on location, I am analyzing the proportions, textures, scale, and context of the objects that define a place and simplifying it all to just a series of lines. As a Site Architect, I use my urban sketches as a mental reference bank to draw and design a city. Drawing is a tool and the language that I use in my career to communicate and explore ideas. Although drawing is only a tiny piece of my career, it is easily one of the most critical assets of my design process. Urban sketching is how I practice, learn and explore topics related to my profession.

The two most valuable lessons I have learned professionally, via sketching on location, is to be unafraid to fail and that the ugliest sketch is better than no sketch at all. A mentor of mine once broke it down to me like this:  the best designer is the one who is least afraid of failing. Before I started urban sketching I only wanted to show people perfect drawings, but I have learned that this hinders the design process and restricts the flow of ideas. Loosening up a bit and focusing on conveying an idea, as opposed to seeking perfection has been a real turning point in my career. Being unafraid to fail has gotten me to the “design table” at a very early in my career. I credit joining Urban Sketchers Chicago and its community for giving me a space to explore this practice and learn the truth in the advice I’ve been given.

Andrew:  Wow, that's so awesome.  Your response is not only inspiring and challenging, but also a great reminder to me (and I am sure others as well) about what urban sketching is all about.  It really sounds like urban sketching is intertwined with your day to day professional work, and is giving you some great opportunities for creative expression and experimentation all at the same time.  


I really like what you said here: "the best designer is the one who is least afraid of failing. Before I started urban sketching I only wanted to show people perfect drawings, but I have learned that this hinders the design process and restricts the flow of ideas. Loosening up a bit and focusing on conveying an idea, as opposed to seeking perfection has been a real turning point in my career."  

I really think that every single person in our group will benefit from that advice.  I know I already have.  It's so easy to get critical of our own work, wondering whether it's worth sharing or not.  But when we start holding ourselves back or aiming for some standard of perfection we lose out on a lot of creative opportunities.

Andrew: Is there a specific subject matter you are particularly drawn to or inspired to sketch?

Aaron Elswick: I am most attracted to iconic facets of Urban Design – buildings, public spaces, infrastructure, streetscapes, and everything else in a city. I like to capture the whole scene and believe in going big or going home. The public realm is my home and I firmly believe that people define great places and not buildings or landscape architecture. 

Therefore I am commonly sketching in a crowd or in places people choose to spend their leisure time. Doing this enlightened me to the extremely social aspects of urban sketching, which is now is my favorite part. I love the Q&A sessions, exchanging of stories, and impromptu workshops that sketching on location facilitates. Occasionally, I want to sketch from a distance and tend to choose public parks. However, I rarely ever sketch a singular object. For me and what I do, context is everything!
The Nature Board Walk at the Lincoln Park Zoo, Studio Gang Architects, sketched during the 2016 UskChicago outing with a Stabilo fine 0.4 pen and ultrafine sharpie. (~30mins)


Andrew: What is your favorite medium to sketch with?

Aaron Elswick: My favorite medium to sketch with is 100% pen and ink. A pen tells the truth and the whole story of the sketch. The authenticity of storytelling through my sketches is something I have recently have started to explore. I learned to draw with a pencil, but in my profession pen and ink is the standard for hand graphics. To learn how to draw with a pen, I just stopped taking a pencil and eraser with me. At first this was quite the challenge, but with a lot of practice it is now starting to come more naturally to me. 

This approach has saved me countless hours of erasing and inking over pencil. It has also changed the way that I view the world, instead of just seeing a brick building, I now see the lines and shapes that define the building. In return I have begun to develop my own style and form of artistic expression, which will always be a work in progress effort. Using only pen and paper forced me to embrace imperfections and lead me to take the Bob Ross approach: “I made some mistakes once, now they are trees.”

Andrew: The idea of truth and authenticity in storytelling through our sketches is a super interesting topic and I would love to hear more of your thoughts and approach to this sometime.  I agree though, there is something really freeing about jumping in to a sketch in ink without any pencil outlines.  It definitely forces you to be intentional with each line. I work a lot with ink myself and I like to tell people that while you can't erase ink, it's also a fairly forgiving medium to sketch with if you know how to work with your mistakes and build them into the sketch. 


Andrew: Are there any Urban Sketchers who inspire your own work?

Aaron Elswick: In all honesty, every member inspires me. Seeing how often people are posting, what they are sketching, and the techniques they are using motivates me to get out there and go do it more often.  I believe some members are in a completely different league and/or playing an entirely different game than I am. 

There are two members that really speak to me with their work and influence my sketching: Andrew Banks and Wes Douglas. Both of these guys are absolute masters of their craft. What I enjoy most about their work is the subject matter and their uniquely identifiable styles. Andrew’s hatching and spot on architectural rendering style is extremely impressive. Wes’ diversity of subject matter, techniques, and use of markers is out of this world.

Andrew Banks:  That is the beauty of the urban sketching community. There is such a wide range of styles, techniques, view points and skills levels to learn from. There is never a shortage of inspiration to be found, that is for sure.

Thank you for the compliments!


Andrew: If you could choose any location for the next group sketch event, where would it be?

Aaron Elswick: Without a doubt I would choose the Shedd Aquarium! Sharks are my weird obsession and I have been drawing them my whole life. The Shedd would offer a unique opportunity to take a crack at the plethora of subject matter the aquatic environment offers, after all it is pretty hard to draw underwater. It would be a real treat and I would absolutely LOVE to see how all of the different members of UskChicago depict life underwater.


Andrew: Do you have any websites, blogs or social media accounts where people can see more of your work?

Aaron Elswick: I am on Facebook and Instagram at the moment. I have a lot of projects in the works and a website/marketplace is in development. Once that all gets launched I’ll be sure to let the group know. 

Facebook: https://www.facebook.com/aaron.elswick
Instagram: @acelsw2  https://www.instagram.com/acelsw2/

For more information on Terry Guen Design Associates and “Design for Life” please see https://www.tgda.net/

Andrew Banks: Thanks again Aaron!  


Sunday, June 26, 2016

Spotlight Sunday - Claudia Renzi

SPOTLIGHT SUNDAY - CLAUDIA RENZI


Spotlight Sunday is a series of interviews designed to introduce and highlight Chicago Urban Sketchers to one of its own. Now that our chapter has eclipsed the 500 member mark, it became more of a challenge to meet every member in person and have a conversation. The hope is that, through these interviews, you will get to know a little more about one artist and read their story in their own words and sketches.

Interview by: Andrew Banks (AB)

AB: Hi Claudia, thank-you for taking the time to talk and to tell our group a little bit about yourself!

How did you first hear about the Urban Sketchers community and what made you decide to join Urban Sketching Chicago?

© Claudia Renzi
I heard about Urban Sketching Chicago from Don Yang and Alex Zonis. We both take Don's Portrait class. They told me great things about this group and I needed a way to deal with life stresses at that moment. I find drawing very relaxing.

AB: That's awesome.  I also find urban sketching very relaxing.  There is something very meditative about focusing on capturing a scene on paper and blocking everything else out for a while.


AB: Did you sketch before finding USk Chicago?  If so, when did you start sketching?

CR:
Yes I have been drawing off and on since college, but never professionally. It has always been a hobby of mine. For the past couple of year I have tried to take it a bit more seriously.


AB:  I believe that you recently held a booth for the first time at the Wells Street Art Fair, and it looks like many of the pieces you were selling were urban sketches?  How did you like the experience, and how did people respond to your work?  Would you recommend other urban sketchers to pursue their own booth at an art fair?

CR: Yes, most of my drawings where urban sketches. Some where done in the spot and some where done at home from a picture (the theaters). Having a booth at the Wells Street Art Fest was a great and exiting experience, but since work a full time job as an Art Director for Crate and Barrel, preparing the artwork was very stressful and expensive in comparison to the profit. People responded favorably, I got lots of great complements and positive feedback. Specially Architects!!! It's good for getting your name out there. (I ran out off business cards) I also confirmed that people who attend festivals are not there to spend money in original art. I was able to sell lots a prints and stationary. Everyone should try it at least once.

AB:  What is your favorite medium to sketch with?

Moleskine Watercolor Sketch book, Japanese Platinum Carbon Ink for a Super Fine Fountain Pen.

AB: Interesting!  This is my "go to" sketch kit too.  I do a lot of ink drawing also, so I really identify with and enjoy your work.  It is always fun to see similarities and differences in other sketcher's work, especially when the sketcher has an overall similar style to your own.  Your work has definitely caught my eye and inspired my own work

AB:  Has urban sketching ever had an impact on your day job as a Graphic Designer?  If so how?

© Claudia Renzi
CR: Yes, it has. It has helped me mostly with conceptual design. I can more easily illustrate/explain logo and layout ideas. I am the kind of graphic designer that likest to sketch before working directly on the computer. My sensitivity to details has improved, specially when it comes to typographical solutions.

AB: Are there any Urban Sketchers who inspire your own work?

CR:
Yes of course. Many inspire me.  You, Alex Zonis, Don Yang, Fred Polito, Chris Buczinsky and  Adriana Gasparich. Just to name a few.AB: If you could chose the next location for the our group's monthly meet up, where would it be?  In other words, where is your favorite place in Chicago to sketch?

CR: Montrose Harbor in the summer. Any Chicago Theater in the winter.

AB:  Montrose Harbor would be a great summer location.  I actually spend a lot of time there myself, walking my dog and sketching too.

AB:  Do you have any websites, blogs or social media accounts where people can see more of your work?

CL:
Design website: claudiarenzi.com
Fine art website: http://www.claudiarenzi.com/studiorenzi/index.html
Facebook page: http://www.claudiarenzi.com/studiorenzi/index.html
Studio Renzi (Etsy): https://www.etsy.com/shop/StudioRenzi?ref=search_shop_redirect

AB: Thanks Claudia! Your websites are really well done!  It has been a pleasure, and I look forward to seeing more of your work!

© Claudia Renzi


Sunday, May 8, 2016

Spotlight Sunday - Ted Gordon

Spotlight Sunday is a series of interviews designed to introduce and highlight Chicago Urban Sketchers individually.  Now that our chapter has reached nearly 500 members it has become more of a challenge to meet every member in person and have a conversation.  These posts concentrate on individuals and speak in their own words and sketches.

Interview by Andrew Banks
Spotlight on Ted Gordon: 3D Character Animator, Urban Sketcher, Plein Air Painter


Hi Ted, thanks so much for taking the time to talk and to tell our group a little bit about yourself!

How did you first hear about the Urban Sketchers community and what made you decide to join Urban Sketching Chicago?

My friend Ginny, a member of my early-morning sketching & plein air group, recommended USK Chicago to me. She was correct, it was right up my alley!

Did you sketch before finding USk Chicago?  If so, when did you start sketching?

Yes, as a kid, I was very interested in drawing, comic books, science fiction & fantasy illustration, computers - all that stuff predicted my future career. Life Drawing was my favorite part of art school - where I could see my skills increasing dramatically. Sketching outside of sessions keeps me in practice. My favorite artists have done a lot of sketching ‘in the wild’. I’ve been following their example.

Can you tell us a little bit about your career as an animator?  Does urban sketching ever have an impact on your day job?  If so, how?

I have been working as a 3D Character Animator in the games industry since 1999. I use a combination of animation skills and specialized software, including 3DS Max, Maya, and Motionbuilder, to create the motion for people, monsters, animals, and robots for video games.

I believe an artist’s career is as much about what is done outside of work hours to become a better artist as it is about what is done in the studio. I like to draw on the bus, I have a weekly plein air group, I do life drawing & life sculpture, and I like to go out and explore areas with my camera. Most recently, I explored Chinatown before people filled the sidewalks for the day. I work on portrait & house portrait commissions during my lunch hour and I make my plein air paintings available for sale on my site.

I highly respect the Disney Animators that established my industry’s Principles and actively practiced life drawing and plein air painting as part of their job. They are my role models. That, and my love for drawing, painting, & animation, motivate me. Building my skills of observation, through practice like Urban Sketching, makes me a better animator & artist.

You are also a member of the Plein Air Painters of Chicago group and many of your urban sketches can also be considered plein air paintings.  There is real neat crossover between our two groups, and we’ve personally talked about this before.  In your experience, what distinguishes urban sketching from plein air painting, and, having been a member of both groups, are there any specific skills or lessons you have learned from one group that can apply to the other?

I’ve written a Tuesday Tips and Tricks blog entry about this, so it is easy to answer. :) In my opinion, the differences boil down to three things: Time, Narrative, and Style. While both are created on-location, and in a single session, an Urban Sketch can be created in minutes, while a plein air piece could take all day to complete. Urban Sketching, with its journalistic roots, is often more literally narrative - even including text in the images. Finally, Urban Sketching can be more experimental with style. To the contrarian reader, I’d have you point me to a plein air painting with a cartoon-style character in it! :)

Both groups are about direct observation, drawing and painting on-location. I find them more similar than different. I suspect that my own work will organically combine elements of each the more I do of both!

Is there a specific subject matter you are particularly drawn to or inspired to sketch?

I like to do portrait & house portrait commissions. When I’m out and about, I am attracted to figures and architecture ‘in the wild’ too.

What inspires me tends to be the unusual, the well-lit & appealing. It’s that moment on a train, when I see an intriguing character. It’s when I spot a tree, exploding full of color from back-lit light. It’s when I find rusty old controls on a conservatory pipe. Those moments, I think, “Oh yeah, that’s getting drawn!”

What is your favorite medium to sketch with?

I’ve been carrying a fountain pen, a ballpoint & watercolors. For precision and speed, I prefer ballpoint. For even faster, but looser, I prefer the fountain pen. If I have more time, I like to add watercolor washes.

Are there any Urban Sketchers who inspire your own work?

I’m a big Don Colley fan. He shows what a life of regular practice can do. His videos, sketching in ink were so exciting to find. I love the variety of work that USK Chicago and the international group share. Everyone has inspirational work in them.

You will also be an instructor at this year’s Chicago Sketch Seminar for the second year in a row.  What are you most looking forward to about this year’s Seminar?

I’m looking forward to seeing all the new sketches my students will make, the new location, and the other instructors’ classes!

Do you have any websites, blogs or social media accounts where people can see more of your work?

I sure do!

You can follow me here:

Please contact me through http://www.tedgordonart.com/contact/ to inquire about commissioning original portraits & house portraits.

You may order prints of my work at: http://www.tedgordonart.com/order-prints/

You can find examples of my animation here: www.MotionImpossible.com Also, visit a Dave&Busters, movie theater, or amusement park near you and play Jurassic Park Arcade! I loved animating those dinosaurs!


Saturday, March 26, 2016

Spotlight Sunday - Dave Wittekind

Spotlight Sunday is series of interviews designed to introduce and highlight Chicago Urban Sketchers individually.  Now that our chapter has reached nearly 500 members it has become more of a challenge to meet every single member in person and have a meaningful conversation.  These posts concentrate on individuals and speak in their own words.


Dave Wittekind

Interviewed by Andrew Banks


For this week's Spotlight Sunday, I had the opportunity of interviewing Chicago based illustrator Dave Wittekind.  I have always been big fan of Dave's work and have a special appreciation for his really great line work and really smart use of toned papers.  Thanks again for answering my questions, Dave! It's my pleasure to help share a little more about you and your work with our group:


Hi Dave, thanks so much for taking the time to chat. 
I always enjoy seeing your sketches posted to our Facebook group.


ANDREW:  How did you first hear about the Urban Sketchers community and what made you decide to join Urban Sketching Chicago?

DAVE: Thanks very much for asking me to be a part of this series, Andrew.  I first heard of Urban Sketchers, I believe, through Twitter, though it may have been another city’s chapter. I was so happy to discover that Chicago had a chapter that met monthly.  My first meetup was the water taxi outing two years ago, and from there I was hooked.  I look forward to every outing.


ANDREW:  The water taxi event was a lot of fun.  One of the reasons I like our group is that you end up visiting places (and in this case, taking a different modes of transportation) you may not have normally gone to had it not been for the group.  I believe that is the first time we met as well.Did you sketch before finding USk Chicago?  If so, when did you start sketching?

DAVE: Previous to the USk Chicago meetups, I did very little sketching on my own, which I’m not proud of.  I still need to get into the regular habit of sketching in between meetups, though I am getting better at it.  I’ve always done preliminary sketches for my illustration work and would occasionally sketch people on the L or in airports, but very little outdoor or architectural sketching.  During the Occupy movement, I would sometimes go downtown and sketch the people there.

ANDREW: As a professional illustrator, does urban sketching play a role in your day to day job?  If so, how does it help you?

DAVE: Urban sketching has definitely helped my sense of observation and sharpens my fundamental skills.  Sketching also gives me a sense of connecting to a tradition that goes back centuries.  Also as a freelance illustrator, it’s nice to get out of the studio and interact with other artists.  I’ve met such great friends at USk outings!   

ANDREW: I have the same experience, working from home myself.  It's always inspiring to get together with our group, with so many people who have the same passion for art and sketching as I do.  I've also met some great friends along the way too!

I really appreciate the line work in this sketch.  The lines are very deliberate, yet loose and highly descriptive all at the same time.  I see this technique in much of your work.  Can you talk about this style and how you developed it?  Does it tie into a particular background or training you have had?


DAVE:
Thanks, Andrew!  My dad was always into drawing, especially political cartooning, and he encouraged my early interest in drawing. Then there was Mad Magazine, which I devoured and introduced me to the work of caricaturists like Mort Drucker and Jack Davis.
Later, at the American Academy of  Art in Chicago, I had the late Eugene Hall as a life drawing instructor.  His enthusiasm and energetic drawing style was a big influence.
After graduation, I worked as a storyboard artist at Foote, Cone, & Belding ad agency, where we needed to further develop a quick, expressive style to convey action & emotion with just a few lines.

ANDREW:  Is there a specific subject matter you are particularly drawn to or inspired to sketch?

­
DAVE: My two dogs are always a great source of inspiration (and they never complain if I make their noses too big).  I’ve always been more comfortable drawing organic things like people, animals, and foliage as opposed to man made structures.  That’s why I’m so impressed with the work that you and others post of buildings and architectural details.  I’m hoping to get more comfortable in that area.

ANDREW:  What is your favorite medium to sketch with?

DAVE: Though my illustration work for the most part is created digitally, it always starts with a series of preliminary sketches, usually with pencil or Sharpie.  My USk sketches to this point have been done using Sharpie or Tombow brush markers on toned paper with white conté highlights.  I’ve added occasional watercolor washes too.
  

ANDREW: Are there any Urban Sketchers who inspire your own work?

DAVE: I can honestly say that everyone at USk inspires me.  It’s such a pleasure to see such a great variety of styles and medium.  I also occasionally go online and do Twitter searches for #sketchbook and #urbanSketch.  It’s astounding to me how much incredible work is being done on a daily basis.  I also recently read New York artist Molly Crabapple’s memoir “Drawing Blood”.  I like the way she uses her sketches to inspire activism.

ANDREW: If you had to narrow your sketch kit down to your three favorite sketching tools, which would you choose?

DAVE: In the previous interview, Fred Polito said that he’d like to expand his tool set, though his watercolors are so masterful, I can see why he’s tempted to stick with them.  I feel the same way about exploring additional tools, rather than getting too comfortable with a routine.  Still, if I HAD to limit it to three, I guess I’d have to go with toned paper, Tombows and white conté.

ANDREW:  Fair enough!  I threw you a curve ball there, but I can't help but agree that it's also tempting to try different media on occasion.  I think it comes naturally to creative types.

ANDREW:  Do you have any websites, blogs or social media accounts where people can see more of your work?

DAVE:  I have two sites. One, at http://davesink.com is my personal Illustration website and blog, and another website run by myself and a partner, at http://dipstickstudio.com, features graphic recording and whiteboard videos.

Thanks again Andrew. I really appreciate  all the work you and the rest of the USk Chicago organizers do for the group!

ANDREW:
Thanks for your time Dave!


Tuesday, March 31, 2015

Sketching Architectural Details

TUESDAY TIPS AND TRICKS


If you have ever finished a sketch, held it up and compared it to the actual subject only to realize that something about your sketch was just not right, this post is for you.

Between Barbara Week's recent post entitled "Off The Grid - Designing a Page" which talked about guidelines as compositional tools, and a recent architectural sketch I made, I wanted to "piggy-back" off of the topic of guidelines in urban sketching and talk specifically about how guidelines can help you simplify and map out the different parts of architectural details.

Buildings and architectural details can seem like daunting subjects to draw.  Thankfully, there are several observational cues to pick up on that will help you map out your drawing and establish an educated guess about the sizes, proportions, patterns and elements that make up your specific detail.  You don't even need to know the technical names of the architectural elements, or how they go together.  You just have to have the ability to make observations.  After all, that's half the battle of urban sketching is, isn't it?

(A couple quick side notes: 1.Check out a couple of my previous and related posts for a more full set of tips on architectural sketching.  "Perspective for the Urban Sketcher" and "Drawing Architecture: Sighting Size and Proportion" AND 2) these ideas can be applied to other subjects including figure drawing, landscapes, and most other types of subjects as well.)

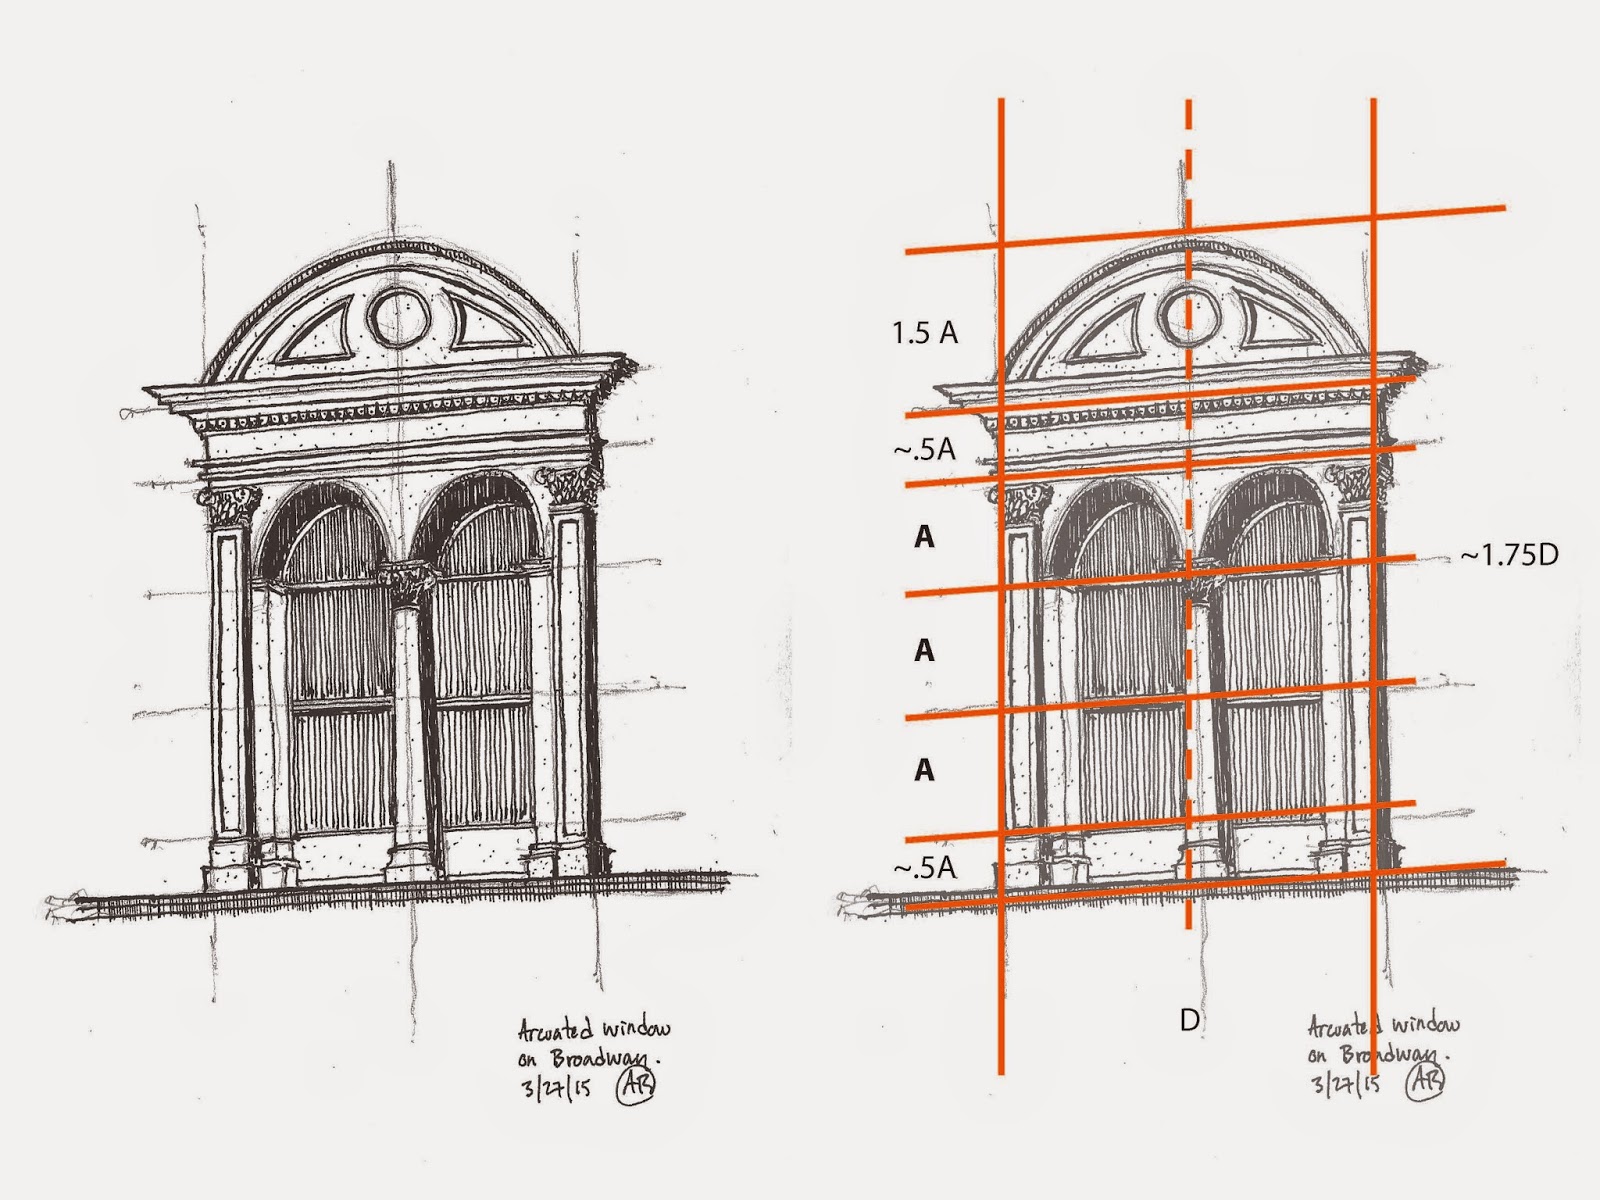
Here is the scan of my sketch.  As you can see more clearly here than in the picture above, I used several guidelines in my initial pencil sketch before adding value in ink.  I left the pencil guidelines in for aesthetics.  Personally, I like how guidelines can add to the story of a sketch.  Guidelines show your process.  They add a level of technicality to the drawing. Many of the greatest artists left pencil underlays partially visible in their masterpieces. I think guidelines give an added personal touch, but this is just my opinion.


The image to the right is fairly self explanatory, however, I will share a little bit about how I approached this drawing.

I began by drawing the center line (dashed) guideline.  Since this detail is symmetrical, the center line is the most important guide to get you started.  Recognizing that the left and right sides of the detail have the same width, I added two more vertical guides, spaced equally as far away from the center line as I could have approximated while standing up, holding the sketchbook.

After I had determined the overall width of the detail, I used the sighting technique (explained in more detail here) to approximate how many widths (D) tall the detail was.  I found that the details was about 1.75 widths (D) tall.  Basing all of the approximate sizes off of one or two of the dimensions in your detail will help you keep all of the different parts of the drawing proportional to the detail as a whole and in relationship to one another.


I then drew a few horizontal lines.  I found larger shapes that I could use as benchmarks for the detail, so to speak.  So as you can see, (bottom to top) my horizontal guidelines fell on the base of the column, the center line of the window, the top of the middle column, the top of the two side columns, the bottom of the entablature, as well as the top of the arched pediment at the top.  Like in all other forms of design, there is a method to the madness in this detail's composition, which is why the sizes of A, .5A and 1.5 A all work well together, and were easy to approximate.

I drew the guidelines at the center line of the window, the top of the middle column, and the tops of the two side columns first.  A quick approximation told me that the bottom and top portions were half the height of A, and that the curved pediment on top was about 1.5A.

Now that the major heights and widths were mapped out, I filled in all of the rest of the details. (Column capitals, window mullions, arched openings above windows, additional lines on the entablature, as well as the dentils in the molding).  I did not draw guidelines for every single detail (although if you want to you can.)  Instead, since the major sizes and proportions were laid out, I could then "eyeball" the sizes and proportions of the smaller details since enough information was already mapped out for me.

This is something that may take a while to get the hang of, but once you do it a few times it will begin to make more sense.  At first, sketching like this may take a little longer than just "winging it".  However, the more you do it, the more it will make sense and will end up increasing your sketching speed in the end.  Learning how to sight size, proportion and perspectives were the most valuable urban sketching skills I learned when I was first introduced to urban sketching.  They are skills I use in almost every sketch I do to this day.

I hope this post, along with the previous posts on sighting and perspective are helpful.  Feel free to ask any questions.

Lastly, don't forget to follow us on Twitter, Instagram, and Pinterest.  If you live in the Chicago area, connect with us through Facebook.  We sketch as a group every third weekend of each month at different locations throughout Chicago.

Andrew


Tuesday, October 28, 2014

Graded Wash in Watercolor

Tuesday Tips and Tricks

Watercolor is a great tool for urban sketching.  In this post, I will show you a technique I use frequently in both urban sketching and my professional work.

Watercolor is a delicate media and can be frustrating to work with if you do not have some basic steps to work with.  Graded washes are a helpful skill to know when wanting to capture light, shade and shadow.  In nature, light rarely hits a surface as a flat tone.  Factors such as the orientation of the subject, the context of the subject and the direction from which the light is coming from all impact how light appears on the subject. 

Here is a step by step process for creating a smooth, graded wash with watercolor, followed by a few practical applications for graded washes:

Creating the Graded Wash:


1)
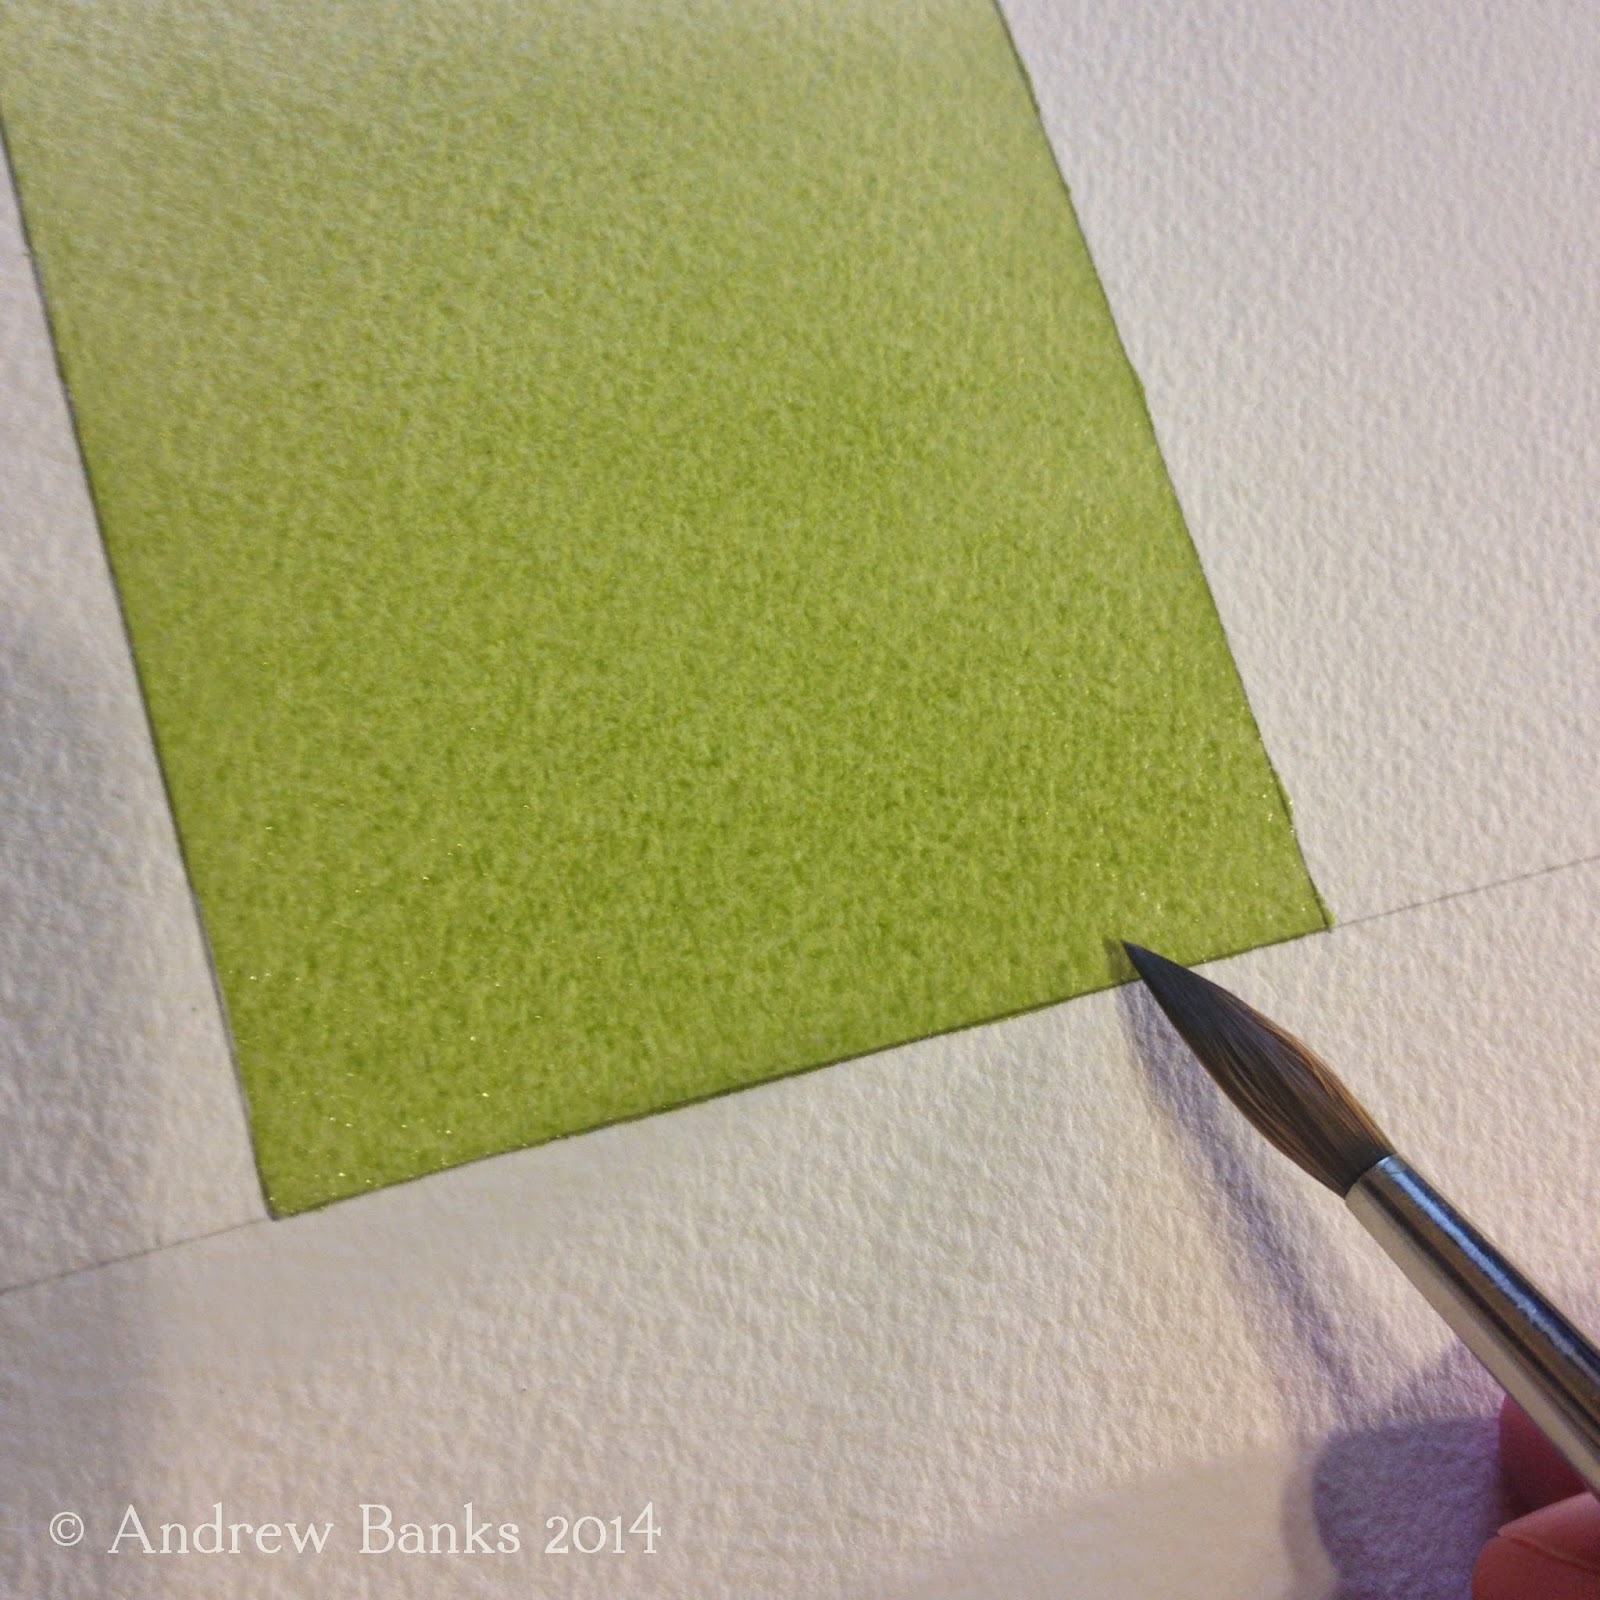
Hold your sketchbook or paper at an angle to allow the watercolor to flow down the paper.  About a 35 degree angle works well for me.  If the angle is too high, the water will drip too fast for you to control.  If the angle is too low, the paint will not move fast enough, could cause unwanted buckling of the paper and will not allow for a smooth wash.

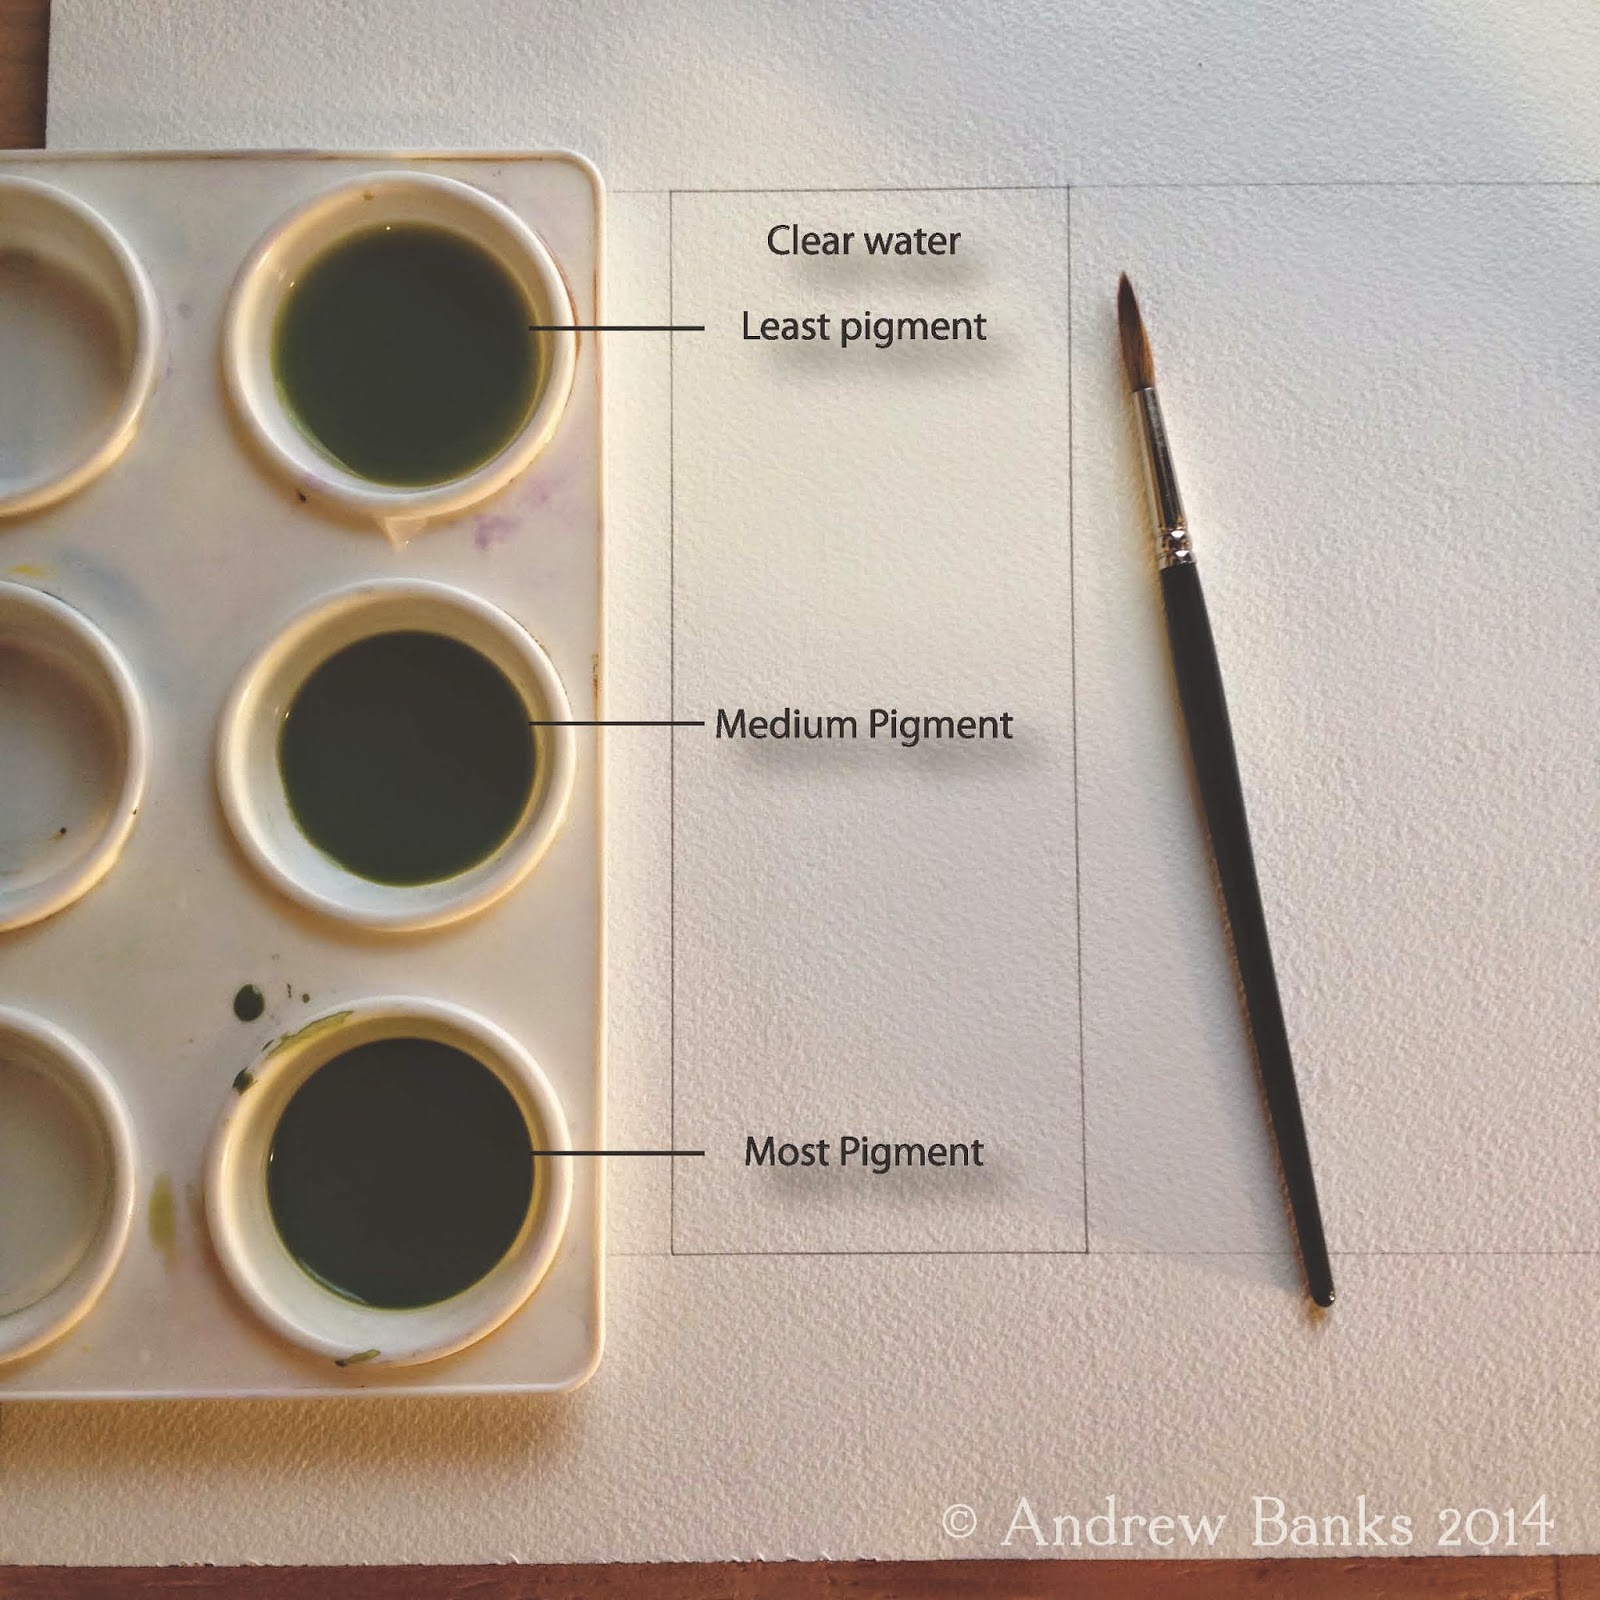
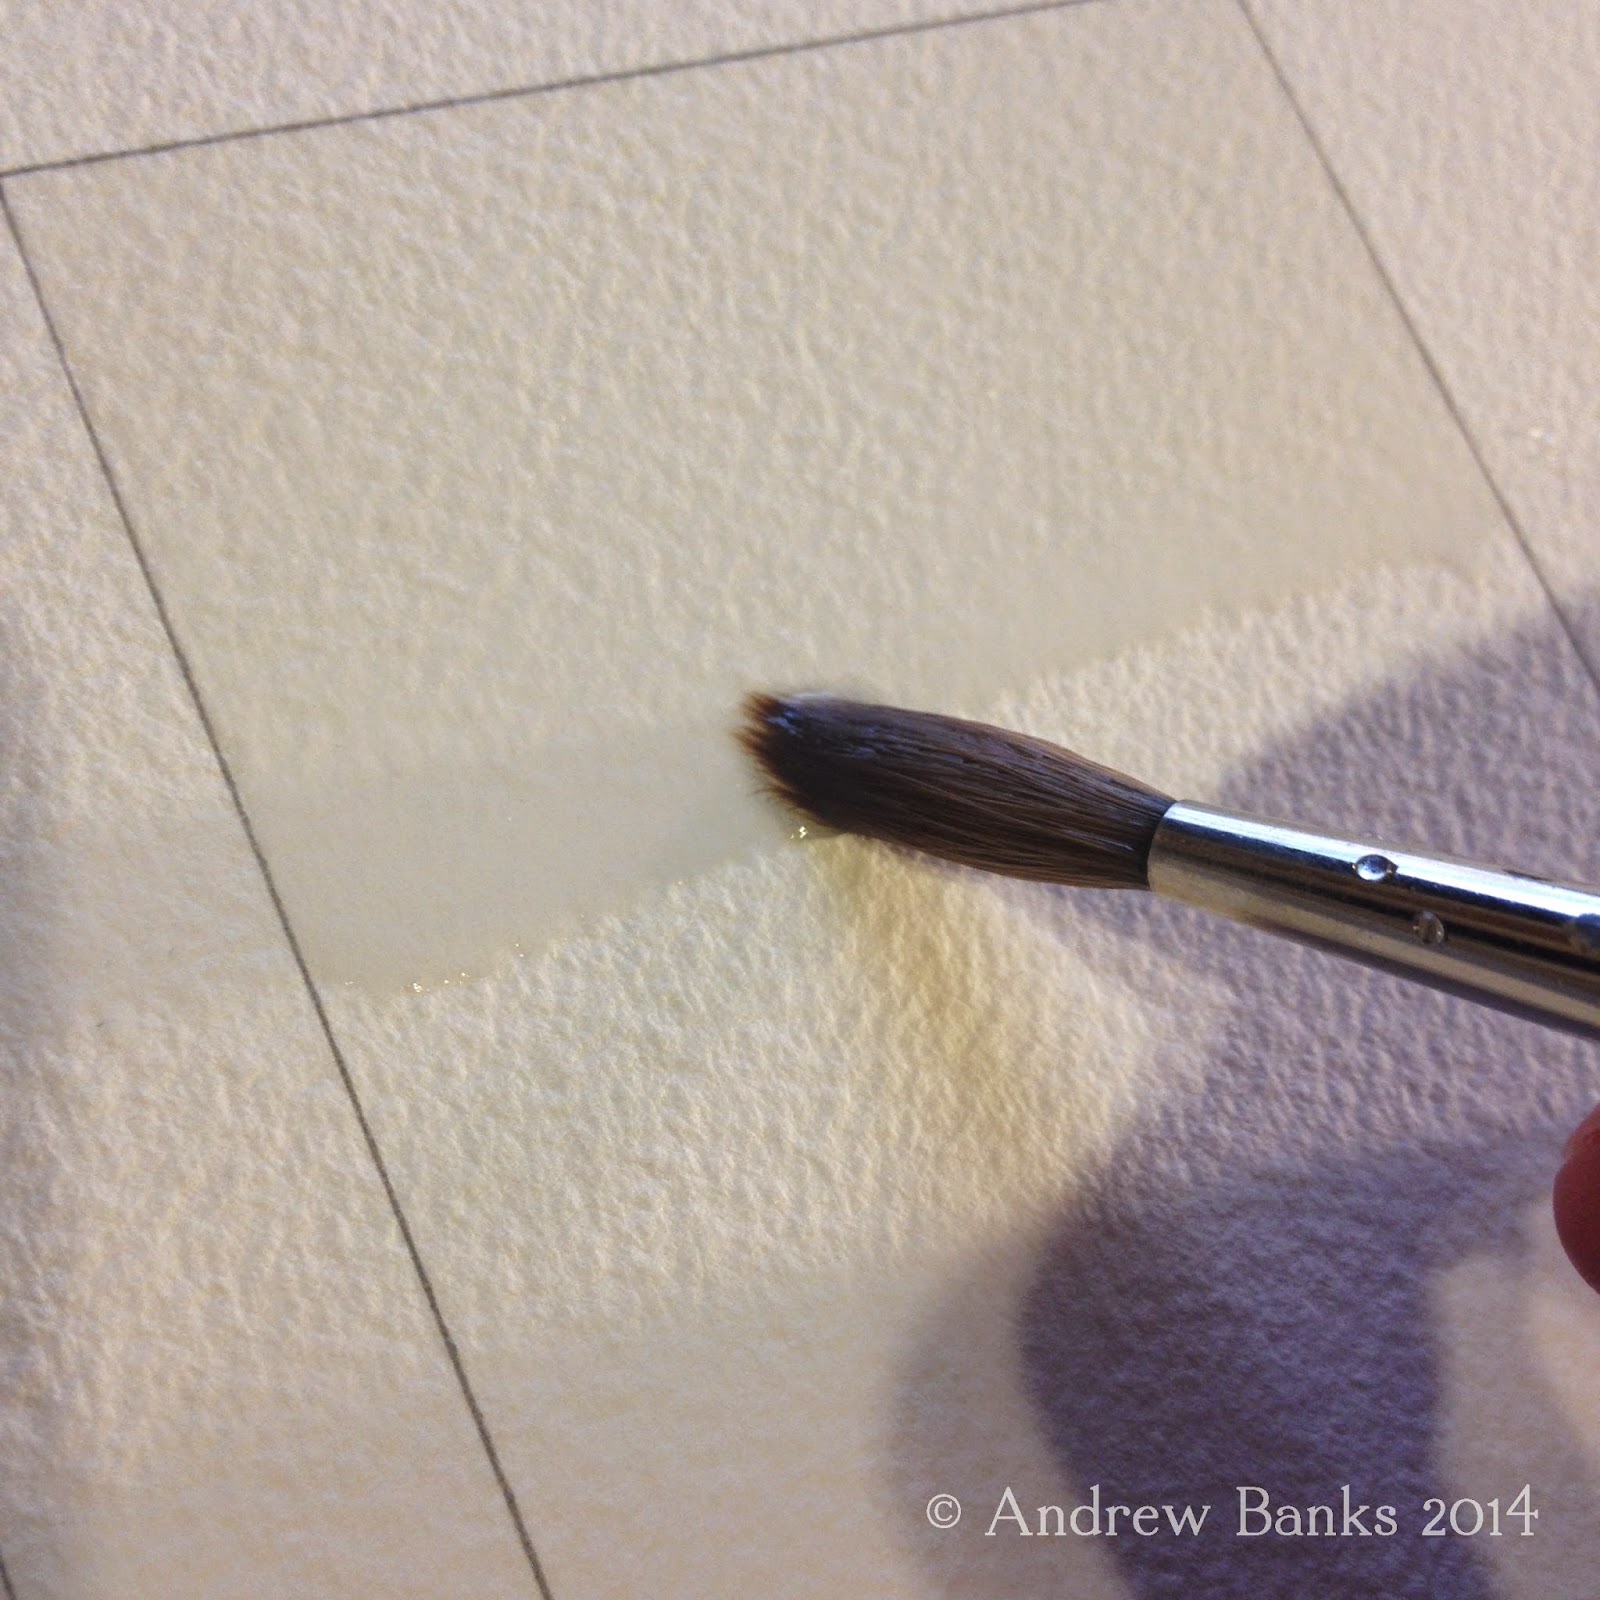
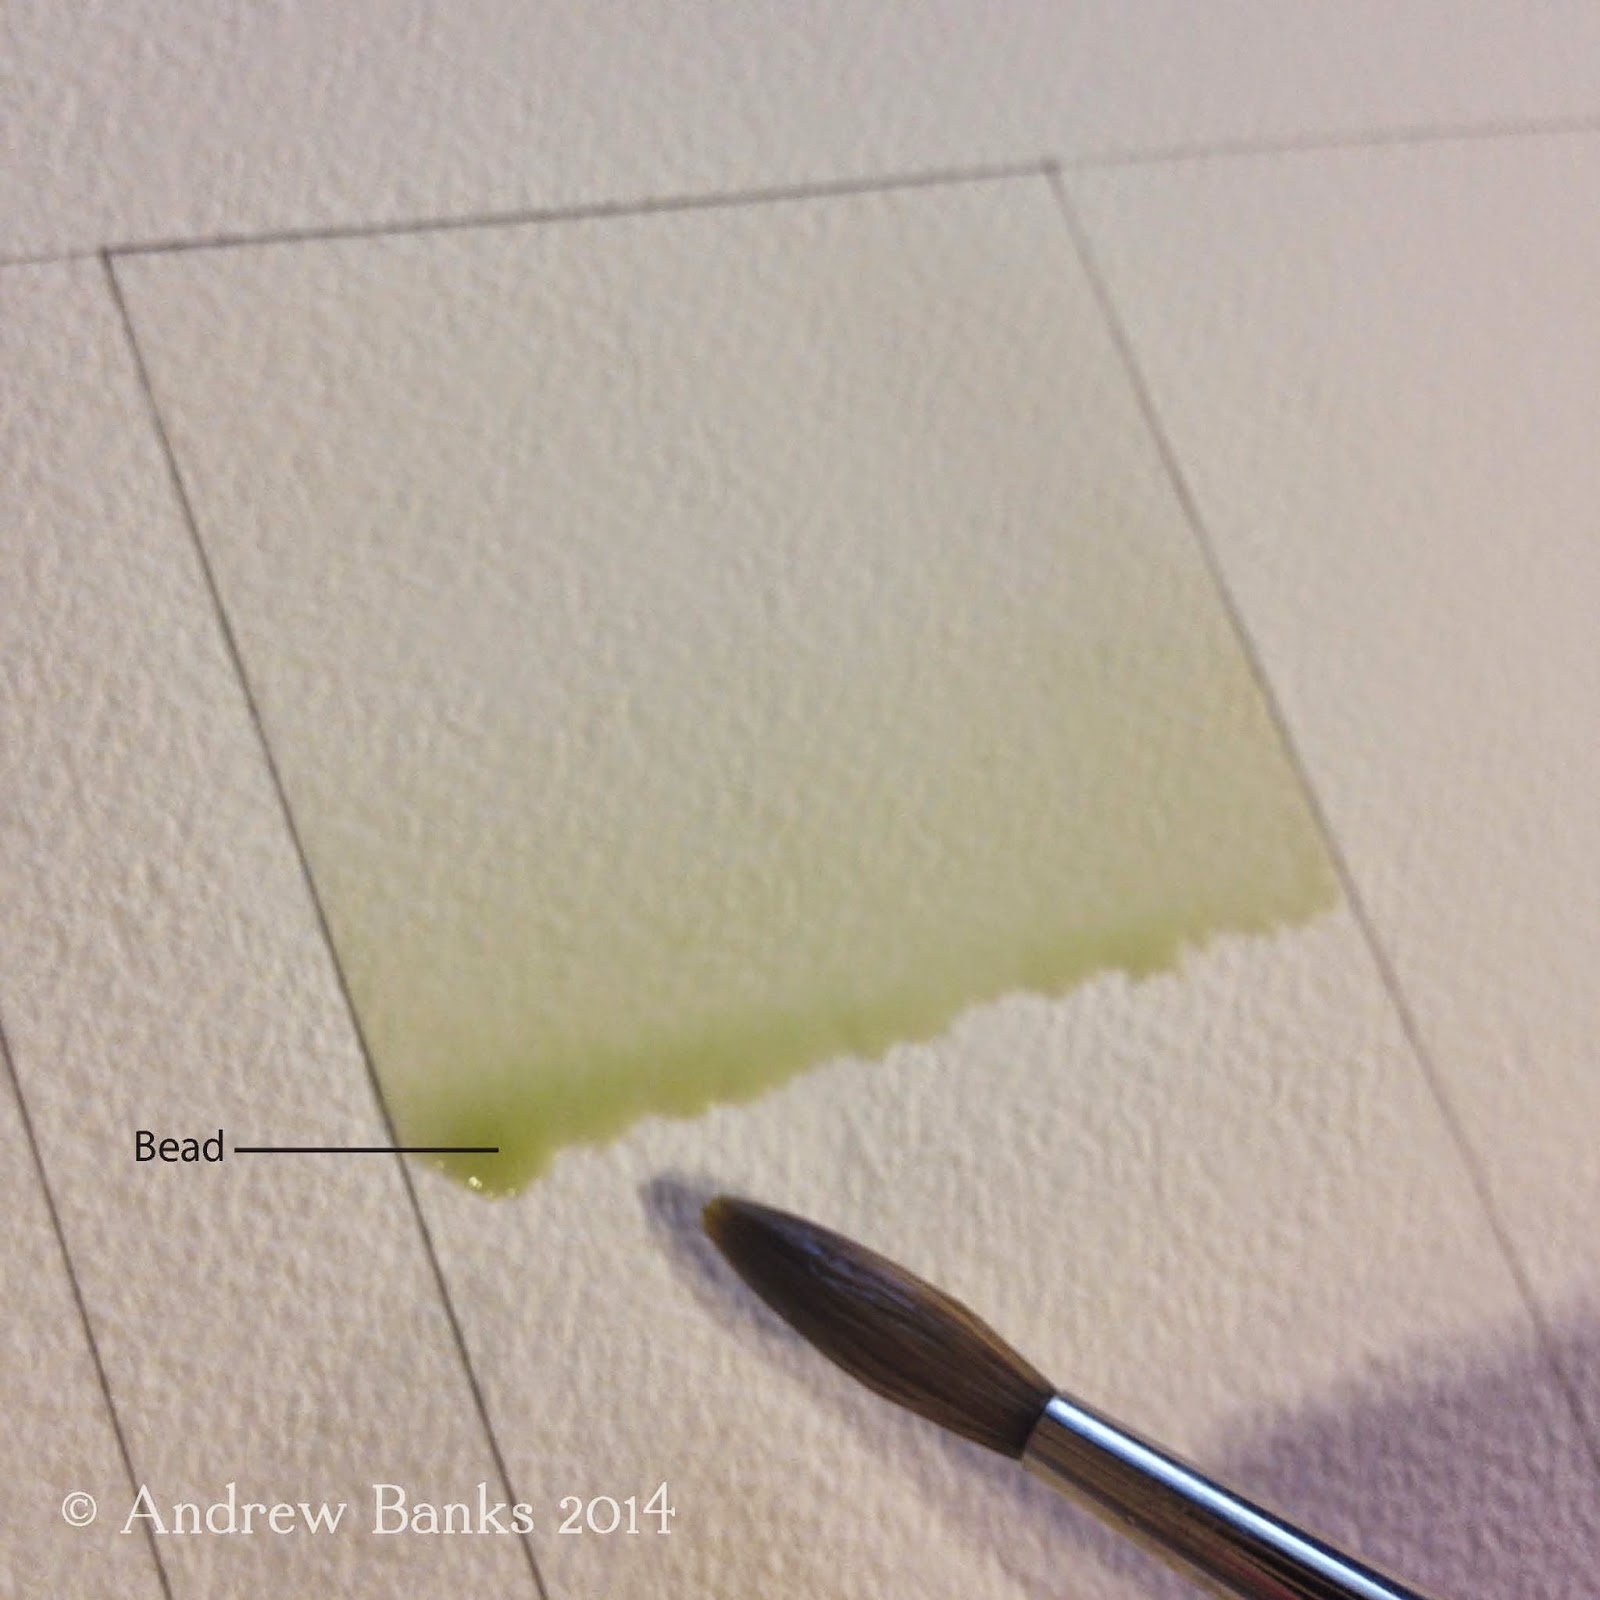
2) Load brush with completely clear water.  Apply clear wash to paper, creating a bead, allowing the water to gather slightly.  (If your angle is just right, the water will stay where you guide it.)  Make sure there is an even amount of water in all parts of the bead.


3)
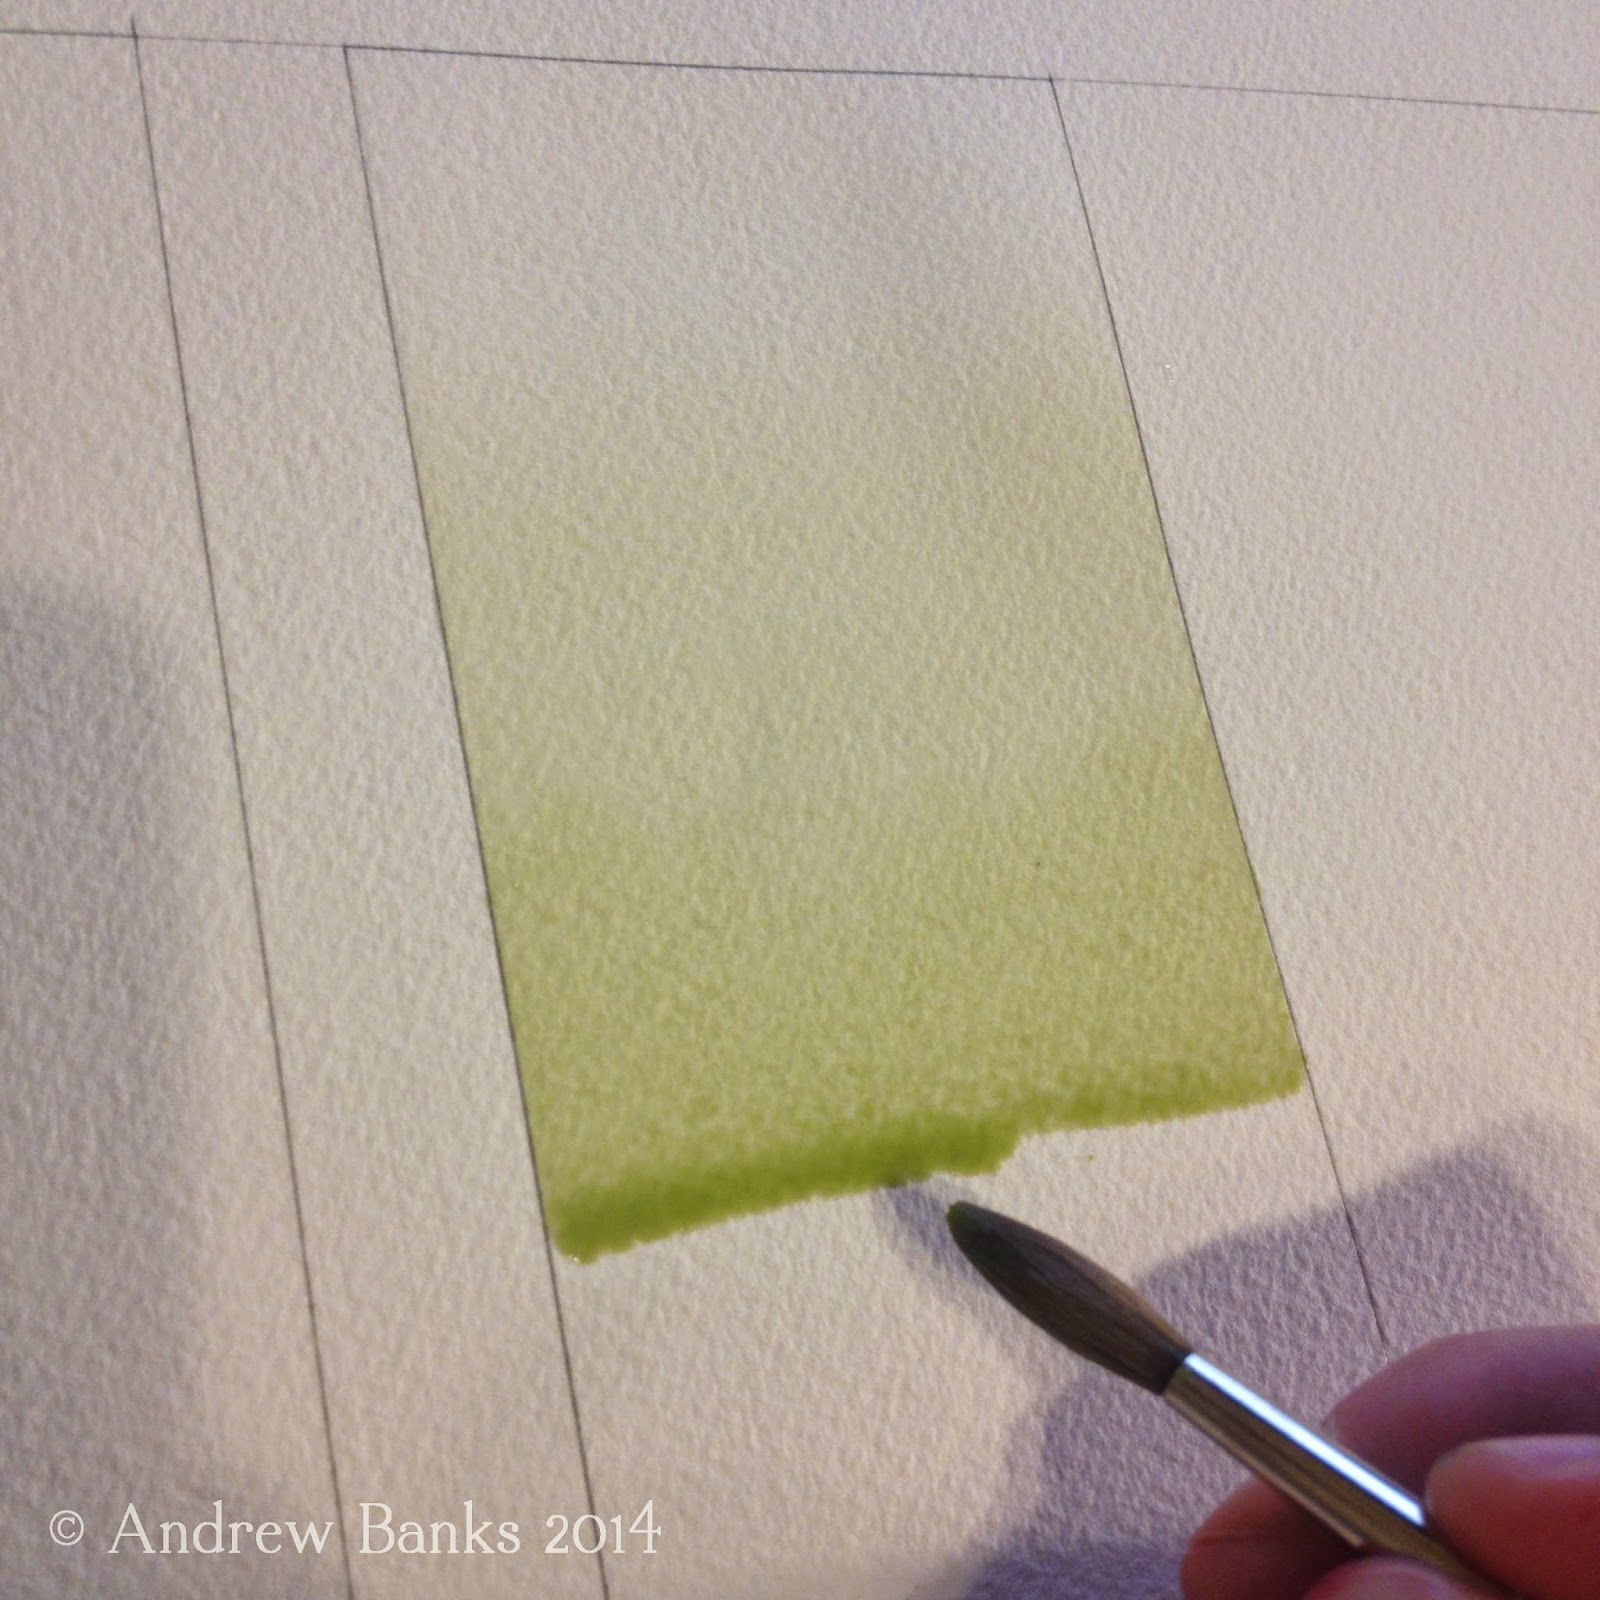
  Load your brush with a highly diluted watercolor wash and introduce it into the clear wash before it has time to soak into the paper and dry.  With downward brush strokes, pull the bead of paint down the page.  You will begin to see the pigment from your brush get pulled into the clear wash.


4)
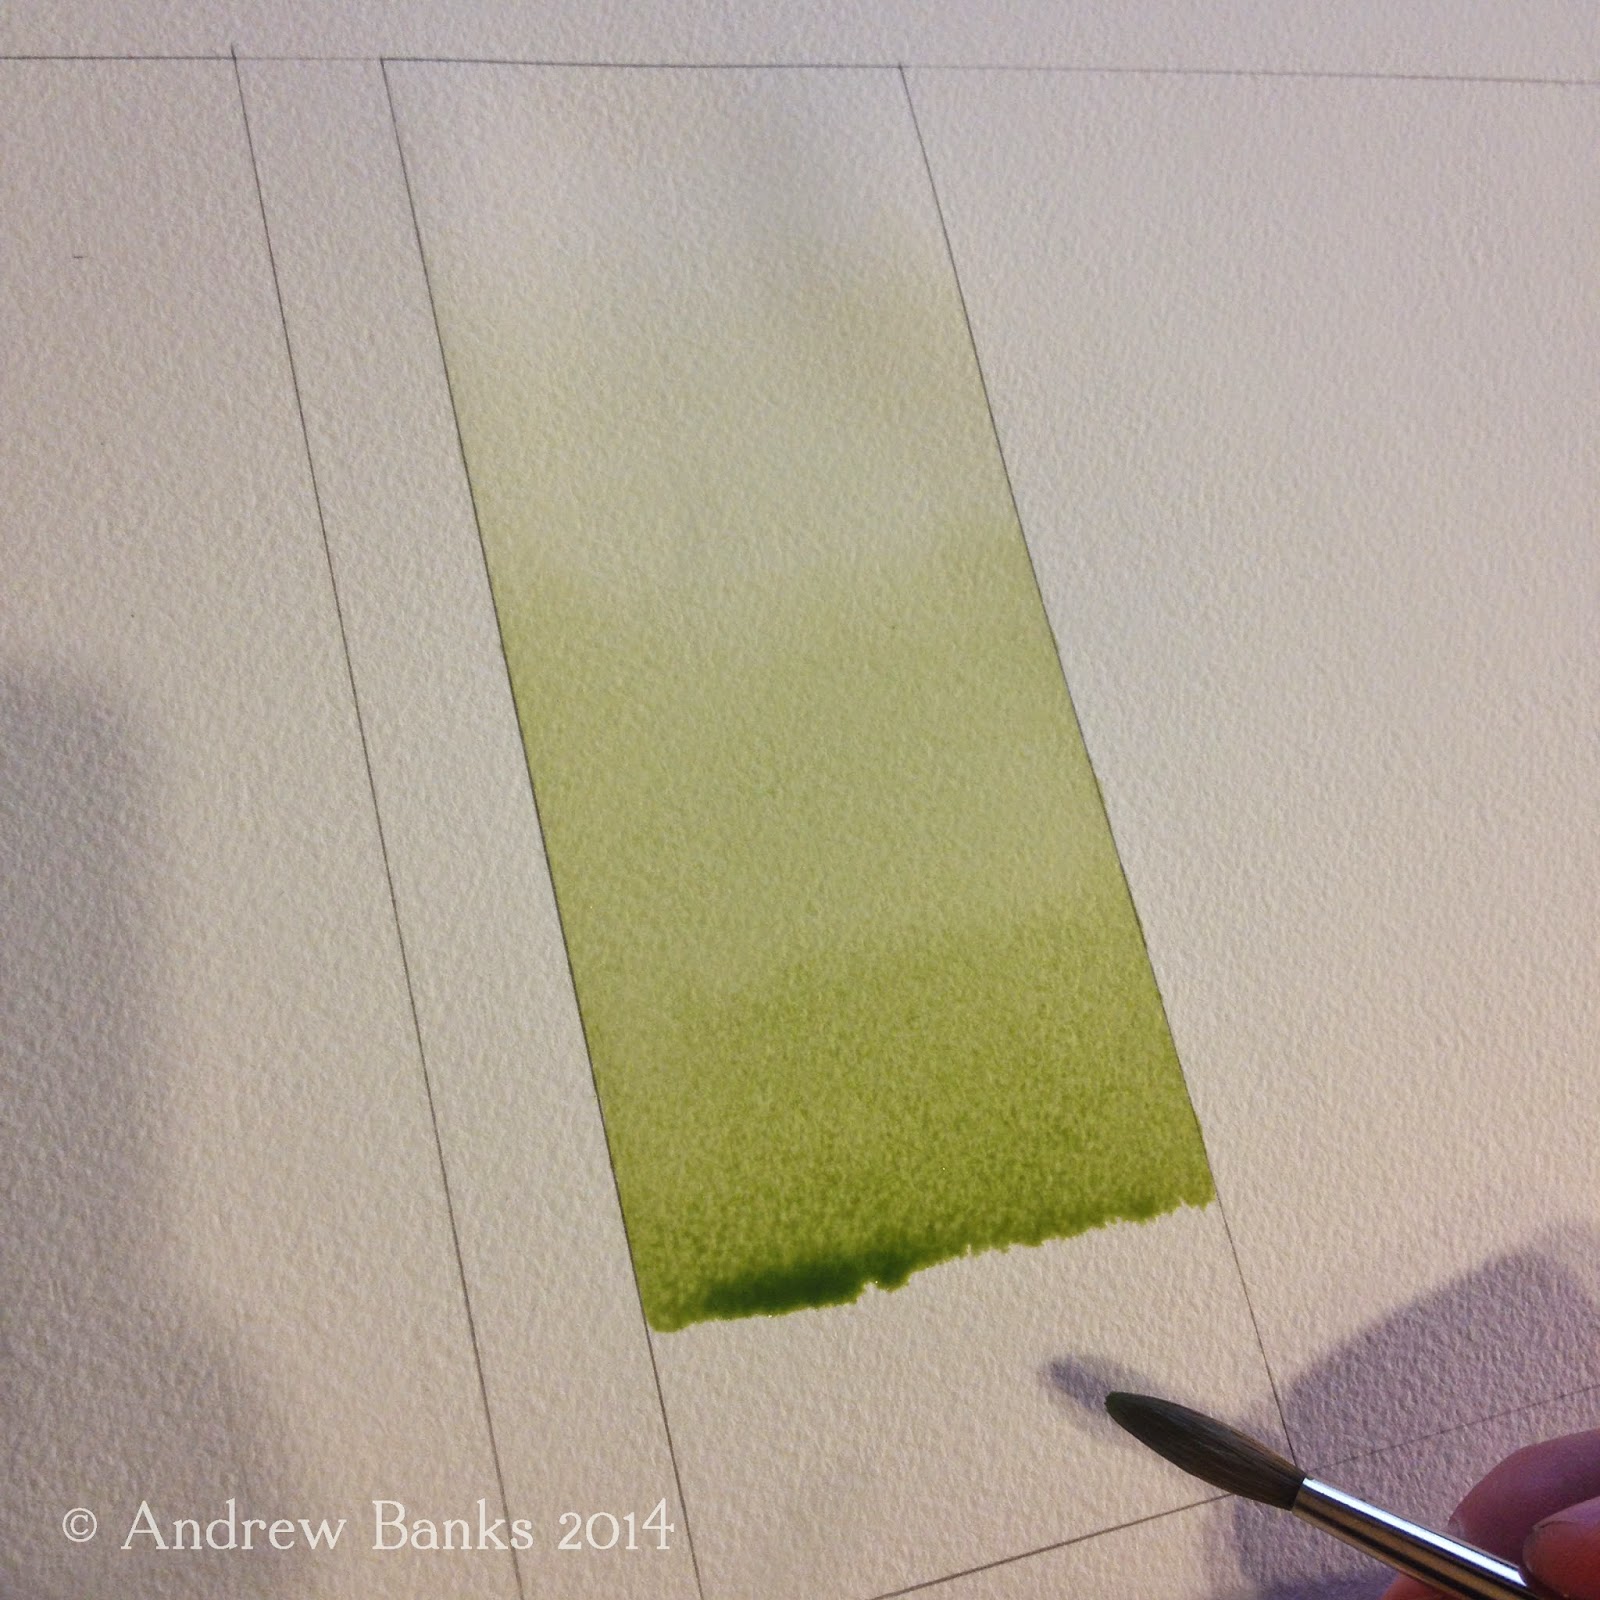
Load your brush with a slightly more pigmented wash and introduce it into your bead, continuing to pull it down the page.  (Work on doing this quickly.  If you allow the bead to dry, you will be left with a line of color that will interrupt the graded wash).


5)
Load your brush with the highest pigmented wash and continue to pull the bead downward.


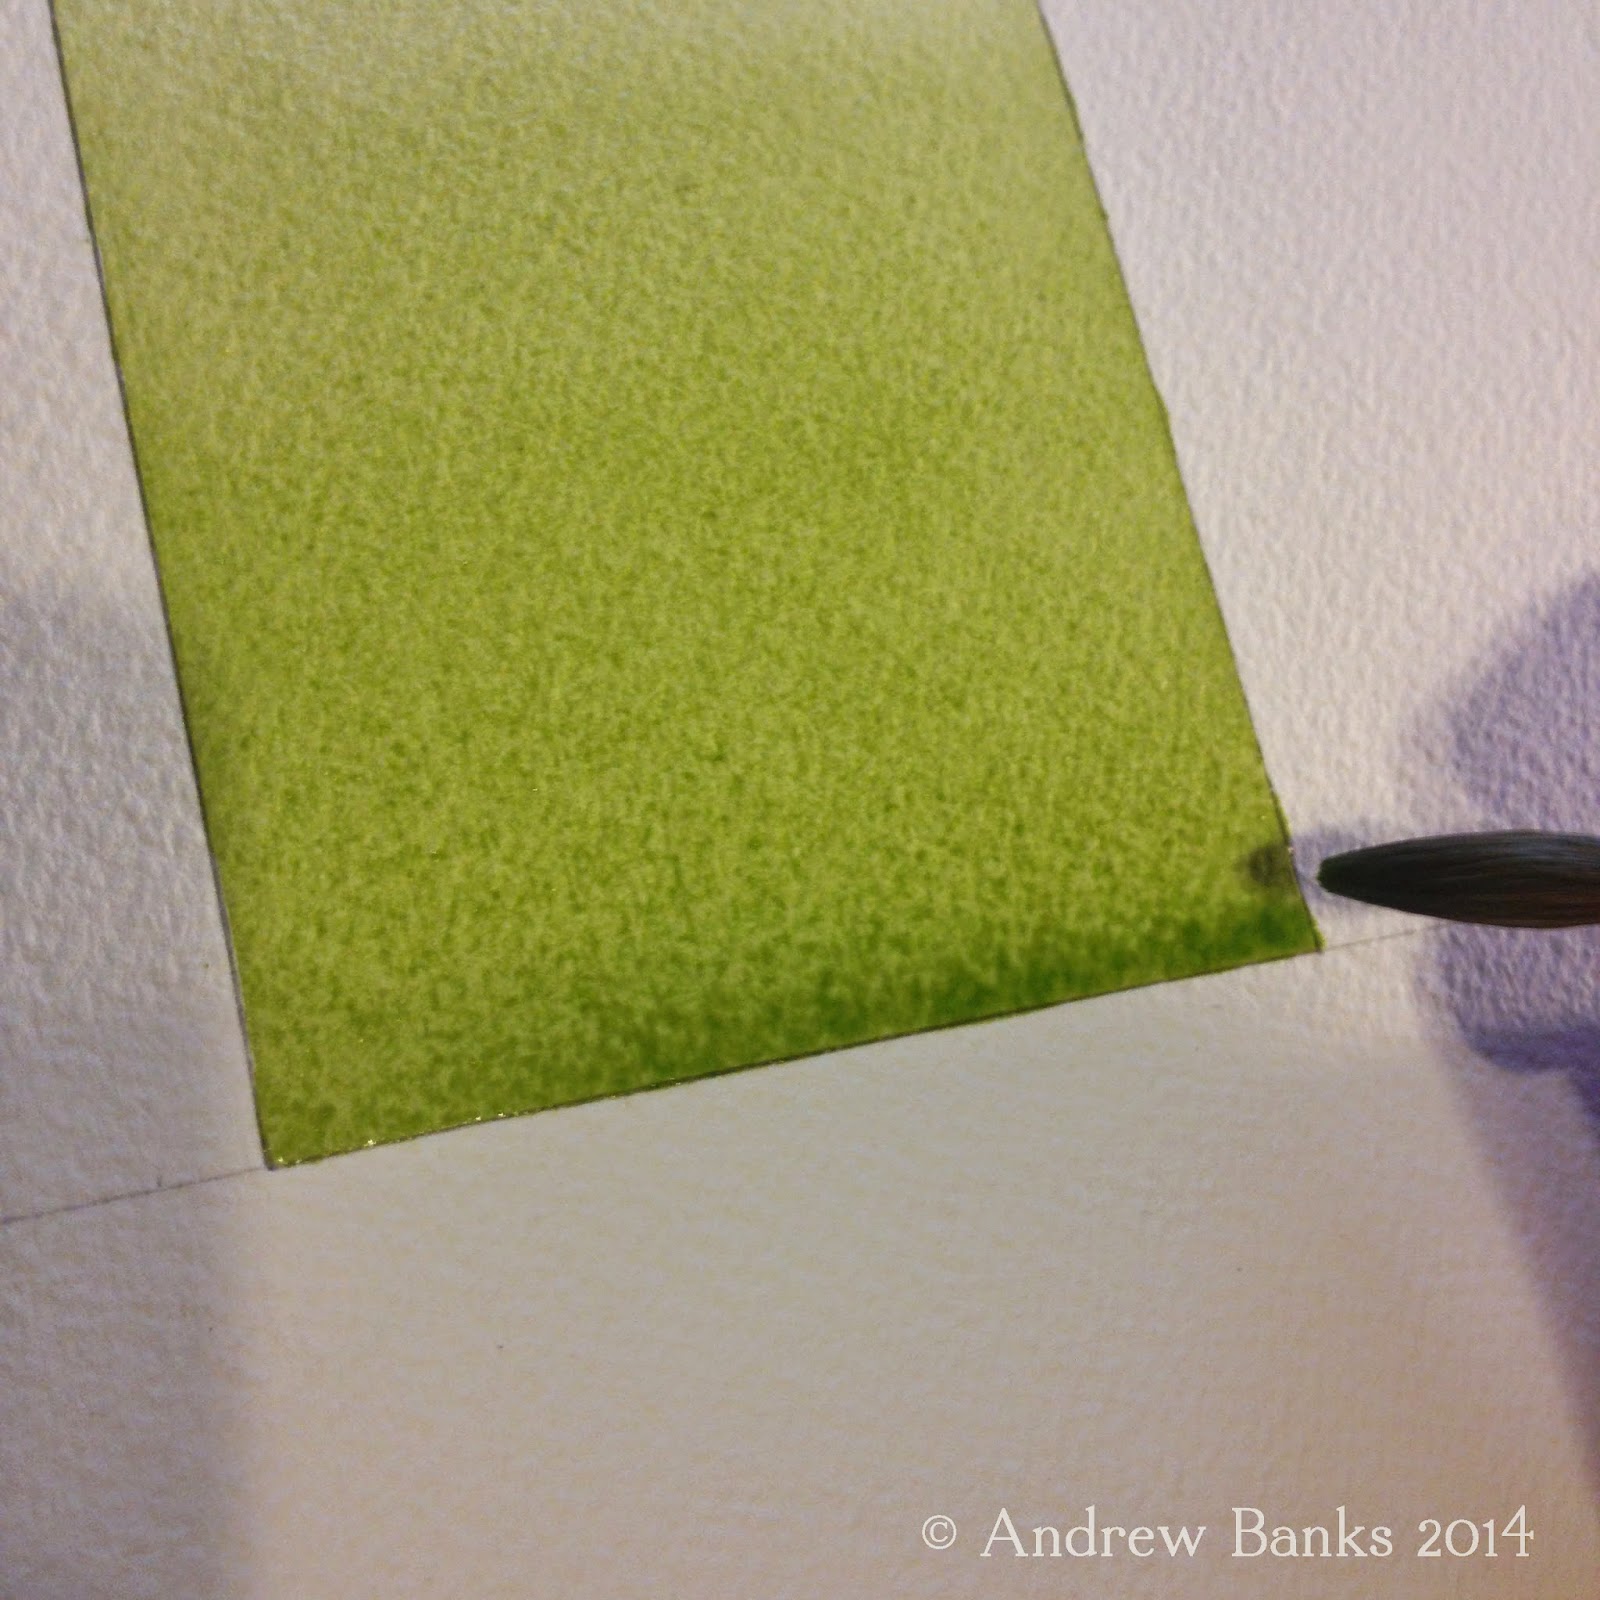
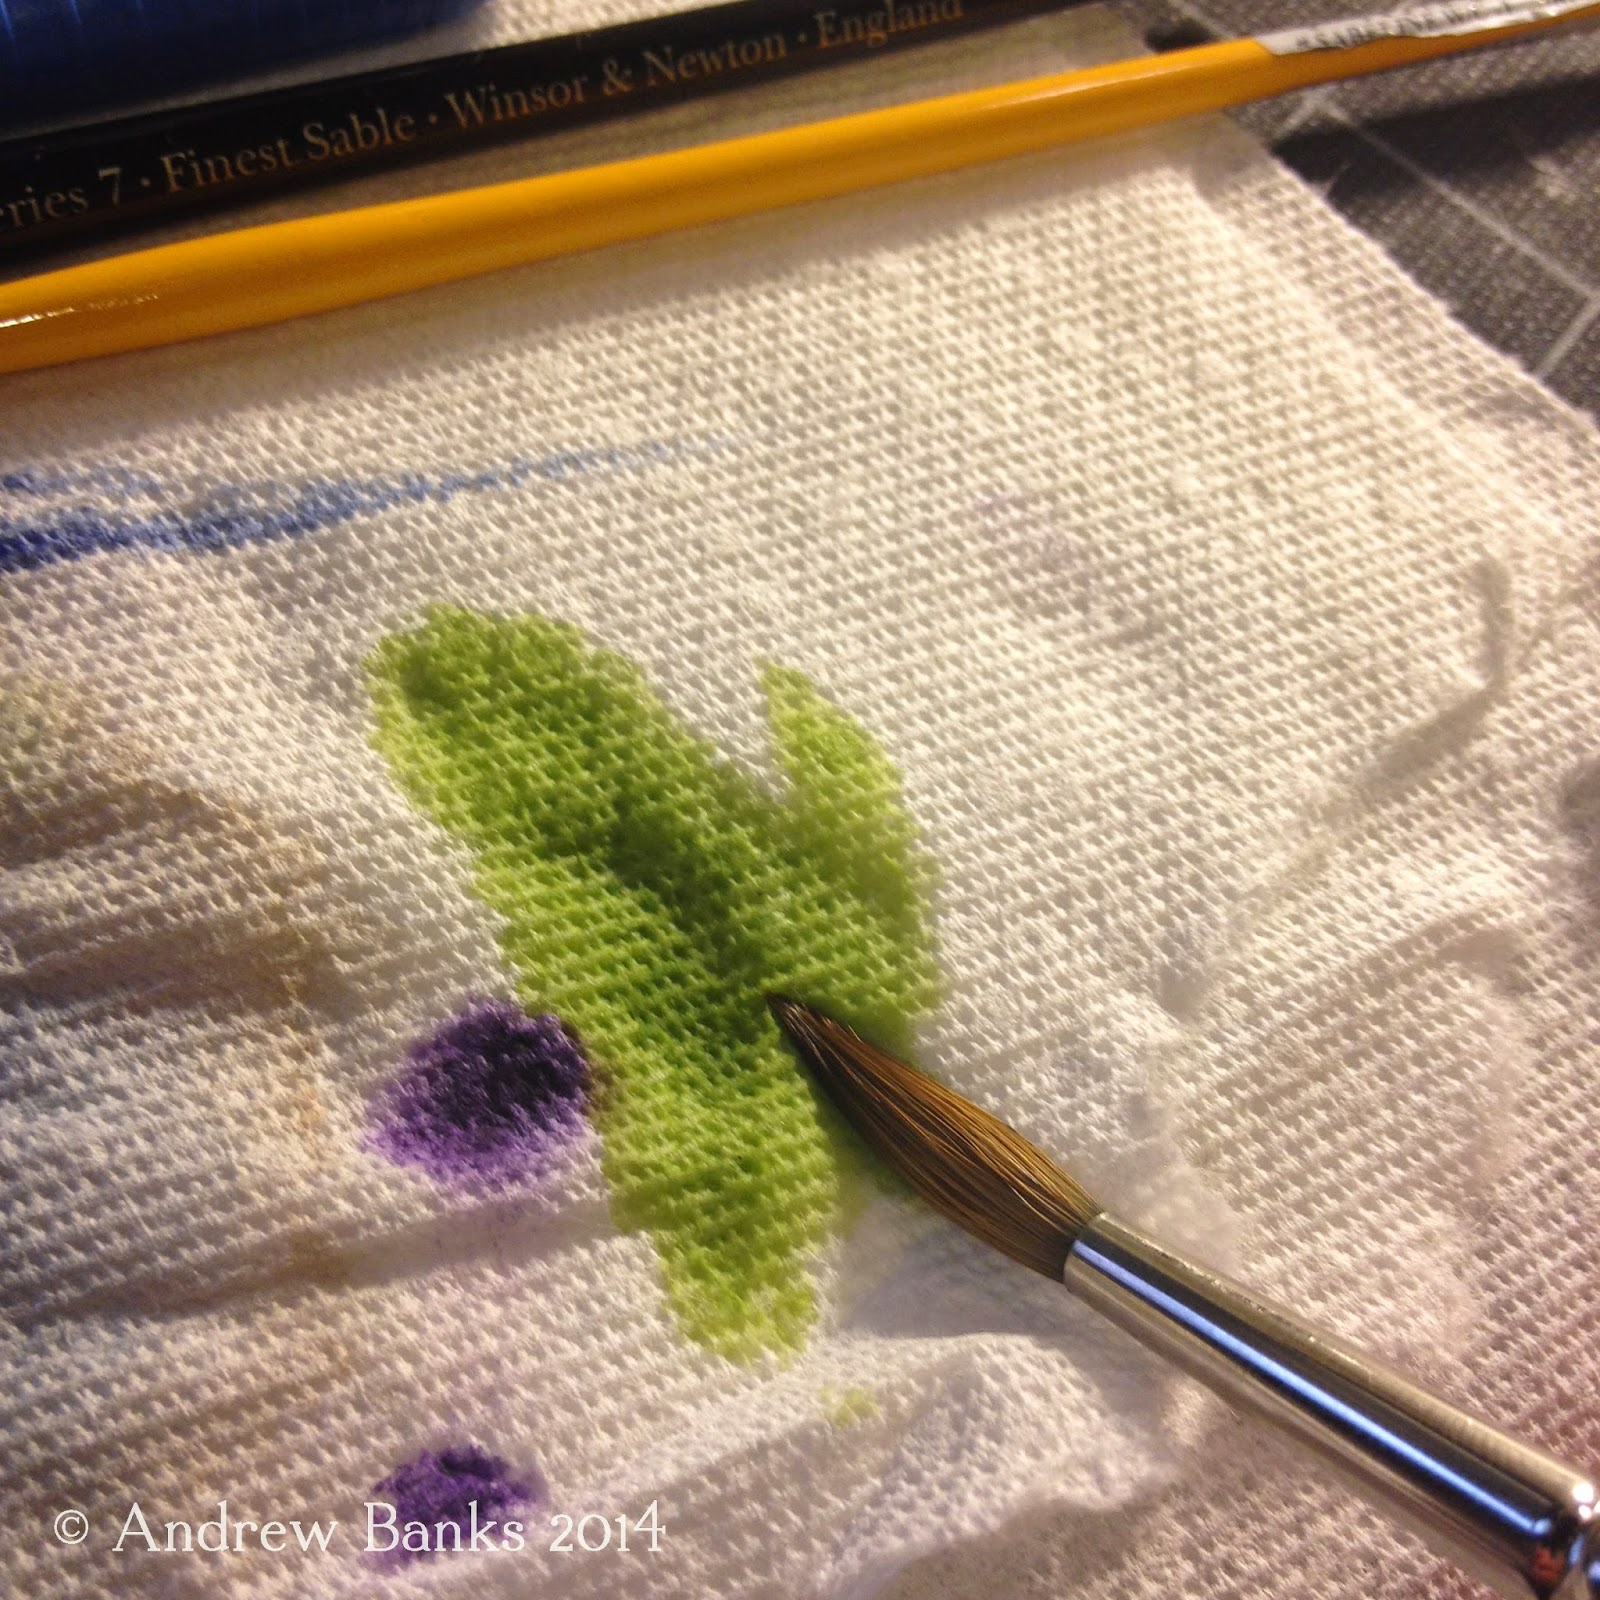
6) Bring your bead to your desired edge or location.  Shake the brush off of or touch the brush to a paper towel to absorb the excess water.  Gently touch your dry brush to the bead.  Your brush will absorb the excess water back into the brush, leaving an even surface of paint on the paper.  If we left the bead of water on the paper, the excess paint would diffuse back up into the earlier wash and would create an unwanted stain.


7) Repeat steps 2-6 until you get the values you want.

Graded Wash Applications:
Here are just a few examples of applications for graded washes

Shadows
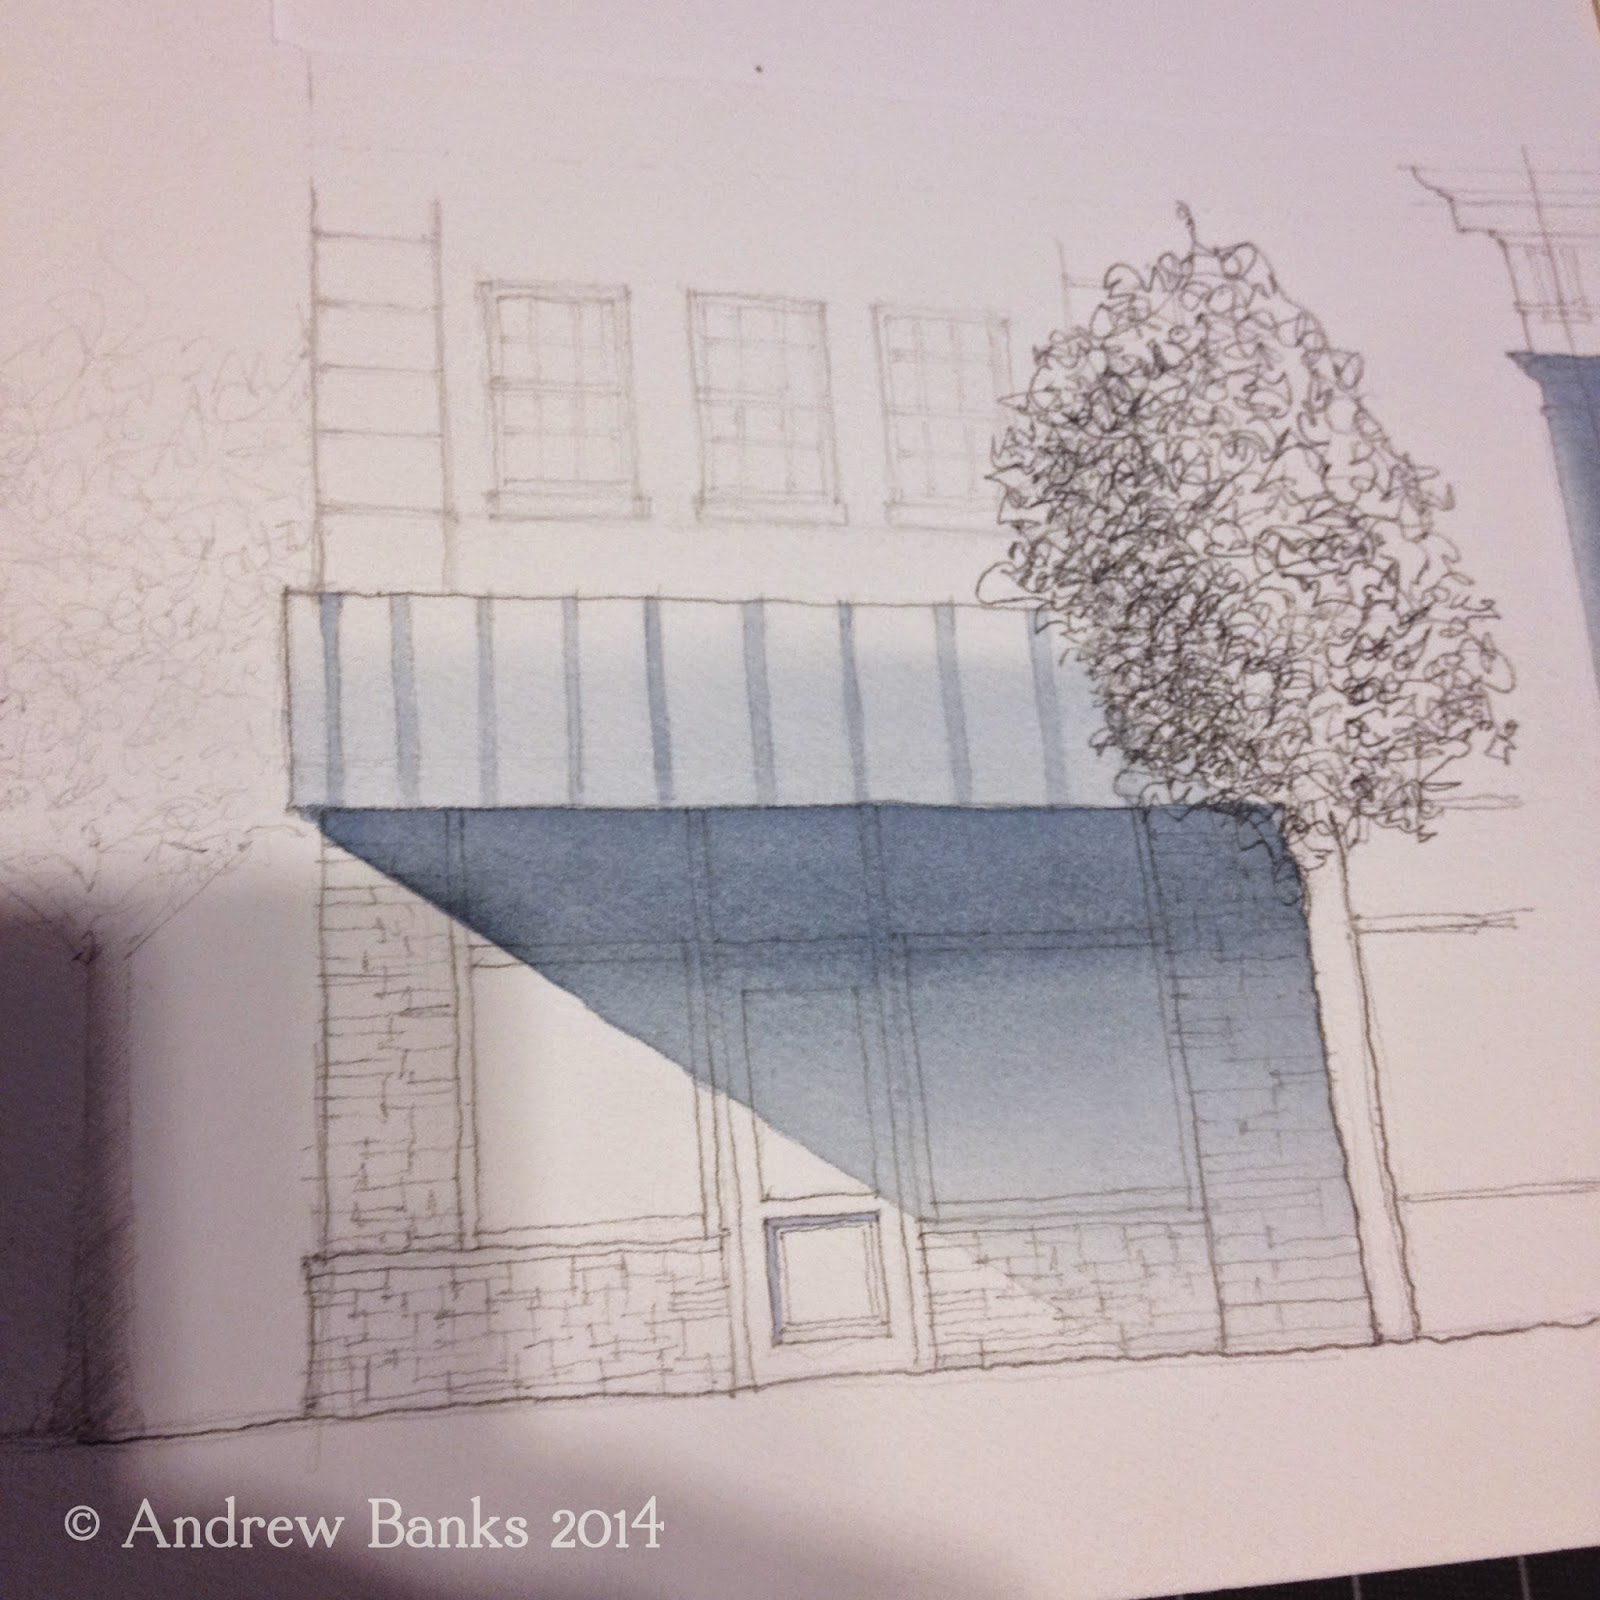
Here, the graded wash works perfectly for a shadow cast on the underside of an awning.  On a sunny day, light will reflect off of the ground surface back on the building wall.  The graded wash allows you to show this reflected light gradually darkening as it gets farther from the ground and up under the awning.


Curved objects
Curved objects have a range of tones (highlight, mid tone, shadow, reflected light, cast shadow) that can be achieved with graded wash.

Skies
Depending on where the sun is in the sky, the sky will have a graded wash.  For example when the sun is low on the horizon, the graded wash will be light on the horizon line and darker the higher you go into the sky.  When the sun is higher in the sky it is generally the opposite.

Tuesday, September 30, 2014

Drawing Architecture: Sighting Size and Proportion

In my last post “Perspective for the Urban Sketcher:Sighting” I shared a technique for drawing in perspective.  With some of the feedback I received from that post, I was reminded of a related, yet different technique that can be used with sighting.  Sighting can also be used to gauge size and proportions.  In this post, I will build upon the sighting technique and show you how to draw architecture, simplifying an elevation down to large, simple shapes and using architectural features as measuring devises.

If you've ever spent time observing architecture, you've probably noticed that there are almost always some degree of pattern and relationships between different shapes and masses.  Whether they are windows, doors, columns, arches, roofs etc... they are all sized and proportioned in relationship to one another and to the building as a whole.  An urban sketcher can use different elements of a building as tools to his/her advantage, especially when sighting.

When sketching architecture, size and proportions are dependent on your distance from and relative position to your subject.  So, before getting to the steps, the following rule must be followed in order for this technique to work:

Remember, once you decide where to sit and sketch, you must stay in the same spot until you have at least marked out all sizes and proportions.  (Once you move, your distance and relative position to the subject changes, and your sighting approximations will be inconsistent).

Sighting Size and Proportions: Step by Step

1) Take a few minutes to observe the building, pointing out some of the major shapes, structural features or patterns.  When sighting for size and proportion, you will draw your building starting with the larger masses of the building, moving down to the smallest masses and details last.


2)
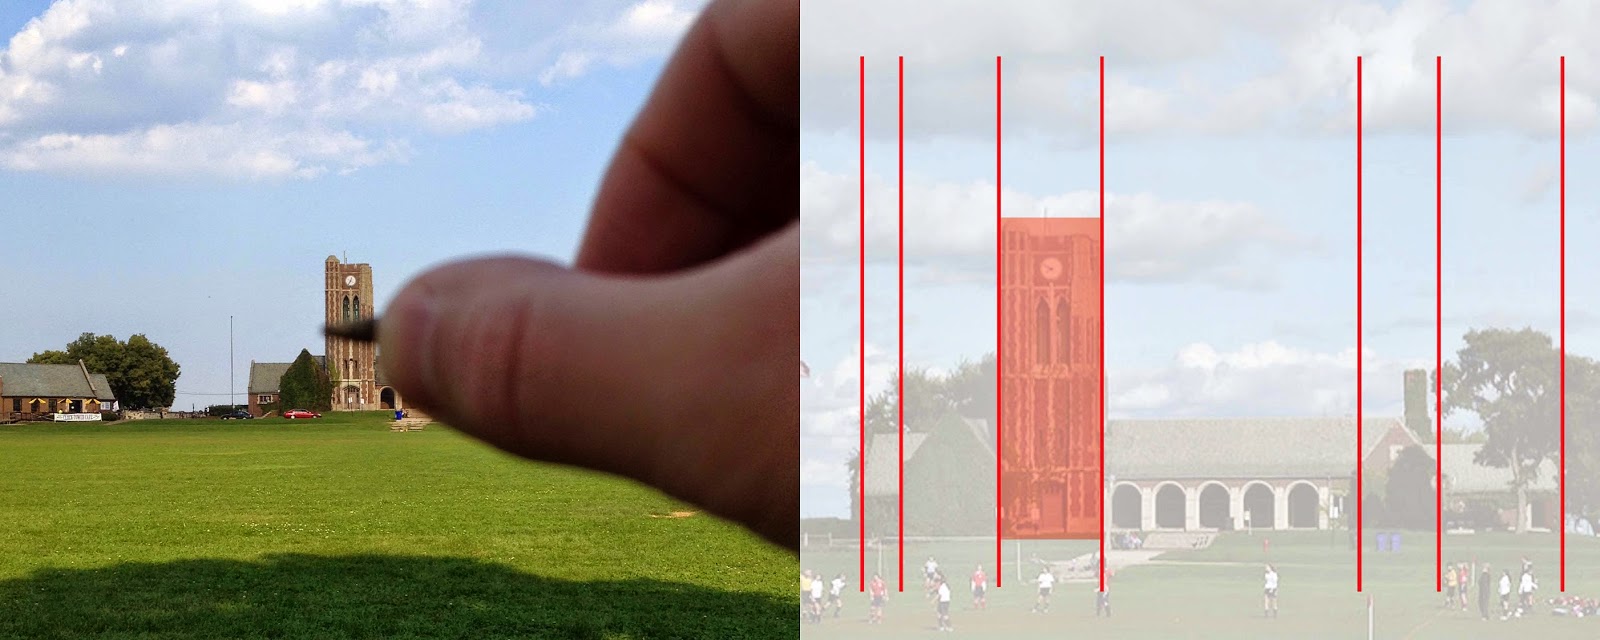
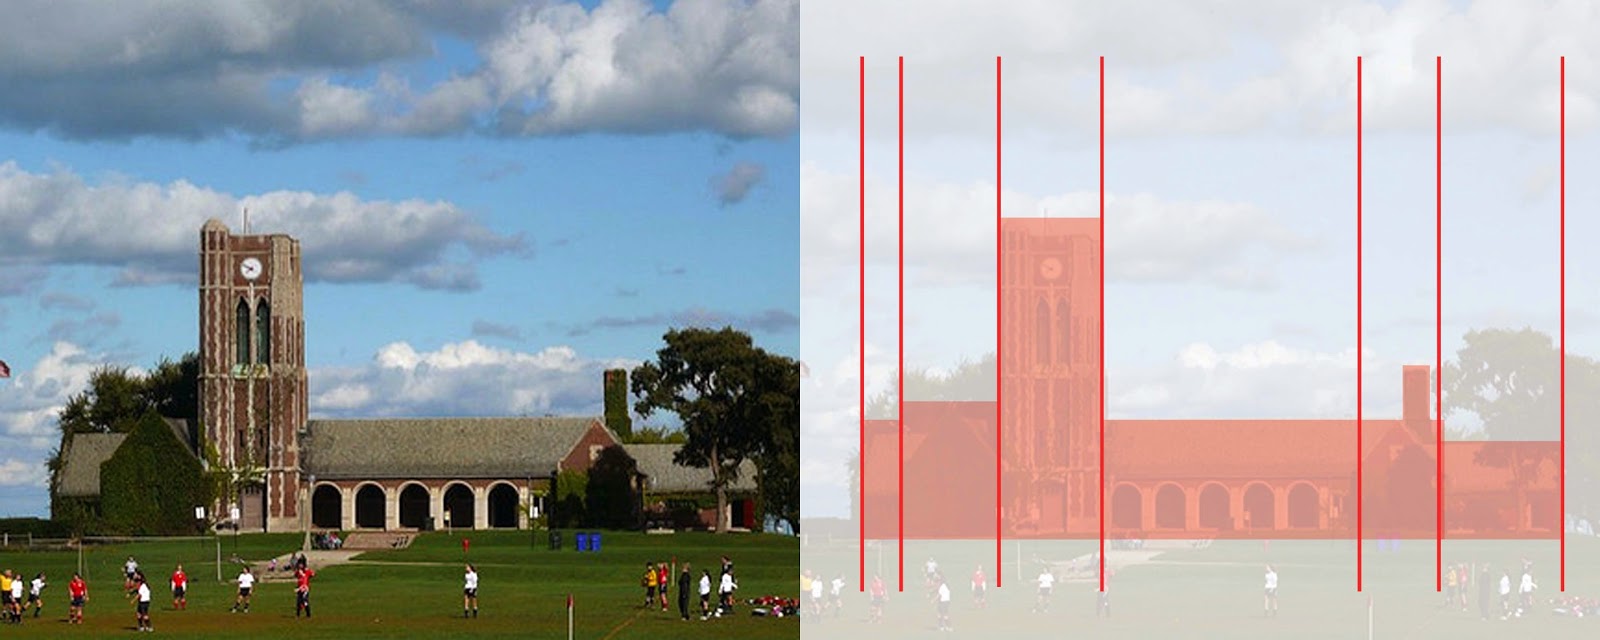
Chose one feature of the building to use as a measuring unit.  I chose the width of the tower.  With your sighting tool (pencil, wooden skewer etc…), fully extend your arm out, placing it in front of the architectural feature.  (It helps to close one eye and squint).  Move your thumb along your sighting tool until it reaches the edge of the architectural feature, essentially measuring the feature’s width.  This will become the measuring unit for the majority of the sighting.  So, all measurements will be in X number of tower widths.


3) 
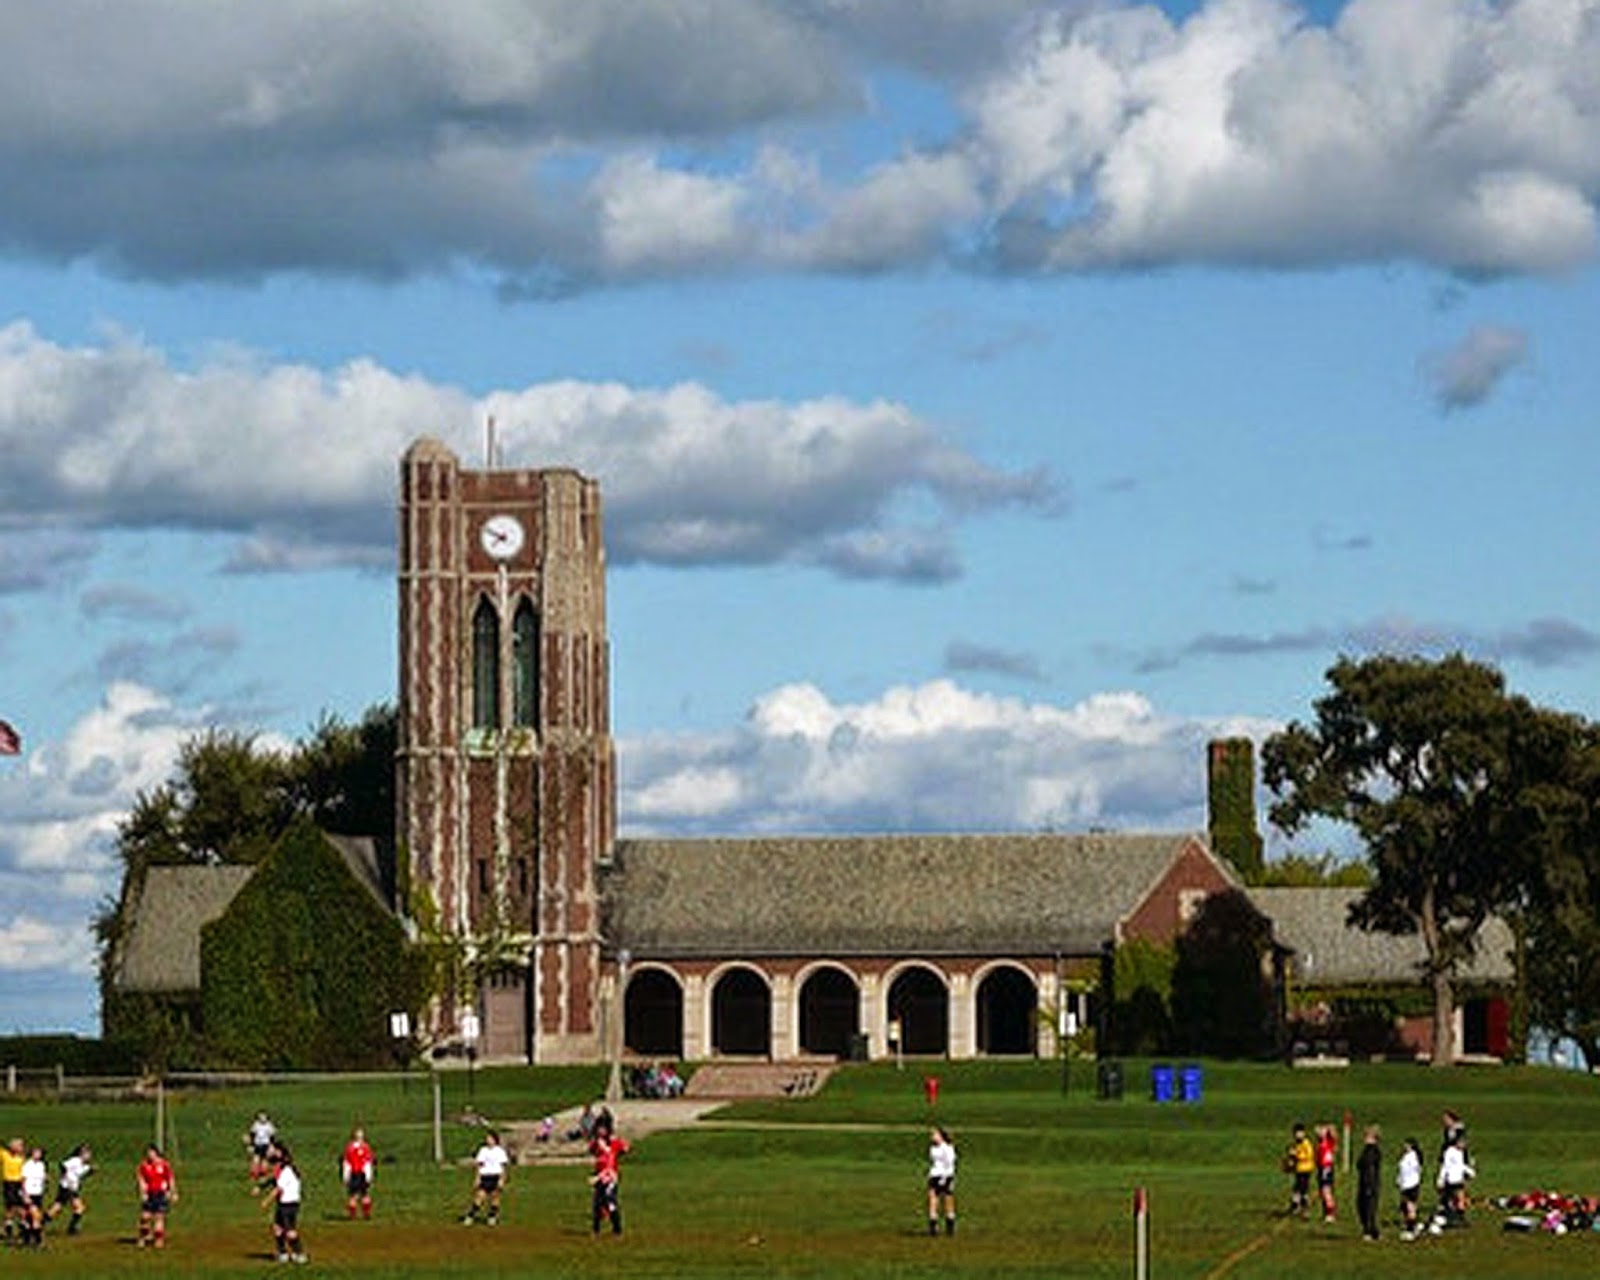
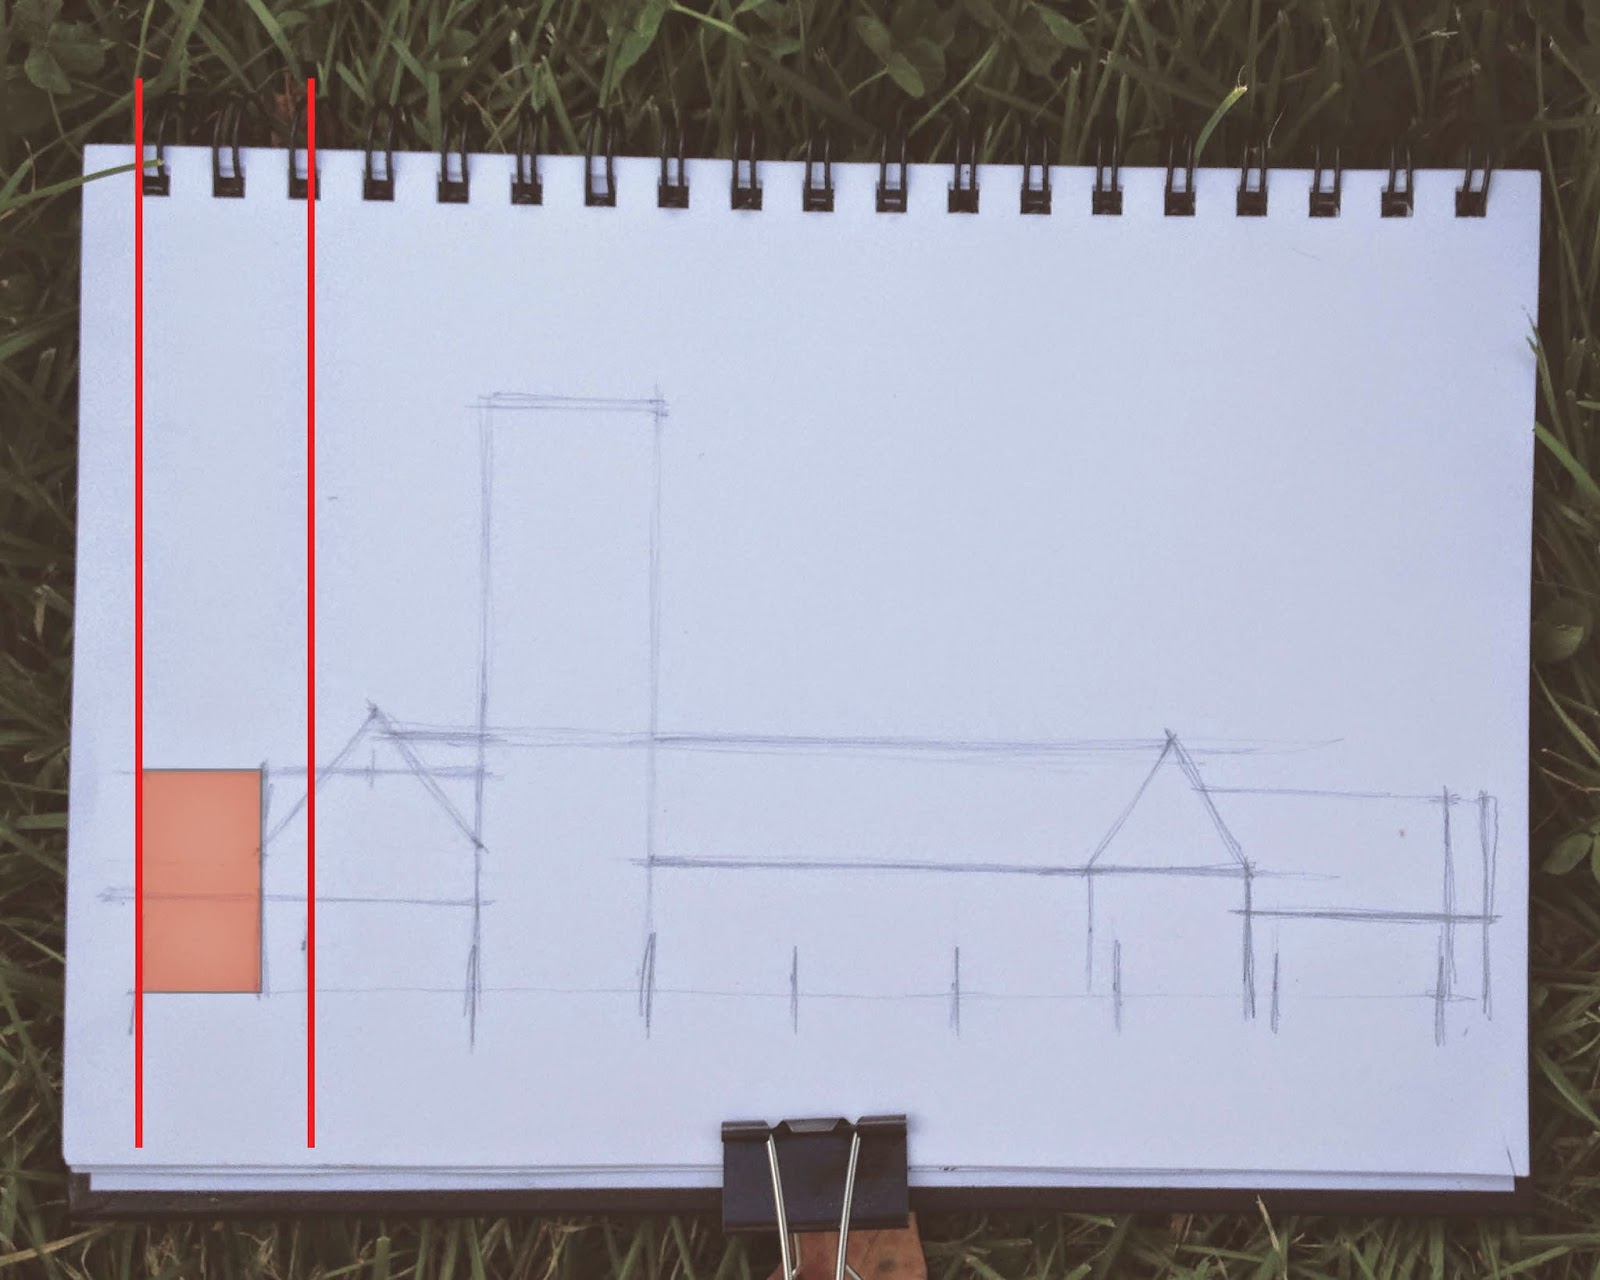
Measure the width and height of the building.  The length of this building was about 8 tower width’s wide.  The tower was 3.5 tower widths tall, and the roof heights changed at different locations, but ranged from 1.5-2 tower widths tall.  Use tick marks and guidelines to help visualize your measurements.  Here I marked out the overall length of the building at slightly more than 8 widths.  Use guidelines for all of your measurement.  You will begin to see how different parts of the building relate to one another.


 4)
Mark out all the other large masses.  In this building there were essentially 6 large masses that comprised the entire elevation.  I sized each portion based on my measuring unit, the tower width.


The 8 tick marks I made on the length of the building helped as guidelines.  So for example, I sighted that the first mass (farthest left) was about ¾ of 1 tower width.  Since I have the tower width marked out, I was able to draw my vertical line for that portion of the wall at ¾ of the way through the first tick mark.  Repeat these steps for the rest of the masses.


5)
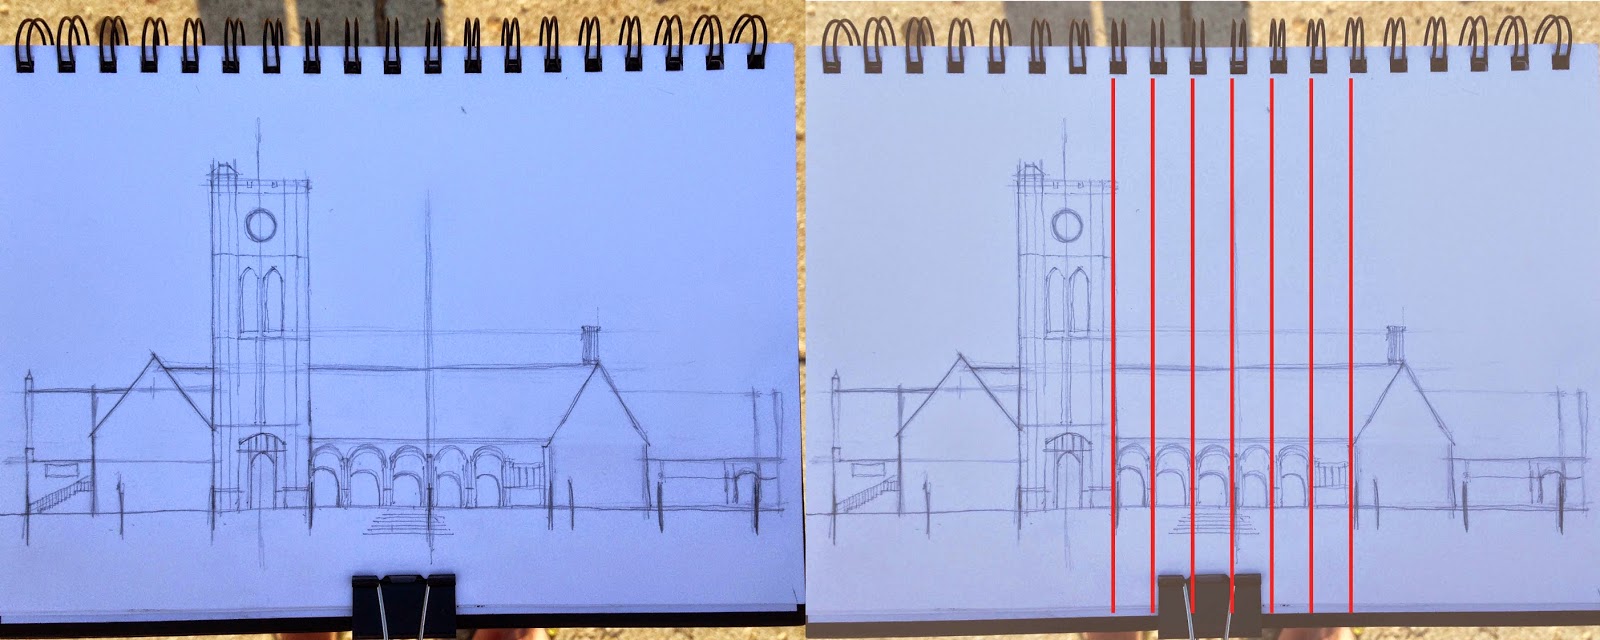
Now that you've marked out the largest masses of the building, move to the medium sized masses.  For me these were the arches, windows and doors.  The colonnade of arches is nicely divided into 6 uniform bays, so I was easily able to divide the middle portion of the building up into 6 equal parts.  Use this type of logic for the rest of the details.  (If your details are not evenly spaced, simply use a smaller architectural element as your measuring unit to determine the distances and proportions you need.)


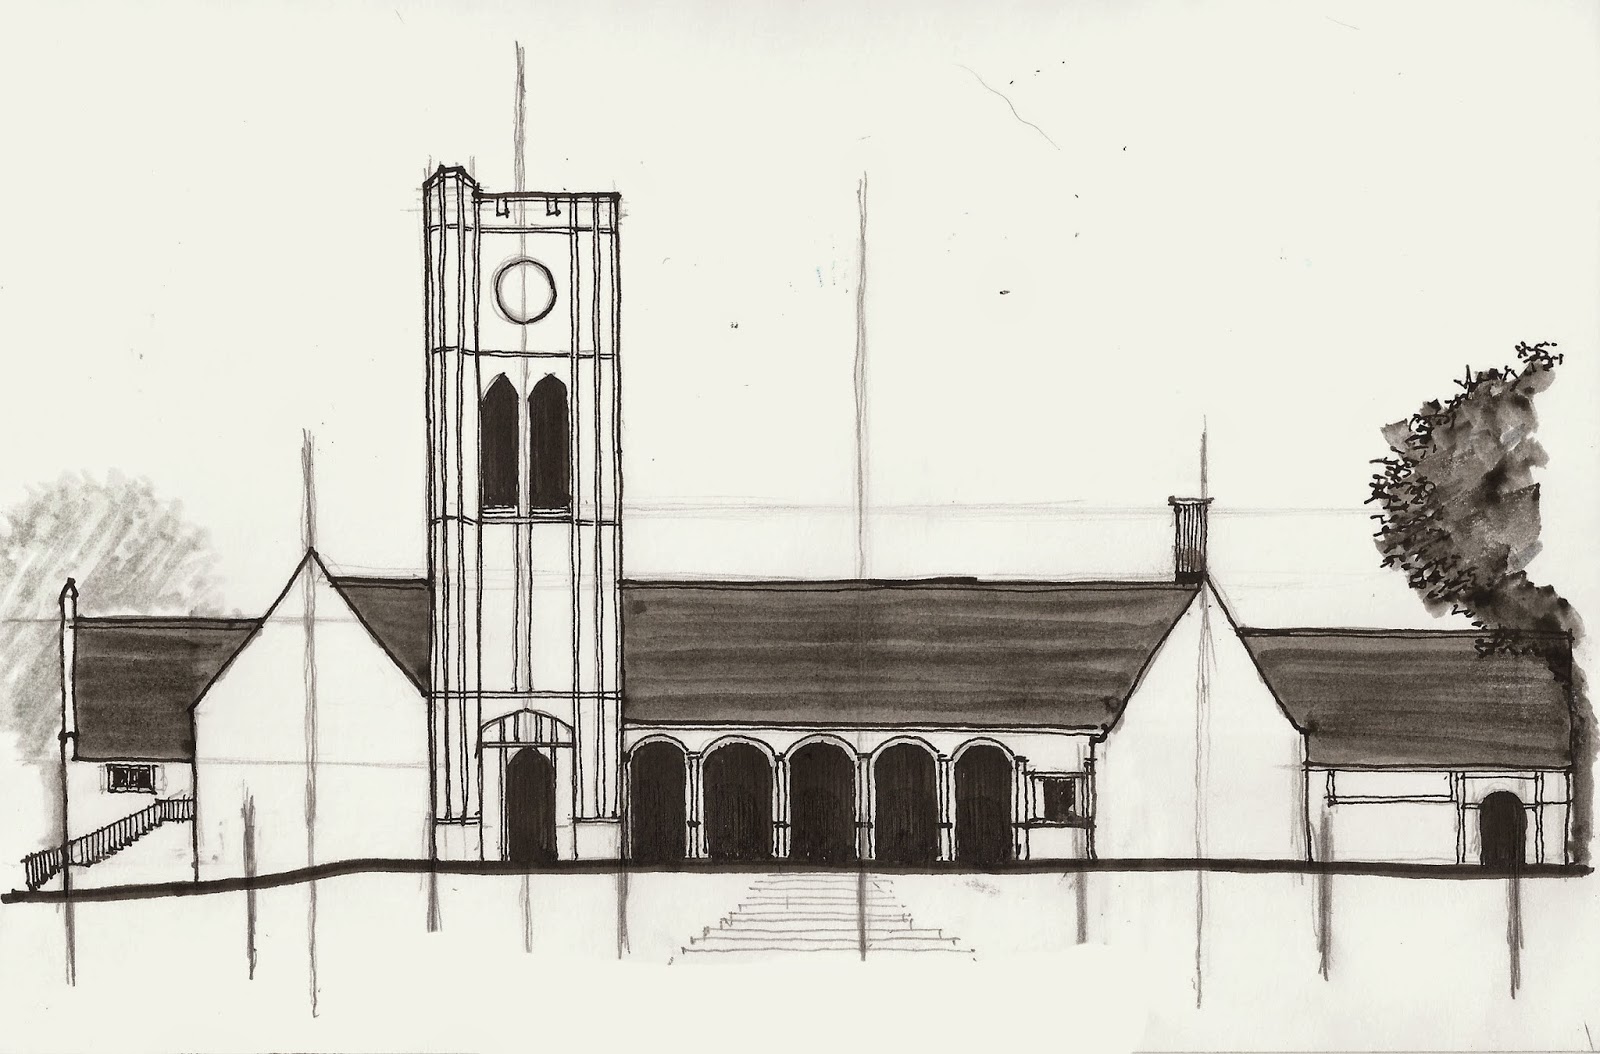
Now you can begin to add details, value, shading and shadows.


Once you feel comfortable sighting sizes and proportions on a building at a straightforward view, you will be ready to combine the techniques of perspective with those in this post.

I hope this is helpful!  As always, let me know if you have any questions!

-Andrew